New to KubeDB? Please start here.
MySQL QuickStart
This tutorial will show you how to use KubeDB to run a MySQL database.
The yaml files that are used in this tutorial, stored in docs/examples folder in GitHub repository kubedb/cli.
Before You Begin
At first, you need to have a Kubernetes cluster, and the kubectl command-line tool must be configured to communicate with your cluster. If you do not already have a cluster, you can create one by using Minikube.
Now, install KubeDB cli on your workstation and KubeDB operator in your cluster following the steps here.
To keep things isolated, this tutorial uses a separate namespace called demo throughout this tutorial. This tutorial will also use a phpMyAdmin deployment to connect and test MySQL database, once it is running. Run the following command to prepare your cluster for this tutorial:
$ kubectl create -f https://raw.githubusercontent.com/kubedb/cli/0.8.0-beta.2/docs/examples/mysql/demo-0.yaml
namespace "demo" created

$ kubectl create -f https://raw.githubusercontent.com/kubedb/cli/0.8.0-beta.2/docs/examples/mysql/quickstart/demo-1.yaml
deployment "myadmin" created
service "myadmin" created

$ kubectl get pods -n demo --watch
NAME                      READY     STATUS              RESTARTS   AGE
myadmin-c4db4df95-8lk74   0/1       ContainerCreating   0          27s
myadmin-c4db4df95-8lk74   1/1       Running             0          1m

$ kubectl get service -n demo
NAME      TYPE           CLUSTER-IP     EXTERNAL-IP   PORT(S)        AGE
myadmin   LoadBalancer   10.105.73.16   <pending>     80:30158/TCP   23m

$ minikube ip
192.168.99.100
Now, open your browser and go to the following URL: http://{minikube-ip}:{myadmin-svc-nodeport}.
You can also get this URl by running the following command:
$ minikube service myadmin -n demo --url
http://192.168.99.100:30158
According to the above example, this URL will be http://192.168.99.100:30158. The login informations to phpMyAdmin (host, username and password) will be retrieved later in this tutorial.
Create a MySQL database
KubeDB implements a MySQL CRD to define the specification of a MySQL database. Below is the MySQL object created in this tutorial.
apiVersion: kubedb.com/v1alpha1
kind: MySQL
metadata:
  name: mysql-quickstart
  namespace: demo
spec:
  version: 8.0
  doNotPause: true
  storage:
    storageClassName: "standard"
    accessModes:
    - ReadWriteOnce
    resources:
      requests:
        storage: 50Mi
$ kubedb create -f https://raw.githubusercontent.com/kubedb/cli/0.8.0-beta.2/docs/examples/mysql/quickstart/demo-2.yaml
validating "https://raw.githubusercontent.com/kubedb/cli/0.8.0-beta.2/docs/examples/mysql/quickstart/demo-2.yaml"
mysql "mysql-quickstart" created
Here,
spec.version is the version of MySQL database. In this tutorial, a MySQL 8.0 database is going to be created.
spec.doNotPause tells KubeDB operator that if this object is deleted, it should be automatically reverted. This should be set to true for production databases to avoid accidental deletion.
spec.storage specifies the StorageClass of PVC dynamically allocated to store data for this database. This storage spec will be passed to the StatefulSet created by KubeDB operator to run database pods. You can specify any StorageClass available in your cluster with appropriate resource requests. If no storage spec is given, an emptyDir is used.
KubeDB operator watches for MySQL objects using Kubernetes api. When a MySQL object is created, KubeDB operator will create a new StatefulSet and a ClusterIP Service with the matching MySQL object name. KubeDB operator will also create a governing service for StatefulSets with the name kubedb, if one is not already present. No MySQL specific RBAC permission is required in RBAC enabled clusters.
$ kubedb describe my -n demo mysql-quickstart
Name:		mysql-quickstart
Namespace:	demo
StartTimestamp:	Fri, 09 Feb 2018 15:55:42 +0600
Status:		Running
Volume:
  StorageClass:	standard
  Capacity:	50Mi
  Access Modes:	RWO

StatefulSet:
  Name:			mysql-quickstart
  Replicas:		1 current / 1 desired
  CreationTimestamp:	Fri, 09 Feb 2018 15:55:44 +0600
  Pods Status:		1 Running / 0 Waiting / 0 Succeeded / 0 Failed

Service:
  Name:		mysql-quickstart
  Type:		ClusterIP
  IP:		10.104.50.139
  Port:		db	3306/TCP

Database Secret:
  Name:	mysql-quickstart-auth
  Type:	Opaque
  Data
  ====
  password:	16 bytes
  user:		4 bytes

No Snapshots.

Events:
  FirstSeen   LastSeen   Count     From             Type       Reason       Message
  ---------   --------   -----     ----             --------   ------       -------
  2m          2m         1         MySQL operator   Normal     Successful   Successfully patched StatefulSet
  2m          2m         1         MySQL operator   Normal     Successful   Successfully patched MySQL
  2m          2m         1         MySQL operator   Normal     Successful   Successfully created StatefulSet
  2m          2m         1         MySQL operator   Normal     Successful   Successfully created MySQL
  9m          9m         1         MySQL operator   Normal     Successful   Successfully created Service


$ kubectl get statefulset -n demo
NAME               DESIRED   CURRENT   AGE
mysql-quickstart   1         1         10m

$ kubectl get pvc -n demo
NAME                      STATUS    VOLUME                                     CAPACITY   ACCESS MODES   STORAGECLASS   AGE
data-mysql-quickstart-0   Bound     pvc-652e02c7-0d7f-11e8-9091-08002751ae8c   50Mi       RWO            standard       10m

$ kubectl get pv -n demo
NAME                                       CAPACITY   ACCESS MODES   RECLAIM POLICY   STATUS    CLAIM                          STORAGECLASS   REASON    AGE
pvc-652e02c7-0d7f-11e8-9091-08002751ae8c   50Mi       RWO            Delete           Bound     demo/data-mysql-quickstart-0   standard                 11m

$ kubectl get service -n demo
NAME               TYPE           CLUSTER-IP      EXTERNAL-IP   PORT(S)        AGE
kubedb             ClusterIP      None            <none>        <none>         11m
myadmin            LoadBalancer   10.105.73.16    <pending>     80:30158/TCP   41m
mysql-quickstart   ClusterIP      10.104.50.139   <none>        3306/TCP       11m
KubeDB operator sets the status.phase to Running once the database is successfully created. Run the following command to see the modified MySQL object:
$ kubedb get my -n demo mysql-quickstart -o yaml
apiVersion: kubedb.com/v1alpha1
kind: MySQL
metadata:
  clusterName: ""
  creationTimestamp: 2018-02-09T09:55:42Z
  finalizers:
  - kubedb.com
  generation: 0
  name: mysql-quickstart
  namespace: demo
  resourceVersion: "25645"
  selfLink: /apis/kubedb.com/v1alpha1/namespaces/demo/mysqls/mysql-quickstart
  uid: 64388c9a-0d7f-11e8-9091-08002751ae8c
spec:
  databaseSecret:
    secretName: mysql-quickstart-auth
  doNotPause: true
  storage:
    accessModes:
    - ReadWriteOnce
    resources:
      requests:
        storage: 50Mi
    storageClassName: standard
  version: 8
status:
  creationTime: 2018-02-09T09:55:43Z
  phase: Running
Please note that KubeDB operator has created a new Secret called mysql-quickstart-auth (format: {mysql-object-name}-auth) for storing the password for mysql superuser. This secret contains a user key which contains the username for MySQL superuser and a password key which contains the password for MySQL superuser.
If you want to use an existing secret please specify that when creating the MySQL object using spec.databaseSecret.secretName. While creating this secret manually, make sure the secret contains these two keys containing data user and password and also make sure of using root as value of user.
Now, you can connect to this database from the phpMyAdmin dashboard using the database pod IP and and mysql user password.
$ kubectl get pods mysql-quickstart-0 -n demo -o yaml | grep IP
  hostIP: 192.168.99.100
  podIP: 172.17.0.6

$ kubectl get secrets -n demo mysql-quickstart-auth -o jsonpath='{.data.\user}' | base64 -d
root

$ kubectl get secrets -n demo mysql-quickstart-auth -o jsonpath='{.data.\password}' | base64 -d
pefjWeXoAQ9PaRZv
Now, open your browser and go to the following URL: http://{minikube-ip}:{myadmin-svc-nodeport}. To log into the phpMyAdmin, use host 172.17.0.6 , username root and password pefjWeXoAQ9PaRZv.
Pause Database
KubeDB takes advantage of ValidationWebhook feature in Kubernetes 1.9.0 or later clusters to implement doNotPause feature. If admission webhook is enabled, It prevents user from deleting the database as long as the spec.doNotPause is set to true. Since the MySQL object created in this tutorial has spec.doNotPause set to true, if you delete the MySQL object, KubeDB operator will nullify the delete operation. You can see this below:
$ kubedb delete my mysql-quickstart -n demo
error: MySQL "mysql-quickstart" can't be paused. To continue delete, unset spec.doNotPause and retry.
Now, run kubedb edit my mysql-quickstart -n demo to set spec.doNotPause to false or remove this field (which default to false). Then if you delete the MySQL object, KubeDB operator will delete the StatefulSet and its pods, but leaves the PVCs unchanged. In KubeDB parlance, we say that mysql-quickstart MySQL database has entered into dormant state. This is represented by KubeDB operator by creating a matching DormantDatabase object.
$ kubedb delete my mysql-quickstart -n demo
mysql "mysql-quickstart" deleted

$ kubedb get drmn -n demo mysql-quickstart
NAME               STATUS    AGE
mysql-quickstart   Pausing   16s

$ kubedb get drmn -n demo mysql-quickstart
NAME               STATUS    AGE
mysql-quickstart   Paused    31s
$ kubedb get drmn -n demo mysql-quickstart -o yaml
apiVersion: kubedb.com/v1alpha1
kind: DormantDatabase
metadata:
  clusterName: ""
  creationTimestamp: 2018-02-09T10:18:29Z
  finalizers:
  - kubedb.com
  generation: 0
  labels:
    kubedb.com/kind: MySQL
  name: mysql-quickstart
  namespace: demo
  resourceVersion: "26269"
  selfLink: /apis/kubedb.com/v1alpha1/namespaces/demo/dormantdatabases/mysql-quickstart
  uid: 931ce051-0d82-11e8-9091-08002751ae8c
spec:
  origin:
    metadata:
      creationTimestamp: null
      name: mysql-quickstart
      namespace: demo
    spec:
      mysql:
        databaseSecret:
          secretName: mysql-quickstart-auth
        resources: {}
        storage:
          accessModes:
          - ReadWriteOnce
          resources:
            requests:
              storage: 50Mi
          storageClassName: standard
        version: "8"
status:
  creationTime: 2018-02-09T10:18:30Z
  pausingTime: 2018-02-09T10:18:48Z
  phase: Paused
Here,
Resume Dormant Database
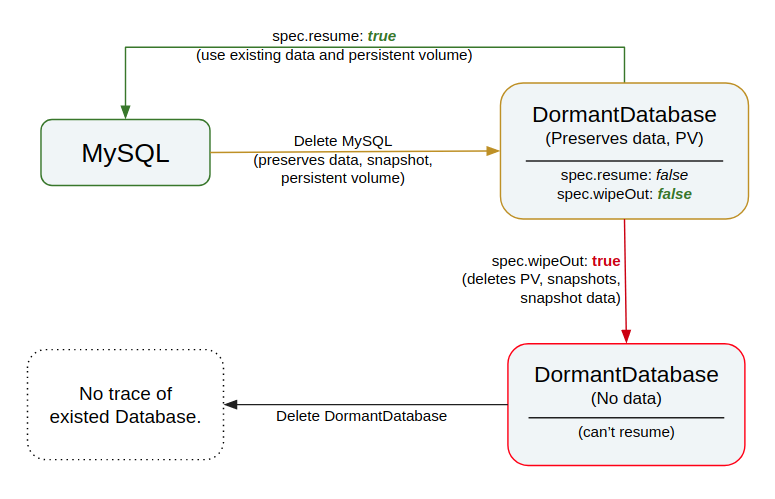
To resume the database from the dormant state, set spec.resume to true in the DormantDatabase object.
$ kubedb edit drmn -n demo mysql-quickstart
apiVersion: kubedb.com/v1alpha1
kind: DormantDatabase
metadata:
  name: mysql-quickstart
  namespace: demo
  ...
spec:
  resume: true
  ...
status:
  phase: Paused
  ...
KubeDB operator will notice that spec.resume is set to true. KubeDB operator will delete the DormantDatabase object and create a new MySQL object using the original spec. This will in turn start a new StatefulSet which will mount the originally created PVCs. Thus the original database is resumed.
Please note that the dormant database can also be resumed by creating same MySQL database by using same Specs. In this tutorial, the dormant database can be resumed by creating MySQL database using demo-2.yaml file. The below command resumes the dormant database mysql-quickstart that was created before.
$ kubedb create -f https://raw.githubusercontent.com/kubedb/cli/0.8.0-beta.2/docs/examples/mysql/quickstart/demo-2.yaml
validating "https://raw.githubusercontent.com/kubedb/cli/0.8.0-beta.2/docs/examples/mysql/quickstart/demo-2.yaml"
mysql "mysql-quickstart" created
Wipeout Dormant Database
You can also wipe out a DormantDatabase by setting spec.wipeOut to true. KubeDB operator will delete the PVCs, delete any relevant Snapshot objects for this database and also delete snapshot data stored in the Cloud Storage buckets. There is no way to resume a wiped out database. So, be sure before you wipe out a database.
Create dormant database again and set spec.wipeOut to true:
$ kubedb delete my mysql-quickstart -n demo
mysql "mysql-quickstart" deleted

$ kubedb edit drmn -n demo mysql-quickstart
apiVersion: kubedb.com/v1alpha1
kind: DormantDatabase
metadata:
  name: mysql-quickstart
  namespace: demo
  ...
spec:
  wipeOut: true
  ...
status:
  phase: Paused
  ...

$ kubedb get drmn -n demo mysql-quickstart -o yaml
apiVersion: kubedb.com/v1alpha1
kind: DormantDatabase
metadata:
  clusterName: ""
  creationTimestamp: 2018-02-09T10:43:52Z
  finalizers:
  - kubedb.com
  generation: 0
  labels:
    kubedb.com/kind: MySQL
  name: mysql-quickstart
  namespace: demo
  resourceVersion: "27323"
  selfLink: /apis/kubedb.com/v1alpha1/namespaces/demo/dormantdatabases/mysql-quickstart
  uid: 1e9ab842-0d86-11e8-9091-08002751ae8c
spec:
  origin:
    metadata:
      creationTimestamp: null
      name: mysql-quickstart
      namespace: demo
    spec:
      mysql:
        databaseSecret:
          secretName: mysql-quickstart-auth
        resources: {}
        storage:
          accessModes:
          - ReadWriteOnce
          resources:
            requests:
              storage: 50Mi
          storageClassName: standard
        version: "8"
  wipeOut: true
status:
  creationTime: 2018-02-09T10:43:52Z
  pausingTime: 2018-02-09T10:44:08Z
  phase: WipedOut
  wipeOutTime: 2018-02-09T10:45:41Z

$ kubedb get drmn -n demo
NAME               STATUS     AGE
mysql-quickstart   WipedOut   6m
Delete Dormant Database
You still have a record that there used to be a MySQL database mysql-quickstart in the form of a DormantDatabase database mysql-quickstart. Since you have already wiped out the database, you can delete the DormantDatabase object.
$ kubedb delete drmn mysql-quickstart -n demo
dormantdatabase "mysql-quickstart" deleted
Cleaning up
To cleanup the Kubernetes resources created by this tutorial, run:
$ kubedb delete my mysql-quickstart -n demo --force
$ kubedb delete drmn mysql-quickstart -n demo --force

# or
# $ kubedb delete my,drmn,snap -n demo --all --force

$ kubectl delete ns demo
namespace "demo" deleted
Next Steps


