


You are looking at the documentation of a prior release. To read the documentation of the latest release, please
visit here.
New to KubeDB? Please start here.
Database Scheduled Snapshots
This tutorial will show you how to use KubeDB to take scheduled snapshot of a MySQL database.
Before You Begin
At first, you need to have a Kubernetes cluster, and the kubectl command-line tool must be configured to communicate with your cluster. If you do not already have a cluster, you can create one by using Minikube.
Now, install KubeDB cli on your workstation and KubeDB operator in your cluster following the steps here.
To keep things isolated, this tutorial uses a separate namespace called
demothroughout this tutorial. Run the following command to prepare your cluster for this tutorial:$ kubectl create ns demo namespace "demo" created $ kubectl get ns NAME STATUS AGE demo Active 1m
Note: The yaml files that are used in this tutorial are stored in docs/examples folder in GitHub repository kubedb/cli.
Scheduled Backups
KubeDB supports taking periodic backups for a database using a cron expression. KubeDB operator will launch a Job periodically that runs the mysql dump command and uploads the output bson file to various cloud providers S3, GCS, Azure, OpenStack Swift and/or locally mounted volumes using osm.
In this tutorial, snapshots will be stored in a Google Cloud Storage (GCS) bucket. To do so, a secret is needed that has the following 2 keys:
| Key | Description |
|---|---|
GOOGLE_PROJECT_ID | Required. Google Cloud project ID |
GOOGLE_SERVICE_ACCOUNT_JSON_KEY | Required. Google Cloud service account json key |
$ echo -n '<your-project-id>' > GOOGLE_PROJECT_ID
$ mv downloaded-sa-json.key > GOOGLE_SERVICE_ACCOUNT_JSON_KEY
$ kubectl create secret generic my-snap-secret -n demo \
    --from-file=./GOOGLE_PROJECT_ID \
    --from-file=./GOOGLE_SERVICE_ACCOUNT_JSON_KEY
secret/my-snap-secret created
$ kubectl get secret my-snap-secret -n demo -o yaml
apiVersion: v1
data:
  GOOGLE_PROJECT_ID: PHlvdXItcHJvamVjdC1pZD4=
  GOOGLE_SERVICE_ACCOUNT_JSON_KEY: ewogICJ0eXBlIjogInNlcnZpY2VfYWNjb3V...9tIgp9Cg==
kind: Secret
metadata:
  name: my-snap-secret
  namespace: demo
  ...
type: Opaque
To learn how to configure other storage destinations for Snapshots, please visit here. Now, create the MySQL object with scheduled snapshot.
apiVersion: kubedb.com/v1alpha1
kind: MySQL
metadata:
  name: mysql-scheduled
  namespace: demo
spec:
  version: "8.0-v1"
  storage:
    storageClassName: "standard"
    accessModes:
    - ReadWriteOnce
    resources:
      requests:
        storage: 50Mi
  backupSchedule:
    cronExpression: "@every 1m"
    storageSecretName: my-snap-secret
    gcs:
      bucket: kubedb
$ kubedb create -f https://raw.githubusercontent.com/kubedb/cli/0.9.0-rc.2/docs/examples/mysql/snapshot/demo-4.yaml
mysql.kubedb.com/mysql-scheduled created
It is also possible to add backup scheduler to an existing MySQL. You just have to edit the MySQL CRD and add below spec:
$ kubedb edit my {db-name} -n demo
spec:
  backupSchedule:
    cronExpression: '@every 1m'
    gcs:
      bucket: kubedb
    storageSecretName: my-snap-secret
Once the spec.backupSchedule is added, KubeDB operator will create a new Snapshot object on each tick of the cron expression. This triggers KubeDB operator to create a Job as it would for any regular instant backup process. You can see the snapshots as they are created using kubedb get snap command.
$ kubedb get snap -n demo
NAME                              DATABASENAME      STATUS      AGE
mysql-scheduled-20180927-083539   mysql-scheduled   Succeeded   3m
mysql-scheduled-20180927-083639   mysql-scheduled   Succeeded   2m
mysql-scheduled-20180927-083739   mysql-scheduled   Succeeded   1m
mysql-scheduled-20180927-083839   mysql-scheduled   Succeeded   39s
you should see the output of the mysql dump command for each snapshot stored in the GCS bucket.
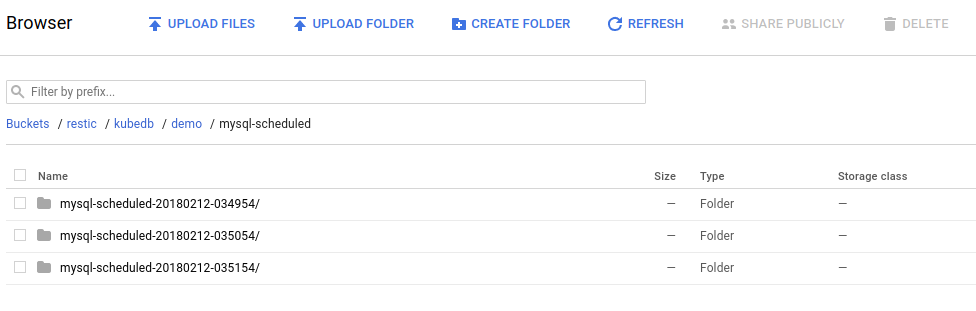
From the above image, you can see that the snapshot output is stored in a folder called {bucket}/kubedb/{namespace}/{mysql-object}/{snapshot}/.
Remove Scheduler
To remove scheduler, edit the MySQL object to remove spec.backupSchedule section.
$ kubedb edit my mysql-scheduled -n demo
apiVersion: kubedb.com/v1alpha1
kind: MySQL
metadata:
  name: mysql-scheduled
  namespace: demo
  ...
spec:
#  backupSchedule:
#    cronExpression: '@every 1m'
#    gcs:
#      bucket: kubedb
#    storageSecretName: my-snap-secret
  databaseSecret:
    secretName: mysql-scheduled-auth
  storage:
    accessModes:
    - ReadWriteOnce
    resources:
      requests:
        storage: 50Mi
    storageClassName: standard
  version: 8
status:
  phase: Running
Cleaning up
To cleanup the Kubernetes resources created by this tutorial, run:
kubectl patch -n demo mysql/mysql-scheduled -p '{"spec":{"terminationPolicy":"WipeOut"}}' --type="merge"
kubectl delete -n demo mysql/mysql-scheduled

kubectl patch -n demo drmn/mysql-scheduled -p '{"spec":{"wipeOut":true}}' --type="merge"
kubectl delete -n demo drmn/mysql-scheduled

kubectl delete ns demo
Next Steps
- See the list of supported storage providers for snapshots here.
- Initialize MySQL with Script.
- Initialize MySQL with Snapshot.
- Monitor your MySQL database with KubeDB using out-of-the-box CoreOS Prometheus Operator.
- Monitor your MySQL database with KubeDB using out-of-the-box builtin-Prometheus.
- Use private Docker registry to deploy MySQL with KubeDB.
- Detail concepts of MySQL object.
- Detail concepts of MySQLVersion object.
- Want to hack on KubeDB? Check our contribution guidelines.