


You are looking at the documentation of a prior release. To read the documentation of the latest release, please
visit here.
New to KubeDB? Please start here.
Elasticsearch QuickStart
This tutorial will show you how to use KubeDB to run an Elasticsearch database.
Before You Begin
At first, you need to have a Kubernetes cluster, and the kubectl command-line tool must be configured to communicate with your cluster. If you do not already have a cluster, you can create one by using Minikube.
Now, install KubeDB cli on your workstation and KubeDB operator in your cluster following the steps here.
To keep things isolated, this tutorial uses a separate namespace called demo throughout this tutorial.
$ kubectl create ns demo
namespace/demo created

$ kubectl get ns demo
NAME    STATUS  AGE
demo    Active  5s
Note: YAML files used in this tutorial are stored in docs/examples/elasticsearch folder in GitHub repository kubedb/docs.
We have designed this tutorial to demonstrate a production setup of KubeDB managed Elasticsearch. If you just want to try out KubeDB, you can bypass some of the safety features following the tips here.
Find Available StorageClass
We will have to provide StorageClass in Elasticsearch crd specification. Check available StorageClass in your cluster using the following command,
$ kubectl get storageclass
NAME       PROVISIONER        AGE
standard   external/pharmer   1m
Here, we have standard StorageClass in our cluster.
Find Available ElasticsearchVersion
When you have installed KubeDB, it has created ElasticsearchVersion crd for all supported Elasticsearch versions. Let’s check available ElasticsearchVersions by,
$ kubectl get elasticsearchversions
NAME       VERSION   DB_IMAGE                        DEPRECATED   AGE
5.6        5.6       kubedb/elasticsearch:5.6        true         21m
5.6-v1     5.6       kubedb/elasticsearch:5.6-v1                  21m
5.6.4      5.6.4     kubedb/elasticsearch:5.6.4      true         21m
5.6.4-v1   5.6.4     kubedb/elasticsearch:5.6.4-v1                21m
6.2        6.2       kubedb/elasticsearch:6.2        true         21m
6.2-v1     6.2       kubedb/elasticsearch:6.2-v1                  21m
6.2.4      6.2.4     kubedb/elasticsearch:6.2.4      true         21m
6.2.4-v1   6.2.4     kubedb/elasticsearch:6.2.4-v1                21m
6.3        6.3       kubedb/elasticsearch:6.3        true         21m
6.3-v1     6.3       kubedb/elasticsearch:6.3-v1                  21m
6.3.0      6.3.0     kubedb/elasticsearch:6.3.0      true         21m
6.3.0-v1   6.3.0     kubedb/elasticsearch:6.3.0-v1                20m
Notice the DEPRECATED column. Here, true means that this ElasticsearchVersion is deprecated for current KubeDB version. KubeDB will not work for deprecated ElasticsearchVersion.
In this tutorial, we will use 6.3-v1 ElasticsearchVersion crd to create Elasticsearch database. To know more about what is ElasticsearchVersion crd and why there is 6.3 and 6.3-v1 variation, please visit here. You can also see supported ElasticsearchVersion in KubeDB 0.11.0 from here.
Create an Elasticsearch database
KubeDB implements an Elasticsearch CRD to define the specification of an Elasticsearch database.
Below is the Elasticsearch object created in this tutorial.
apiVersion: kubedb.com/v1alpha1
kind: Elasticsearch
metadata:
  name: quick-elasticsearch
  namespace: demo
spec:
  version: "6.3-v1"
  storageType: Durable
  storage:
    storageClassName: "standard"
    accessModes:
    - ReadWriteOnce
    resources:
      requests:
        storage: 1Gi
  terminationPolicy: DoNotTerminate
Here,
spec.versionis name of the ElasticsearchVersion crd. In this tutorial, an Elasticsearch 6.3 database is created.spec.storageTypespecifies the type of storage that will be used for Elasticsearch database. It can beDurableorEphemeral. The default value of this field isDurable. IfEphemeralis used then KubeDB will create Elasticsearch database usingEmptyDirvolume. In this case, you don’t have to specifyspec.storagefield. This is useful for testing purpose.spec.storagespecifies the StorageClass of PVC dynamically allocated to store data for this database. This storage spec will be passed to the StatefulSet created by KubeDB operator to run database pods. You can specify any StorageClass available in your cluster with appropriate resource requests. If you don’t specifyspec.storageType: Ephemeral, then this field is required.spec.terminationPolicyspecifies what KubeDB should do when user try to delete Elasticsearch crd. Termination policyDoNotTerminateprevents a user from deleting this object if admission webhook is enabled.
Note:
spec.storagesection is used to create PVC for database pod. It will create PVC with storage size specified instorage.resources.requestsfield. Don’t specifylimitshere. PVC does not get resized automatically.
Let’s create Elasticsearch crd that is shown above with following command
$ kubectl create -f https://github.com/kubedb/docs/raw/v0.13.0-rc.0/docs/examples/elasticsearch/quickstart/quick-elasticsearch.yaml
elasticsearch.kubedb.com/quick-elasticsearch created
KubeDB operator watches for Elasticsearch objects using Kubernetes api. When an Elasticsearch object is created, KubeDB operator creates a new StatefulSet and two ClusterIP Service with the matching name.
KubeDB operator will also create a governing service for StatefulSet with the name kubedb, if one is not already present.
KubeDB operator sets the status.phase to Running once the database is successfully created.
$ kubectl get es -n demo quick-elasticsearch
NAME                  VERSION   STATUS    AGE
quick-elasticsearch   6.3-v1    Running   3m
Let’s describe Elasticsearch object quick-elasticsearch
$ kubedb describe es -n demo quick-elasticsearch
Name:               quick-elasticsearch
Namespace:          demo
CreationTimestamp:  Fri, 28 Sep 2018 11:33:29 +0600
Labels:             <none>
Annotations:        kubectl.kubernetes.io/last-applied-configuration={"apiVersion":"kubedb.com/v1alpha1","kind":"Elasticsearch","metadata":{"annotations":{},"name":"quick-elasticsearch","namespace":"demo"},"spec":{"doNot...
Status:             Running
Replicas:           1  total
  StorageType:      Durable
Volume:
  StorageClass:  standard
  Capacity:      1Gi
  Access Modes:  RWO

StatefulSet:
  Name:               quick-elasticsearch
  CreationTimestamp:  Fri, 28 Sep 2018 11:33:36 +0600
  Labels:               kubedb.com/kind=Elasticsearch
                        kubedb.com/name=quick-elasticsearch
                        node.role.client=set
                        node.role.data=set
                        node.role.master=set
  Annotations:        <none>
  Replicas:           824640716856 desired | 1 total
  Pods Status:        1 Running / 0 Waiting / 0 Succeeded / 0 Failed

Service:
  Name:         quick-elasticsearch
  Labels:         kubedb.com/kind=Elasticsearch
                  kubedb.com/name=quick-elasticsearch
  Annotations:  <none>
  Type:         ClusterIP
  IP:           10.100.103.159
  Port:         http  9200/TCP
  TargetPort:   http/TCP
  Endpoints:    192.168.1.5:9200

Service:
  Name:         quick-elasticsearch-master
  Labels:         kubedb.com/kind=Elasticsearch
                  kubedb.com/name=quick-elasticsearch
  Annotations:  <none>
  Type:         ClusterIP
  IP:           10.99.42.193
  Port:         transport  9300/TCP
  TargetPort:   transport/TCP
  Endpoints:    192.168.1.5:9300

Certificate Secret:
  Name:         quick-elasticsearch-cert
  Labels:         kubedb.com/kind=Elasticsearch
                  kubedb.com/name=quick-elasticsearch
  Annotations:  <none>

Type:  Opaque

Data
====
  key_pass:     6 bytes
  node.jks:     3014 bytes
  root.jks:     864 bytes
  sgadmin.jks:  3009 bytes

Database Secret:
  Name:         quick-elasticsearch-auth
  Labels:         kubedb.com/kind=Elasticsearch
                  kubedb.com/name=quick-elasticsearch
  Annotations:  <none>

Type:  Opaque

Data
====
  READALL_PASSWORD:       8 bytes
  READALL_USERNAME:       7 bytes
  sg_action_groups.yml:   430 bytes
  sg_config.yml:          242 bytes
  sg_internal_users.yml:  156 bytes
  sg_roles_mapping.yml:   73 bytes
  ADMIN_PASSWORD:         8 bytes
  ADMIN_USERNAME:         5 bytes
  sg_roles.yml:           312 bytes

Topology:
  Type                Pod                    StartTime                      Phase
  ----                ---                    ---------                      -----
  master|client|data  quick-elasticsearch-0  2018-09-28 11:33:42 +0600 +06  Running

No Snapshots.

Events:
  Type    Reason      Age   From                    Message
  ----    ------      ----  ----                    -------
  Normal  Successful  3m    Elasticsearch operator  Successfully created Service
  Normal  Successful  3m    Elasticsearch operator  Successfully created Service
  Normal  Successful  2m    Elasticsearch operator  Successfully created StatefulSet
  Normal  Successful  2m    Elasticsearch operator  Successfully created Elasticsearch
  Normal  Successful  2m    Elasticsearch operator  Successfully patched StatefulSet
  Normal  Successful  1m    Elasticsearch operator  Successfully patched Elasticsearch
  Normal  Successful  1m    Elasticsearch operator  Successfully patched StatefulSet
  Normal  Successful  1m    Elasticsearch operator  Successfully patched Elasticsearch
$ kubectl get service -n demo --selector=kubedb.com/kind=Elasticsearch,kubedb.com/name=quick-elasticsearch
NAME                         TYPE        CLUSTER-IP       EXTERNAL-IP   PORT(S)    AGE
quick-elasticsearch          ClusterIP   10.100.103.159   <none>        9200/TCP   5m
quick-elasticsearch-master   ClusterIP   10.99.42.193     <none>        9300/TCP   5m
Two services for each Elasticsearch object.
- Service
quick-elasticsearchtargets all Pods which are acting as client node - Service
quick-elasticsearch-mastertargets all Pods which are acting as master node
KubeDB supports Elasticsearch clustering where pods can be any of these three roles: master, data or client.
If you see Topology section in kubedb describe result, you will know role(s) of each Pod.
Topology:
  Type                Pod                    StartTime                      Phase
  ----                ---                    ---------                      -----
  master|client|data  quick-elasticsearch-0  2018-09-28 11:33:42 +0600 +06  Running
Here, we have created an Elasticsearch database with a single node. This single node is acting as master, data and client.
To learn about how to configure an Elasticsearch cluster, please visit here.
Please note that KubeDB operator has created two new Secrets for Elasticsearch object.
quick-elasticsearch-authfor storing the passwords and search-guard configuration.quick-elasticsearch-certfor storing certificates used for SSL connection.
Secret for authentication & configuration
Auth secret is used to authenticate user for Elasticsearch database and configure Search Guard plugin.
$ kubectl get secret -n demo quick-elasticsearch-auth -o yaml
apiVersion: v1
data:
  ADMIN_PASSWORD: Y2JjaXdjZmg=
  ADMIN_USERNAME: YWRtaW4=
  READALL_PASSWORD: YW02b21zY2g=
  READALL_USERNAME: cmVhZGFsbA==
  sg_action_groups.yml: ClVOTElNSVRFRDoKICAtICIqIgoKUkVBRDoKICAtICJpbmRpY2VzOmRhdGEvcmVhZCoiCiAgLSAiaW5kaWNlczphZG1pbi9tYXBwaW5ncy9maWVsZHMvZ2V0KiIKCkNMVVNURVJfQ09NUE9TSVRFX09QU19STzoKICAtICJpbmRpY2VzOmRhdGEvcmVhZC9tZ2V0IgogIC0gImluZGljZXM6ZGF0YS9yZWFkL21zZWFyY2giCiAgLSAiaW5kaWNlczpkYXRhL3JlYWQvbXR2IgogIC0gImluZGljZXM6ZGF0YS9yZWFkL2Nvb3JkaW5hdGUtbXNlYXJjaCoiCiAgLSAiaW5kaWNlczphZG1pbi9hbGlhc2VzL2V4aXN0cyoiCiAgLSAiaW5kaWNlczphZG1pbi9hbGlhc2VzL2dldCoiCgpDTFVTVEVSX0tVQkVEQl9TTkFQU0hPVDoKICAtICJpbmRpY2VzOmRhdGEvcmVhZC9zY3JvbGwqIgoKSU5ESUNFU19LVUJFREJfU05BUFNIT1Q6CiAgLSAiaW5kaWNlczphZG1pbi9nZXQiCg==
  sg_config.yml: CnNlYXJjaGd1YXJkOgogIGR5bmFtaWM6CiAgICBhdXRoYzoKICAgICAgYmFzaWNfaW50ZXJuYWxfYXV0aF9kb21haW46CiAgICAgICAgZW5hYmxlZDogdHJ1ZQogICAgICAgIG9yZGVyOiA0CiAgICAgICAgaHR0cF9hdXRoZW50aWNhdG9yOgogICAgICAgICAgdHlwZTogYmFzaWMKICAgICAgICAgIGNoYWxsZW5nZTogdHJ1ZQogICAgICAgIGF1dGhlbnRpY2F0aW9uX2JhY2tlbmQ6CiAgICAgICAgICB0eXBlOiBpbnRlcm5hbAo=
  sg_internal_users.yml: CmFkbWluOgogIGhhc2g6ICQyYSQxMCRaQ0ROZVdyLjFiNGhJUVFCcno0TmpPaW9OTG9YVjZLRDJ4UFNEMTZ6di5IMHZFRUQvV0J3dQoKcmVhZGFsbDoKICBoYXNoOiAkMmEkMTAkSmpzUkkvVDBhb2dRb3hDcDlQZXV6dWd6Umw5UUZIMzg5aFJZUmQ0eUI5dU9lVFVGRlpiTzIK
  sg_roles.yml: CnNnX2FsbF9hY2Nlc3M6CiAgY2x1c3RlcjoKICAgIC0gVU5MSU1JVEVECiAgaW5kaWNlczoKICAgICcqJzoKICAgICAgJyonOgogICAgICAgIC0gVU5MSU1JVEVECiAgdGVuYW50czoKICAgIGFkbV90ZW5hbnQ6IFJXCiAgICB0ZXN0X3RlbmFudF9ybzogUlcKCnNnX3JlYWRhbGw6CiAgY2x1c3RlcjoKICAgIC0gQ0xVU1RFUl9DT01QT1NJVEVfT1BTX1JPCiAgICAtIENMVVNURVJfS1VCRURCX1NOQVBTSE9UCiAgaW5kaWNlczoKICAgICcqJzoKICAgICAgJyonOgogICAgICAgIC0gUkVBRAogICAgICAgIC0gSU5ESUNFU19LVUJFREJfU05BUFNIT1QK
  sg_roles_mapping.yml: CnNnX2FsbF9hY2Nlc3M6CiAgdXNlcnM6CiAgICAtIGFkbWluCgpzZ19yZWFkYWxsOgogIHVzZXJzOgogICAgLSByZWFkYWxsCg==
kind: Secret
metadata:
  creationTimestamp: 2018-09-28T05:33:36Z
  labels:
    kubedb.com/kind: Elasticsearch
    kubedb.com/name: quick-elasticsearch
  name: quick-elasticsearch-auth
  namespace: demo
  ...
type: Opaque
Note: Auth Secret name format:
{elasticsearch-name}-auth
This Secret contains:
ADMIN_USERNAMEusername for superuser used in search-guard configuration as an internal user.ADMIN_PASSWORDpassword for the superuser.READALL_USERNAMEusername forreadalluser with read-only permission only.READALL_PASSWORDpassword for thereadalluser.- Followings are used as search-guard configuration
sg_action_groups.ymlsg_config.ymlsg_internal_users.ymlsg_roles.ymlsg_roles_mapping.yml
To know more about search-guard configuration, please visit here.
Secret for certificates
Certificate secret contains SSL certificates that are used to secure communication with Elasticsearch database.
$ kubectl get secret -n demo quick-elasticsearch-cert -o yaml
apiVersion: v1
data:
  key_pass: ZWR0aGd3
  node.jks: <base64 encoded node certificate in jks format>
  root.jks: <base64 encoded root CA in jks format>
  sgadmin.jks: <base64 encoded admin certificate used to change the Search Guard configuration>
kind: Secret
metadata:
  creationTimestamp: 2018-09-28T05:33:35Z
  labels:
    kubedb.com/kind: Elasticsearch
    kubedb.com/name: quick-elasticsearch
  name: quick-elasticsearch-cert
  namespace: demo
  ...
type: Opaque
Note: Cert Secret name format:
{elasticsearch-name}-cert
To know more about how to create TLS secure Elasticsearch database with KubeDB, please visit here.
Connect with Elasticsearch Database
We will use port forwarding to connect with our Elasticsearch database. Then we will use curl to send http request to check cluster health to verify that our Elasticsearch database is working well.
Let’s forward 9200 port of our database pod. Run following command on a separate terminal,
$ kubectl port-forward -n demo quick-elasticsearch-0 9200
Forwarding from 127.0.0.1:9200 -> 9200
Forwarding from [::1]:9200 -> 9200
Now, we can connect to the database at localhost:9200. Let’s find out necessary connection information first.
Connection information:
Address:
localhost:9200Username: Run following command to get username
$ kubectl get secrets -n demo quick-elasticsearch-auth -o jsonpath='{.data.\ADMIN_USERNAME}' | base64 -d
admin
Password: Run following command to get password
$ kubectl get secrets -n demo quick-elasticsearch-auth -o jsonpath='{.data.\ADMIN_PASSWORD}' | base64 -d
cbciwcfh
Now let’s check health of our Elasticsearch database.
curl --user "admin:cbciwcfh" "localhost:9200/_cluster/health?pretty"
{
  "cluster_name" : "quick-elasticsearch",
  "status" : "green",
  "timed_out" : false,
  "number_of_nodes" : 1,
  "number_of_data_nodes" : 1,
  "active_primary_shards" : 1,
  "active_shards" : 1,
  "relocating_shards" : 0,
  "initializing_shards" : 0,
  "unassigned_shards" : 0,
  "delayed_unassigned_shards" : 0,
  "number_of_pending_tasks" : 0,
  "number_of_in_flight_fetch" : 0,
  "task_max_waiting_in_queue_millis" : 0,
  "active_shards_percent_as_number" : 100.0
}
Requst format: curl --user "$USERNAME:$PASSWORD" "$ADDRESS/_cluster/health?pretty"
From the health information above, we can see that our Elasticsearch cluster’s status is green. That means everything is going well.
Pause Elasticsearch
KubeDB takes advantage of ValidationWebhook feature in Kubernetes 1.9.0 or later clusters to implement DoNotTerminate termination policy. If admission webhook is enabled, it prevents user from deleting the database as long as the spec.terminationPolicy is set DoNotTerminate.
In this tutorial, Elasticsearch quick-elasticsearch is created with spec.terminationPolicy: DoNotTerminate. So if you try to delete this Elasticsearch object, admission webhook will nullify the delete operation.
$ kubectl delete es -n demo quick-elasticsearch
Error from server (BadRequest): admission webhook "elasticsearch.validators.kubedb.com" denied the request: elasticsearch "quick-elasticsearch" can't be paused. To delete, change spec.terminationPolicy
To pause the database, we have to set spec.terminationPolicy: to Pause by updating it,
$ kubectl edit es -n demo quick-elasticsearch
spec:
  terminationPolicy: Pause
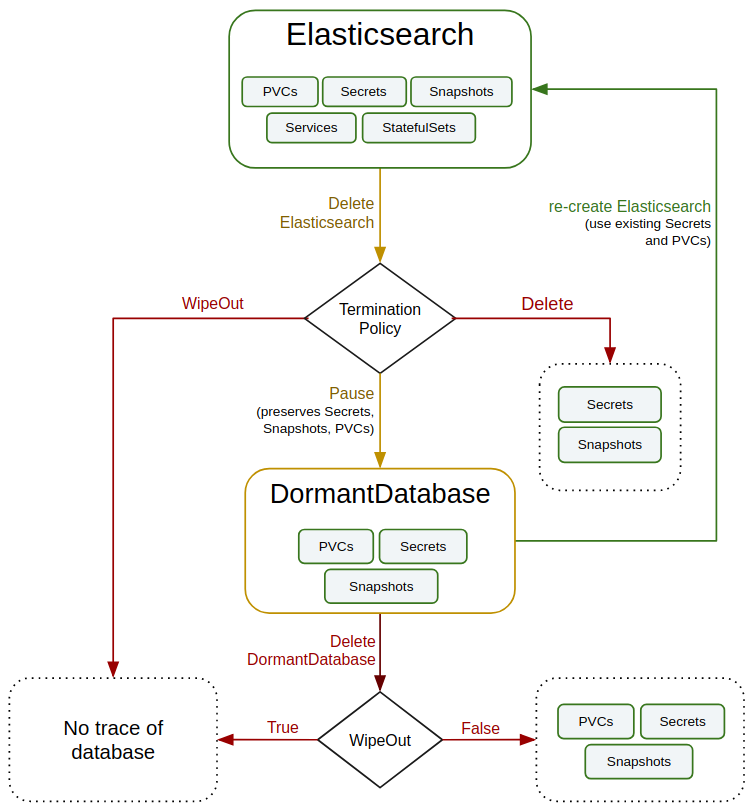
Now, if you delete the Elasticsearch object, KubeDB operator will create a matching DormantDatabase object. KubeDB operator watches for DormantDatabase objects and it will take necessary steps when a DormantDatabase object is created.
KubeDB operator will delete the StatefulSet and its Pods, but leaves the Secret, PVCs unchanged.
$ kubectl delete es -n demo quick-elasticsearch
elasticsearch.kubedb.com "quick-elasticsearch" deleted
Check DormantDatabase entry
$ kubectl get drmn -n demo quick-elasticsearch
NAME                  STATUS    AGE
quick-elasticsearch   Paused    29s
In KubeDB parlance, we say that Elasticsearch quick-elasticsearch has entered into dormant state.
Let’s see, what we have in this DormantDatabase object
$ kubectl get drmn -n demo quick-elasticsearch -o yaml
apiVersion: kubedb.com/v1alpha1
kind: DormantDatabase
metadata:
  creationTimestamp: 2018-09-28T08:56:15Z
  finalizers:
  - kubedb.com
  generation: 1
  labels:
    kubedb.com/kind: Elasticsearch
  name: quick-elasticsearch
  namespace: demo
  resourceVersion: "23969"
  selfLink: /apis/kubedb.com/v1alpha1/namespaces/demo/dormantdatabases/quick-elasticsearch
  uid: 5b1a99dd-c2fc-11e8-aac4-8a5cc86ecf00
spec:
  origin:
    metadata:
      annotations:
        kubectl.kubernetes.io/last-applied-configuration: |
          {"apiVersion":"kubedb.com/v1alpha1","kind":"Elasticsearch","metadata":{"annotations":{},"name":"quick-elasticsearch","namespace":"demo"},"spec":{"terminationPolicy":true,"storage":{"accessModes":["ReadWriteOnce"],"resources":{"requests":{"storage":"1Gi"}},"storageClassName":"standard"},"storageType":"Durable","version":"6.3-v1"}}
      creationTimestamp: 2018-09-28T05:33:29Z
      name: quick-elasticsearch
      namespace: demo
    spec:
      elasticsearch:
        certificateSecret:
          secretName: quick-elasticsearch-cert
        databaseSecret:
          secretName: quick-elasticsearch-auth
        podTemplate:
          controller: {}
          metadata: {}
          spec:
            resources: {}
        replicas: 1
        serviceTemplate:
          metadata: {}
          spec: {}
        storage:
          accessModes:
          - ReadWriteOnce
          resources:
            requests:
              storage: 1Gi
          storageClassName: standard
        storageType: Durable
        terminationPolicy: Pause
        updateStrategy:
          type: RollingUpdate
        version: 6.3-v1
status:
  observedGeneration: 1$10263513872796756591
  pausingTime: 2018-09-28T08:56:24Z
  phase: Paused
Here,
spec.origincontains original Elasticsearch object.status.phasepoints to the current database statePaused.
Resume DormantDatabase
To resume the database from the dormant state, create same Elasticsearch object with same Spec.
In this tutorial, the DormantDatabase quick-elasticsearch can be resumed by creating original Elasticsearch object.
The below command will resume the DormantDatabase quick-elasticsearch
$ kubectl create -f https://github.com/kubedb/docs/raw/v0.13.0-rc.0/docs/examples/elasticsearch/quickstart/quick-elasticsearch.yaml
elasticsearch.kubedb.com/quick-elasticsearch created
WipeOut DormantDatabase
You can wipe out a DormantDatabase while deleting the object by setting spec.wipeOut to true. KubeDB operator will delete any relevant resources of this Elasticsearch database (i.e, PVCs, Secrets, Snapshots). It will also delete snapshot data stored in the Cloud Storage buckets.
$ kubectl edit drmn -n demo quick-elasticsearch
spec:
  wipeOut: true
You can also set wipeOut: true by patching the DormantDatabase,
$ kubectl patch -n demo drmn/quick-elasticsearch -p '{"spec":{"wipeOut":true}}' --type="merge"
If spec.wipeOut is not set to true while deleting the dormantdatabase object, then only this object will be deleted and KubeDB operator won’t delete related Secrets, PVCs and Snapshots. So, user still can access the stored data in the cloud storage buckets as well as PVCs.
Delete DormantDatabase
As it is already discussed above, DormantDatabase can be deleted with or without wiping out the resources. To delete the dormantdatabase,
$ kubectl delete drmn -n demo quick-elasticsearch
dormantdatabase.kubedb.com "quick-elasticsearch" deleted
Cleaning up
To cleanup the Kubernetes resources created by this tutorial, run:
$ kubectl patch -n demo es/quick-elasticsearch -p '{"spec":{"terminationPolicy": "WipeOut"}}' --type="merge"
$ kubectl delete -n demo es/quick-elasticsearch

$ kubectl delete ns demo
Tips for Testing
If you are just testing some basic functionalities, you might want to avoid additional hassles due to some safety features that are great for production environment. You can follow these tips to avoid them.
- Use
storageType: Ephemeral. Databases are precious. You might not want to lose your data in your production environment if database pod fail. So, we recommend to usespec.storageType: Durableand provide storage spec inspec.storagesection. For testing purpose, you can just usespec.storageType: Ephemeral. KubeDB will use emptyDir for storage. You will not require to providespec.storagesection. - Use
terminationPolicy: WipeOut. It is nice to be able to resume database from previous one. So, we createDormantDatabaseand preserve all yourPVCs,Secrets,Snapshotsetc. If you don’t want to resume database, you can just usespec.terminationPolicy: WipeOut. It will not createDormantDatabaseand it will delete everything created by KubeDB for a particular Elasticsearch crd when you delete the crd. For more details about termination policy, please visit here.
Next Steps
- Learn about taking instant backup of Elasticsearch database using KubeDB.
- Learn how to schedule backup of Elasticsearch database.
- Learn about initializing Elasticsearch with Snapshot.
- Learn how to configure Elasticsearch Topology.
- Monitor your Elasticsearch database with KubeDB using
out-of-the-boxbuiltin-Prometheus. - Monitor your Elasticsearch database with KubeDB using
out-of-the-boxCoreOS Prometheus Operator. - Detail concepts of Elasticsearch object.
- Detail concepts of Snapshot object.
- Use private Docker registry to deploy Elasticsearch with KubeDB.
- Want to hack on KubeDB? Check our contribution guidelines.