


You are looking at the documentation of a prior release. To read the documentation of the latest release, please
visit here.
New to KubeDB? Please start here.
Memcached QuickStart
This tutorial will show you how to use KubeDB to run a Memcached server.
Note: The yaml files used in this tutorial are stored in docs/examples/memcached folder in GitHub repository kubedb/docs.
Before You Begin
At first, you need to have a Kubernetes cluster, and the kubectl command-line tool must be configured to communicate with your cluster. If you do not already have a cluster, you can create one by using kind.
Now, install KubeDB cli on your workstation and KubeDB operator in your cluster following the steps here.
To keep things isolated, this tutorial uses a separate namespace called
demothroughout this tutorial. Run the following command to prepare your cluster for this tutorial:
$ kubectl create ns demo
namespace/demo created

$ kubectl get ns demo
NAME      STATUS    AGE
demo      Active    1s
Find Available MemcachedVersion
When you have installed KubeDB, it has created MemcachedVersion crd for all supported Memcached versions. Check 0
$ kubectl get memcachedversions
NAME       VERSION   DB_IMAGE                    DEPRECATED   AGE
1.5        1.5       kubedb/memcached:1.5        true         2h
1.5-v1     1.5       kubedb/memcached:1.5-v1                  2h
1.5.4      1.5.4     kubedb/memcached:1.5.4      true         2h
1.5.4-v1   1.5.4     kubedb/memcached:1.5.4-v1                2h
Create a Memcached server
KubeDB implements a Memcached CRD to define the specification of a Memcached server. Below is the Memcached object created in this tutorial.
apiVersion: kubedb.com/v1alpha2
kind: Memcached
metadata:
name: memcd-quickstart
namespace: demo
spec:
replicas: 3
version: "1.5.4-v1"
podTemplate:
spec:
resources:
limits:
cpu: 500m
memory: 128Mi
requests:
cpu: 250m
memory: 64Mi
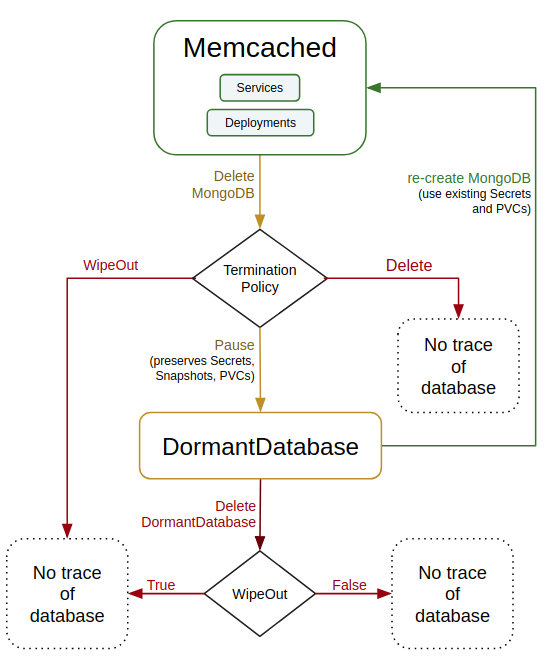
terminationPolicy: DoNotTerminate
$ kubectl create -f https://github.com/kubedb/docs/raw/v2021.03.17/docs/examples/memcached/quickstart/demo-1.yaml
memcached.kubedb.com/memcd-quickstart created
Here,
spec.replicasis an optional field that specifies the number of desired Instances/Replicas of Memcached server. It defaults to 1.spec.versionis the version of Memcached server. In this tutorial, a Memcached 1.5.4 database is going to be created.spec.resourceis an optional field that specifies how much CPU and memory (RAM) each Container needs. To learn details about Managing Compute Resources for Containers, please visit here.spec.terminationPolicygives flexibility whether tonullify(reject) the delete operation ofMemcachedcrd or which resources KubeDB should keep or delete when you deleteMemcachedcrd. If admission webhook is enabled, It prevents users from deleting the database as long as thespec.terminationPolicyis set toDoNotTerminate. Learn details of allTerminationPolicyhere
KubeDB operator watches for Memcached objects using Kubernetes api. When a Memcached object is created, KubeDB operator will create a new Deployment and a ClusterIP Service with the matching Memcached object name.
$ kubectl get mc -n demo
NAME               VERSION    STATUS    AGE
memcd-quickstart   1.5.4-v1   Running   2m

$ kubectl dba describe mc -n demo memcd-quickstart
Name:               memcd-quickstart
Namespace:          demo
CreationTimestamp:  Wed, 03 Oct 2018 15:40:38 +0600
Labels:             <none>
Annotations:        <none>
Replicas:           3  total
Status:             Running

Deployment:
  Name:               memcd-quickstart
  CreationTimestamp:  Wed, 03 Oct 2018 15:40:40 +0600
  Labels:               app.kubernetes.io/name=memcacheds.kubedb.com
                        app.kubernetes.io/instance=memcd-quickstart
  Annotations:          deployment.kubernetes.io/revision=1
  Replicas:           3 desired | 3 updated | 3 total | 3 available | 0 unavailable
  Pods Status:        3 Running / 0 Waiting / 0 Succeeded / 0 Failed

Service:
  Name:         memcd-quickstart
  Labels:         app.kubernetes.io/name=memcacheds.kubedb.com
                  app.kubernetes.io/instance=memcd-quickstart
  Annotations:  <none>
  Type:         ClusterIP
  IP:           10.111.81.177
  Port:         db  11211/TCP
  TargetPort:   db/TCP
  Endpoints:    172.17.0.4:11211,172.17.0.5:11211,172.17.0.6:11211

No Snapshots.

Events:
  Type    Reason      Age   From                Message
  ----    ------      ----  ----                -------
  Normal  Successful  2m    Memcached operator  Successfully created Service
  Normal  Successful  1m    Memcached operator  Successfully created StatefulSet
  Normal  Successful  1m    Memcached operator  Successfully created Memcached
  Normal  Successful  1m    Memcached operator  Successfully patched StatefulSet
  Normal  Successful  1m    Memcached operator  Successfully patched Memcached
KubeDB operator sets the status.phase to Running once the database is successfully created. Run the following command to see the modified Memcached object:
$ kubectl get mc -n demo memcd-quickstart -o yaml
apiVersion: kubedb.com/v1alpha2
kind: Memcached
metadata:
  creationTimestamp: 2018-10-03T09:40:38Z
  finalizers:
  - kubedb.com
  generation: 1
  name: memcd-quickstart
  namespace: demo
  resourceVersion: "23592"
  selfLink: /apis/kubedb.com/v1alpha2/namespaces/demo/memcacheds/memcd-quickstart
  uid: 62b08ec3-c6f0-11e8-8ebc-0800275bbbee
spec:
  podTemplate:
    controller: {}
    metadata: {}
    spec:
      resources:
        limits:
          cpu: 500m
          memory: 128Mi
        requests:
          cpu: 250m
          memory: 64Mi
  replicas: 3
  terminationPolicy: Halt
  version: 1.5.4-v1
status:
  observedGeneration: 1$4210395375389091791
  phase: Running
Now, you can connect to this Memcached cluster using telnet.
Here, we will connect to Memcached server from local-machine through port-forwarding.
$ kubectl get pods -n demo
NAME                                READY     STATUS    RESTARTS   AGE
memcd-quickstart-57d88d6595-gfptm   1/1       Running   0          3m
memcd-quickstart-57d88d6595-wmp5p   1/1       Running   0          3m
memcd-quickstart-57d88d6595-xf4z2   1/1       Running   0          3m

// We will connect to `memcd-quickstart-667cd68854-gs69q` pod from local-machine using port-frowarding.
$ kubectl port-forward -n demo memcd-quickstart-57d88d6595-gfptm 11211
Forwarding from 127.0.0.1:11211 -> 11211

# Connect Memcached cluster from localmachine through telnet.
~ $ telnet 127.0.0.1 11211
Trying 127.0.0.1...
Connected to 127.0.0.1.

# Save data Command:
set my_key 0 2592000 1
2
# Output:
STORED

# Meaning:
# 0       => no flags
# 2592000 => TTL (Time-To-Live) in [s]
# 1       => size in byte
# 2       => value

# View data command
get my_key
# Output
VALUE my_key 0 1
2
END

# Exit
quit
DoNotTerminate Property
When terminationPolicy is DoNotTerminate, KubeDB takes advantage of ValidationWebhook feature in Kubernetes 1.9.0 or later clusters to implement DoNotTerminate feature. If admission webhook is enabled, It prevents users from deleting the database as long as the spec.terminationPolicy is set to DoNotTerminate. You can see this below:
$ kubectl delete mc memcd-quickstart -n demo
Error from server (BadRequest): admission webhook "memcached.validators.kubedb.com" denied the request: memcached "memcd-quickstart" can't be halted. To delete, change spec.terminationPolicy
Now, run kubectl edit mc memcd-quickstart -n demo to set spec.terminationPolicy to Halt (which creates dormantdatabase when memcached is deleted and keeps PVC, snapshots, Secrets intact) or remove this field (which default to Halt). Then you will be able to delete/halt the database.
Learn details of all TerminationPolicy here
Halt Database
When TerminationPolicy is set to Halt, it will halt the Memcached server instead of deleting it. Here, you delete the Memcached object, KubeDB operator will delete the Deployment and its pods. In KubeDB parlance, we say that memcd-quickstart Memcached server has entered into dormant state. This is represented by KubeDB operator by creating a matching DormantDatabase object.
$ kubectl delete mc memcd-quickstart -n demo
memcached.kubedb.com "memcd-quickstart" deleted

$ kubectl get drmn -n demo memcd-quickstart
NAME               STATUS    AGE
memcd-quickstart   Pausing   21s

$ kubectl get drmn -n demo memcd-quickstart
NAME               STATUS    AGE
memcd-quickstart   Halted    2m
$ kubectl get drmn -n demo memcd-quickstart -o yaml
apiVersion: kubedb.com/v1alpha2
kind: DormantDatabase
metadata:
  creationTimestamp: 2018-10-03T09:49:16Z
  finalizers:
  - kubedb.com
  generation: 1
  labels:
    app.kubernetes.io/name: memcacheds.kubedb.com
  name: memcd-quickstart
  namespace: demo
  resourceVersion: "24242"
  selfLink: /apis/kubedb.com/v1alpha2/namespaces/demo/dormantdatabases/memcd-quickstart
  uid: 97ad28ef-c6f1-11e8-8ebc-0800275bbbee
spec:
  origin:
    metadata:
      creationTimestamp: 2018-10-03T09:40:38Z
      name: memcd-quickstart
      namespace: demo
    spec:
      memcached:
        podTemplate:
          controller: {}
          metadata: {}
          spec:
            resources:
              limits:
                cpu: 500m
                memory: 128Mi
              requests:
                cpu: 250m
                memory: 64Mi
        replicas: 3
        terminationPolicy: Halt
        version: 1.5.4-v1
status:
  observedGeneration: 1$7678503742307285743
  pausingTime: 2018-10-03T09:50:10Z
  phase: Halted
Here,
spec.originis the spec of the original spec of the original Memcached object.status.phasepoints to the current database stateHalted.
Resume Dormant Database
To resume the database from the dormant state, create same Memcached object with same Spec.
In this tutorial, the dormant database can be resumed by creating Memcached database using demo-1.yaml file.
The below command resumes the dormant database memcd-quickstart.
$ kubectl create -f https://github.com/kubedb/docs/raw/v2021.03.17/docs/examples/memcached/quickstart/demo-1.yaml
memcached.kubedb.com/memcd-quickstart created
Wipeout Dormant Database
You can wipe out a DormantDatabase while deleting the objet by setting spec.wipeOut to true. KubeDB operator will delete any relevant resources of this Memcached database.
$ kubectl delete mc memcd-quickstart -n demo
memcached "memcd-quickstart" deleted

$ kubectl edit drmn -n demo memcd-quickstart
apiVersion: kubedb.com/v1alpha2
kind: DormantDatabase
metadata:
  name: memcd-quickstart
  namespace: demo
  ...
spec:
  wipeOut: true
  ...
status:
  phase: Halted
  ...
If spec.wipeOut is not set to true while deleting the dormantdatabase object, then only this object will be deleted and kubedb-operator won’t delete related Secrets.
Delete DormantDatabase
As it is already discussed above, DormantDatabase can be deleted with or without wiping out the resources. To delete the dormantdatabase,
$ kubectl delete drmn memcd-quickstart -n demo
dormantdatabase "memcd-quickstart" deleted
Cleaning up
To cleanup the Kubernetes resources created by this tutorial, run:
kubectl patch -n demo mc/memcd-quickstart -p '{"spec":{"terminationPolicy":"WipeOut"}}' --type="merge"
kubectl delete -n demo mc/memcd-quickstart

kubectl patch -n demo drmn/memcd-quickstart -p '{"spec":{"wipeOut":true}}' --type="merge"
kubectl delete -n demo drmn/memcd-quickstart

kubectl delete ns demo
Next Steps
- Monitor your Memcached server with KubeDB using out-of-the-box Prometheus operator.
- Monitor your Memcached server with KubeDB using out-of-the-box builtin-Prometheus.
- Use private Docker registry to deploy Memcached with KubeDB.
- Detail concepts of Memcached object.
- Want to hack on KubeDB? Check our contribution guidelines.