


You are looking at the documentation of a prior release. To read the documentation of the latest release, please
visit here.
New to KubeDB? Please start here.
Search Guard Configuration
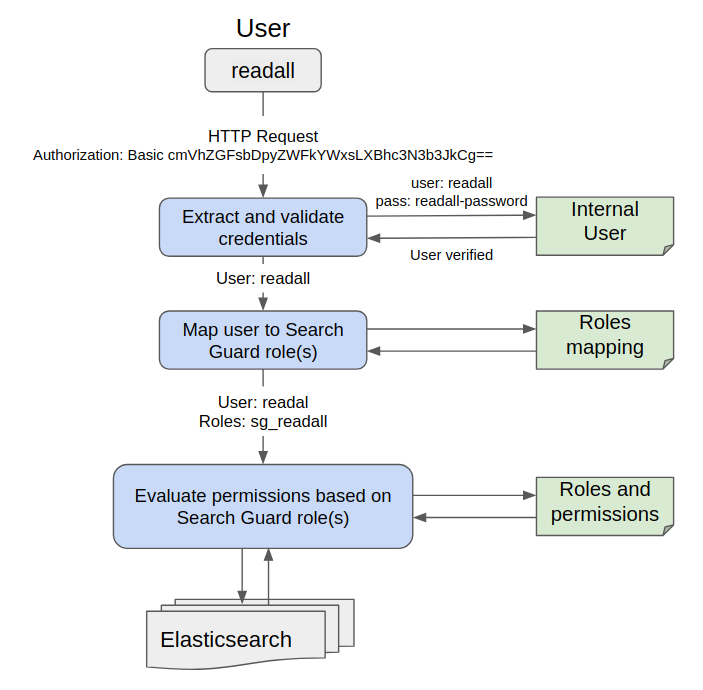
Search Guard configuration enables basic flow as follows:
- Search Guard authenticates the credentials against the configured authentication backend(s).
- Search Guard authorizes the user by retrieving a list of the user’s roles from the configured authorization backend
- Roles retrieved from authorization backends are called backend roles.
- Search Guard maps the user and backend roles to Search Guard roles.
- Search Guard determines the permissions associated with the Search Guard role and decides whether the action the user wants to perform is allowed or not.
Before You Begin
At first, you need to have a Kubernetes cluster, and the kubectl command-line tool must be configured to communicate with your cluster. If you do not already have a cluster, you can create one by using kind.
Now, install KubeDB cli on your workstation and KubeDB operator in your cluster following the steps here.
To keep things isolated, this tutorial uses a separate namespace called demo throughout this tutorial.
$ kubectl create ns demo
namespace/demo created

$ kubectl get ns demo
NAME    STATUS  AGE
demo    Active  5s
We will use htpasswd** to hash user password. Install apache2-utils package for this.
$ sudo apt-get install apache2-utils
To keep configuration files separated, open a new terminal and create a directory /tmp/kubedb/sg
mkdir -p /tmp/kubedb/sg
cd /tmp/kubedb/sg
Note: YAML files used in this tutorial are stored in docs/examples/elasticsearch folder in GitHub repository kubedb/docs.
Create Configuration
The configuration consists of the following files.
sg_config.ymlconfigure authenticators and authorisation backends.sg_internal_users.ymlstores users, roles and hashed passwords in the internal user database.sg_action_groups.ymldefine named permission groups.sg_roles.ymldefine roles and the associated permissions.sg_roles_mapping.ymlmap backend roles, hosts and users to roles.
If you do not provide Secret for configuration, KubeDB will create one with default setup.
sg_config.yml
The main configuration file for authentication and authorization modules is sg_config.yml. It defines how Search Guard retrieves the user credentials, how it verifies these credentials, and how additional user roles are fetched from backend systems.
It has two main parts:
searchguard:
  dynamic:
    authc:
      ...
    authz:
      ...
See details about authentication and authorisation in Search Guard documentation.
We will use following config data in this tutorial
searchguard:
  dynamic:
    authc:
      basic_internal_auth_domain:
        enabled: true
        order: 4
        http_authenticator:
          type: basic
          challenge: true
        authentication_backend:
          type: internal
$ wget https://github.com/kubedb/docs/raw/v2021.12.21/docs/examples/elasticsearch/search-guard/sg-config/sg_config.yml
sg_internal_users.yml
Internal users are configured in sg_internal_users.yml.
Syntax:
<username>:
  hash: <hashed password>
  roles:
    - <rolename>
    - <rolename>
See details about internal users in Search Guard documentation.
KubeDB needs user admin and readall for backup and restore process.
Create two hashed password for user admin and readall
export ADMIN_PASSWORD=admin-password
export READALL_PASSWORD=readall-password

export ADMIN_PASSWORD_HASHED=$(htpasswd -bnBC 12 "" $ADMIN_PASSWORD | tr -d ':\n' | sed 's/$2y/$2a/')
export READALL_PASSWORD_HASHED=$(htpasswd -bnBC 12 "" $READALL_PASSWORD | tr -d ':\n' | sed 's/$2y/$2a/')
Here,
adminuser password :admin-passwordreadalluser password :readall-password
This following template file is used to substitute password for internal user.
admin:
  hash: $ADMIN_PASSWORD_HASHED

readall:
  hash: $READALL_PASSWORD_HASHED
Run following command to write user information in sg_internal_users.yml file with password.
$ curl https://github.com/kubedb/docs/raw/v2021.12.21/docs/examples/elasticsearch/search-guard/sg-config/sg_internal_users.yml | envsubst > sg_internal_users.yml
Note: If user does not provide
spec.authSecret, KubeDB will generate random password for both admin and readall user.
sg_action_groups.yml
An action group is simply a collection of permissions with a telling name. Action groups are defined in the file sg_action_groups.yml
and can be referred to in sg_roles.yml.
The file structure is very simple:
<action group name>:
    - '<permission or action groups>'
    - '<permission or action group>'
    - ...
See details about action groups in Search Guard documentation.
Run following command to get action groups we will use in this tutorial
$ wget https://github.com/kubedb/docs/raw/v2021.12.21/docs/examples/elasticsearch/search-guard/sg-config/sg_action_groups.yml
UNLIMITED:
  - "*"

READ:
  - "indices:data/read*"
  - "indices:admin/mappings/fields/get*"

CLUSTER_COMPOSITE_OPS_RO:
  - "indices:data/read/mget"
  - "indices:data/read/msearch"
  - "indices:data/read/mtv"
  - "indices:data/read/coordinate-msearch*"
  - "indices:admin/aliases/exists*"
  - "indices:admin/aliases/get*"

CLUSTER_KUBEDB_SNAPSHOT:
  - "indices:data/read/scroll*"

INDICES_KUBEDB_SNAPSHOT:
  - "indices:admin/get"
sg_roles.yml
Search Guard roles and their associated permissions are defined in the file sg_roles.yml.
The syntax to define a role, and associate permissions with it, is as follows:
<sg_role_name>:
  cluster:
    - '<action group or single permission>'
    - ...
  indices:
    '<indexname or alias>':
      '<document type>':
        - '<action group or single permission>'
        - ...
      '<document type>':
        - '<action group or single permission>'
        - ...
      _dls_: '<Document level security query>'
      _fls_:
        - '<field level security fiels>'
        - ...
    tenants:
      <tenantname>: <RW|RO>
      <tenantname>: <RW|RO>
See details about roles and permissions in Search Guard documentation.
We will use following roles for Search Guard users.
sg_all_access:
  cluster:
    - UNLIMITED
  indices:
    '*':
      '*':
        - UNLIMITED
  tenants:
    adm_tenant: RW
    test_tenant_ro: RW

sg_readall:
  cluster:
    - CLUSTER_COMPOSITE_OPS_RO
    - CLUSTER_KUBEDB_SNAPSHOT
  indices:
    '*':
      '*':
        - READ
        - INDICES_KUBEDB_SNAPSHOT
$ wget https://github.com/kubedb/docs/raw/v2021.12.21/docs/examples/elasticsearch/search-guard/sg-config/sg_roles.yml
sg_roles_mapping.yml
Backend roles are roles that Search Guard retrieves during the authentication and authorization process. These roles are then mapped to the roles Search Guard uses to define which permissions a given user or host possesses.
In configuration, KubeDB sets for Search Guard, backend roles comes from:
- Roles defined in sg_internal_users.yml for particular users
- A JSON web token, if you’re using JWT authentication
- HTTP headers, if you’re using Proxy authentication
Mapping
Backend users, roles and hosts are mapped to Search Guard roles in the file sg_roles_mapping.yml.
Syntax:
<Search Guard role name>:
  users:
    - <username>
    - ...
  backendroles:
    - <rolename>
    - ...
  hosts:
    - <hostname>
    - ...
See details about backend roles mapping in Search Guard documentation.
Get roles mapping by running
$ wget https://github.com/kubedb/docs/raw/v2021.12.21/docs/examples/elasticsearch/search-guard/sg-config/sg_roles_mapping.yml
sg_all_access:
  users:
    - admin

sg_readall:
  users:
    - readall
Flow Diagram for User readall
Create Secret
Now create a Secret with these files to use in your Elasticsearch object.
$ kubectl create secret generic -n demo config-elasticsearch-auth \
                --from-file=sg_config.yml \
                --from-file=sg_internal_users.yml \
                --from-file=sg_action_groups.yml \
                --from-file=sg_roles.yml \
                --from-file=sg_roles_mapping.yml \
                --from-literal=ADMIN_USERNAME=admin \
                --from-literal=ADMIN_PASSWORD=$ADMIN_PASSWORD \
                --from-literal=READALL_USERNAME=readall \
                --from-literal=READALL_PASSWORD=$READALL_PASSWORD

secret/config-elasticsearch-auth created
Here,
ADMIN_USERNAMEandADMIN_PASSWORDpassword is used for initializing database from previous Snapshot.READALL_USERNAMEandREADALL_PASSWORDpassword is used for taking backup.
If you do not use these two features of Snapshot, you can ignore adding these.
--from-literal=ADMIN_USERNAME=admin
--from-literal=ADMIN_PASSWORD=$ADMIN_PASSWORD
--from-literal=READALL_USERNAME=readall
--from-literal=READALL_PASSWORD=$READALL_PASSWORD
Note:
ADMIN_PASSWORDandREADALL_PASSWORDare the same password you have provided as hashed value insg_internal_users.yml. It is not possible for KubeDB to figure out the password from the hashed value. So, you have to provide these password as a separate key in the secret. Otherwise, KubeDB will not able to perform backup or initialization.
Use this Secret config-elasticsearch-auth in spec.authSecret field of your Elasticsearch object.
Create an Elasticsearch database
Below is the Elasticsearch object created in this tutorial.
apiVersion: kubedb.com/v1alpha2
kind: Elasticsearch
metadata:
  name: config-elasticsearch
  namespace: demo
spec:
  version: searchguard-7.9.3
  authSecret:
    name: config-elasticsearch-auth
  storage:
    storageClassName: "standard"
    accessModes:
    - ReadWriteOnce
    resources:
      requests:
        storage: 1Gi
Here,
spec.authSecretspecifies Secret with Search Guard configuration and basic auth for internal user.
Create example above with following command
$ kubectl create -f https://github.com/kubedb/docs/raw/v2021.12.21/docs/examples/elasticsearch/search-guard/config-elasticsearch.yaml
elasticsearch.kubedb.com/config-elasticsearch created
KubeDB operator sets the status.phase to Running once the database is successfully created.
$ kubectl get es -n demo config-elasticsearch -o wide
NAME                   VERSION   STATUS    AGE
config-elasticsearch   6.3-v1    Running   1m
Connect to Elasticsearch Database
At first, forward port 9200 of config-elasticsearch-0 pod. Run following command on a separate terminal,
$ kubectl port-forward -n demo config-elasticsearch-0 9200
Forwarding from 127.0.0.1:9200 -> 9200
Forwarding from [::1]:9200 -> 9200
Now, you can connect to this database at localhost:9200.
$ curl --user "admin:$ADMIN_PASSWORD" "localhost:9200/_cluster/health?pretty"
{
  "cluster_name" : "config-elasticsearch",
  "status" : "green",
  "timed_out" : false,
  "number_of_nodes" : 1,
  "number_of_data_nodes" : 1,
  "active_primary_shards" : 1,
  "active_shards" : 1,
  "relocating_shards" : 0,
  "initializing_shards" : 0,
  "unassigned_shards" : 0,
  "delayed_unassigned_shards" : 0,
  "number_of_pending_tasks" : 0,
  "number_of_in_flight_fetch" : 0,
  "task_max_waiting_in_queue_millis" : 0,
  "active_shards_percent_as_number" : 100.0
}
Cleaning up
To cleanup the Kubernetes resources created by this tutorial, run:
$ kubectl patch -n demo es/config-elasticsearch -p '{"spec":{"terminationPolicy":"WipeOut"}}' --type="merge"
$ kubectl delete -n demo es/config-elasticsearch

$ kubectl delete ns demo
Next Steps
- Learn how to create TLS certificates.
- Learn how to use TLS certificates to connect Elasticsearch.
- Want to hack on KubeDB? Check our contribution guidelines.