


You are looking at the documentation of a prior release. To read the documentation of the latest release, please
visit here.
New to KubeDB? Please start here.
Running PgBouncer
This tutorial will show you how to use KubeDB to run a PgBouncer.
Before You Begin
At first, you need to have a Kubernetes cluster, and the kubectl command-line tool must be configured to communicate with your cluster. If you do not already have a cluster, you can create one by using kind.
Now, install KubeDB cli on your workstation and KubeDB operator in your cluster following the steps here.
To keep things isolated, this tutorial uses a separate namespace called demo throughout this tutorial.
$ kubectl create ns demo
namespace/demo created
Note: YAML files used in this tutorial are stored in docs/examples/pgbouncer folder in GitHub repository kubedb/docs.
We have designed this tutorial to demonstrate a production setup of KubeDB managed PgBouncer. If you just want to try out KubeDB, you can bypass some of the safety features following the tips here.
Find Available PgBouncerVersion
When you have installed KubeDB, it has created PgBouncerVersion crd for all supported PgBouncer versions. Let’s check available PgBouncerVersion by,
$ kubectl get pgbouncerversions

  NAME     VERSION   PGBOUNCER_IMAGE           DEPRECATED   AGE
  1.17.0   1.17.0    kubedb/pgbouncer:1.17.0                2d23h
Notice the DEPRECATED column. Here, true means that this PgBouncerVersion is deprecated for current KubeDB version. KubeDB will not work for deprecated PgBouncerVersion.
In this tutorial, we will use 1.17.0 PgBouncerVersion crd to create PgBouncer. To know more about what PgBouncerVersion crd is, please visit here. You can also see supported PgBouncerVersion here.
Get PostgreSQL Server ready
PgBouncer is a connection-pooling middleware for PostgreSQL. Therefore you will need to have a PostgreSQL server up and running for PgBouncer to connect to.
Luckily PostgreSQL is readily available in KubeDB as crd and can easily be deployed using this guide here.
In this tutorial, we will use a Postgres named quick-postgres in the demo namespace.
$ kubectl create -f https://github.com/kubedb/docs/raw/v2022.10.18/docs/examples/pgbouncer/quickstart/quick-postgres.yaml
postgres.kubedb.com/quick-postgres created
KubeDB creates all the necessary resources including services, secrets, and appbindings to get this server up and running. A default database postgres is created in quick-postgres. Database secret quick-postgres-auth holds this user’s username and password. Following is the yaml file for it.
$ kubectl get secrets -n demo quick-postgres-auth -o yaml

apiVersion: v1
data:
  password: WkZvcGVMbndrU2ZfZjVZcw==
  username: cG9zdGdyZXM=
kind: Secret
metadata:
  creationTimestamp: "2022-06-01T11:51:32Z"
  labels:
    app.kubernetes.io/component: database
    app.kubernetes.io/instance: quick-postgres
    app.kubernetes.io/managed-by: kubedb.com
    app.kubernetes.io/name: postgreses.kubedb.com
  name: quick-postgres-auth
  namespace: demo
  resourceVersion: "195262"
  uid: abe166bc-a1da-40d9-8a5e-996a8f5d6246
type: kubernetes.io/basic-auth
For the purpose of this tutorial, we will need to extract the username and password from database secret quick-postgres-auth.
$ kubectl get secrets -n demo quick-postgres-auth -o jsonpath='{.data.\password}' | base64 -d
ZFopeLnwkSf_f5Ys⏎

$ kubectl get secrets -n demo quick-postgres-auth -o jsonpath='{.data.\username}' | base64 -d
postgres⏎
Now, to test connection with this database using the credentials obtained above, we will expose the service port associated with quick-postgres to localhost.
$ kubectl port-forward -n demo svc/quick-postgres 5432
Forwarding from 127.0.0.1:5432 -> 5432
Forwarding from [::1]:5432 -> 5432
With that done , we should now be able to connect to postgres database using username postgres, and password ZFopeLnwkSf_f5Ys.
$ export PGPASSWORD=ZFopeLnwkSf_f5Ys
$ psql --host=localhost --port=5432 --username=postgres postgres
psql (14.1 (Ubuntu 14.1-2.pgdg20.04+1), server 13.2)
Type "help" for help.

postgres=#
After establishing connection successfully, we will create a table in postgres database and populate it with data.
postgres=# CREATE TABLE COMPANY( NAME TEXT NOT NULL, EMPLOYEE INT NOT NULL);
CREATE TABLE
postgres=# INSERT INTO COMPANY (name, employee) VALUES ('Apple',10);
INSERT 0 1
postgres=# INSERT INTO COMPANY (name, employee) VALUES ('Google',15);
INSERT 0 1
After data insertion, we need to verify that our data have been inserted successfully.
postgres=# SELECT * FROM company ORDER BY name;
  name  | employee
--------+----------
 Apple  |       10
 Google |       15
(2 rows)
postgres=# \q
If no error occurs, quick-postgres is ready to be used by PgBouncer.
You can also use any other tool to deploy your PostgreSQL server and create a database postgres for user postgres.
Should you choose not to use KubeDB to deploy Postgres, create AppBinding(s) to point PgBouncer to your PostgreSQL server(s) where your target databases are located. Click here for detailed instructions on how to manually create AppBindings for Postgres.
Create a PgBouncer Server
KubeDB implements a PgBouncer crd to define the specifications of a PgBouncer.
Below is the PgBouncer object created in this tutorial.
apiVersion: kubedb.com/v1alpha2
kind: PgBouncer
metadata:
  name: pgbouncer-server
  namespace: demo
spec:
  version: "1.17.0"
  replicas: 1
  databases:
  - alias: "postgres"
    databaseName: "postgres"
    databaseRef:
      name: "quick-postgres"
      namespace: demo
  connectionPool:
    maxClientConnections: 20
    reservePoolSize: 5
    adminUsers:
    - admin
    - admin1
  userListSecretRef:
    name: db-user-pass
  terminationPolicy: Delete
Here,
spec.versionis name of the PgBouncerVersion crd where the docker images are specified. In this tutorial, a PgBouncer with base image version 1.17.0 is created.spec.replicasspecifies the number of replica pgbouncer server pods to be created for the PgBouncer object.spec.databasesspecifies the databases that are going to be served via PgBouncer.spec.connectionPoolspecifies the configurations for connection pool.spec.userListSecretRefspecifies the secret that contains the standard pgbounceruserlistfile.spec.terminationPolicyspecifies what policy to apply while deletion.
spec.databases
Databases contain three required fields and two optional fields.
spec.databases.alias: specifies an alias for the target database located in a postgres server specified by an appbinding.spec.databases.databaseName: specifies the name of the target database.spec.databases.databaseRef: specifies the name and namespace of the appBinding that contains the path to a PostgreSQL server where the target database can be found.spec.databases.username(optional): specifies the user with whom this particular database should have an exclusive connection. By default, if this field is left empty, all users will be able to use the database.spec.databases.password(optional): specifies password to authenticate the user with whom this particular database should have an exclusive connection.
spec.connectionPool
ConnectionPool is used to configure pgbouncer connection pool. All the fields here are accompanied by default values and can be left unspecified if no customization is required by the user.
spec.connectionPool.port: specifies the port on which pgbouncer should listen to connect with clients. The default is 5432.spec.connectionPool.adminUsers: specifies the values of admin_users. An array of names of admin users are listed here.spec.connectionPool.authType: specifies how to authenticate users.spec.connectionPool.poolMode: specifies the value of pool_mode.spec.connectionPool.maxClientConnections: specifies the value of max_client_conn.spec.connectionPool.defaultPoolSize: specifies the value of default_pool_size.spec.connectionPool.minPoolSize: specifies the value of min_pool_size.spec.connectionPool.reservePoolSize: specifies the value of reserve_pool_size.spec.connectionPool.reservePoolTimeout: specifies the value of reserve_pool_timeout.spec.connectionPool.maxDbConnections: specifies the value of max_db_connections.spec.connectionPool.maxUserConnections: specifies the value of max_user_connections.
spec.userListSecretRef
UserList field is used to specify a secret that contains the list of authorized users along with their passwords. Basically this secret is created from the standard pgbouncer userlist file.
spec.userListSecretRef.name: specifies the name of the secret containing userlist in the same namespace as the PgBouncer crd.
In this tutorial we will use a standard userlist text file to create a secret for spec.userListSecretRef. In the userlist text file we have added pgbouncer as user and ZFopeLnwkSf_f5Ys as corresponding password. The file looks like this:
"postgres" "ZFopeLnwkSf_f5Ys"
"myuser" "mypass"
We will need user myuser with password mypass later in this tutorial.
$ wget https://raw.githubusercontent.com/kubedb/docs/v2022.10.18/docs/examples/pgbouncer/quickstart/userlist

2022-06-01 12:29:02 (1.02 MB/s) - ‘userlist’ saved [47/47]
$ kubectl create secret generic -n demo db-user-pass --from-file=./userlist.txt

secret/db-user-pass created
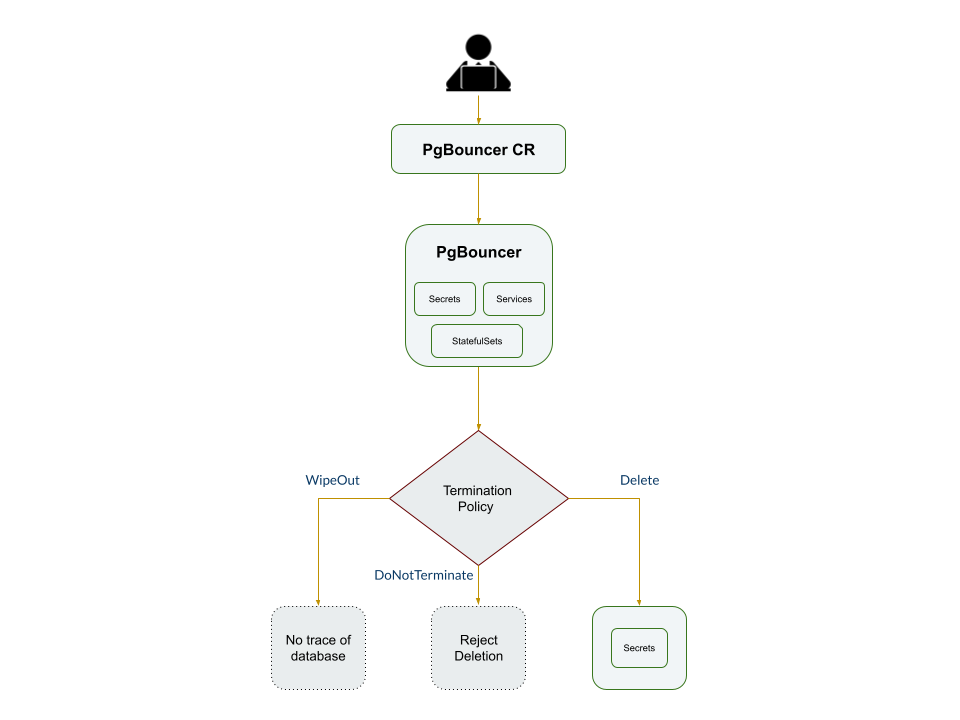
spec.terminationPolicy
terminationPolicy gives flexibility whether to nullify(reject) the delete operation of PgBouncer crd or which resources KubeDB should keep or delete when you delete PgBouncer crd. KubeDB provides following four termination policies:
- DoNotTerminate
- Delete (
Default) - WipeOut
When terminationPolicy is DoNotTerminate, KubeDB takes advantage of ValidationWebhook feature in Kubernetes 1.9.0 or later clusters to provide safety from accidental deletion of database. If admission webhook is enabled, KubeDB prevents users from deleting the database as long as the spec.terminationPolicy is set to DoNotTerminate.
Following table show what KubeDB does when you delete Postgres crd for different termination policies,
| Behavior | DoNotTerminate | Delete | WipeOut |
|---|---|---|---|
| 1. Block Delete operation | ✓ | ✗ | ✗ |
| 2. Delete StatefulSet | ✗ | ✓ | ✓ |
| 3. Delete Services | ✗ | ✓ | ✓ |
| 4. Delete PVCs | ✗ | ✓ | ✓ |
| 5. Delete Secrets | ✗ | ✗ | ✓ |
Now that we’ve been introduced to the pgBouncer crd, let’s create it,
$ kubectl create -f https://github.com/kubedb/docs/raw/v2022.10.18/docs/examples/pgbouncer/quickstart/pgbouncer-server.yaml

pgbouncer.kubedb.com/pgbouncer-server created
Connect via PgBouncer
To connect via pgBouncer we have to expose its service to localhost.
$ kubectl port-forward -n demo svc/pgbouncer-server 5432

Forwarding from 127.0.0.1:5432 -> 5432
Forwarding from [::1]:5432 -> 5432
Now, let’s connect to postgres database via PgBouncer using psql.
$ env PGPASSWORD=ZFopeLnwkSf_f5Ys psql --host=localhost --port=5432 --username=postgres postgres
psql (14.1 (Ubuntu 14.1-2.pgdg20.04+1), server 13.2)
Type "help" for help.

postgres=# \q
If everything goes well, we’ll be connected to the postgres database and be able to execute commands. Let’s confirm if the company data we inserted in the postgres database before are available via PgBouncer:
$ env PGPASSWORD=ZFopeLnwkSf_f5Ys psql --host=localhost --port=5432 --username=postgres postgres --command='SELECT * FROM company ORDER BY name;'
  name  | employee
--------+----------
 Apple  |       10
 Google |       15
(2 rows)
Add New Connections to the Pool
We will add a new user and a new database to our PostgreSQL server quick-postgres and add this database to the existing pool and connect to this database using newly created user.
First lets create a new user myuser with password mypass
$ env PGPASSWORD=ZFopeLnwkSf_f5Ys psql --host=localhost --port=5432 --username=postgres postgres --command="create user myuser with encrypted password 'mypass'"
CREATE ROLE
And then create a new database mydb
$ env PGPASSWORD=ZFopeLnwkSf_f5Ys psql --host=localhost --port=5432 --username=postgres postgres --command="CREATE DATABASE mydb;"
CREATE DATABASE
And then grant privileges on database mydb to myuser
$ env PGPASSWORD=ZFopeLnwkSf_f5Ys psql --host=localhost --port=5432 --username=postgres postgres --command="grant all privileges on database mydb to myuser"
GRANT
Now we will need to edit our PgBouncer’s spec.databases to add this database to the connection pool.
The YAML file should now look like this:
apiVersion: kubedb.com/v1alpha2
kind: PgBouncer
metadata:
  name: pgbouncer-server
  namespace: demo
spec:
  version: "1.17.0"
  replicas: 1
  databases:
  - alias: "postgres"
    databaseName: "postgres"
    databaseRef:
      name: "quick-postgres"
      namespace: demo
  - alias: "tmpdb"
    databaseName: "mydb"
    databaseRef:
      name: "quick-postgres"
      namespace: demo
  connectionPool:
    maxClientConnections: 20
    reservePoolSize: 5
    adminUsers:
    - admin
    - admin1
  userListSecretRef:
    name: db-user-pass
  terminationPolicy: Delete
We have given our newly added database an alias tmpdb. We will now apply this modified file.
$ kubectl apply -f https://github.com/kubedb/docs/raw/v2022.10.18/docs/examples/pgbouncer/quickstart/pgbouncer-server-mod.yaml
pgbouncer.kubedb.com/pgbouncer-server configured
Let’s try to connect to mydb via PgBouncer.
$ env PGPASSWORD=mypass psql --host=localhost --port=5432 --username=myuser tmpdb
psql (14.1 (Ubuntu 14.1-2.pgdg20.04+1), server 13.2)
Type "help" for help.

tmpdb=>
We can now switch our connection between our existing databases postgres and mydb as well.
tmpdb=> \c postgres
psql (14.1 (Ubuntu 14.1-2.pgdg20.04+1), server 13.2)
You are now connected to database "postgres" as user "myuser".
postgres=> \c tmpdb
psql (14.1 (Ubuntu 14.1-2.pgdg20.04+1), server 13.2)
You are now connected to database "tmpdb" as user "myuser".
tmpdb=> \q
KubeDB operator watches for PgBouncer objects using Kubernetes api. When a PgBouncer object is created, KubeDB operator will create a new StatefulSet and a Service with the matching name. KubeDB operator will also create a governing service for StatefulSet with the name kubedb, if one is not already present.
KubeDB operator sets the status.phase to Running once the connection-pooling mechanism is ready.
$ kubectl get pb -n demo pgbouncer-server -o wide
NAME               VERSION   STATUS    AGE
pgbouncer-server   1.17.0    Ready     2h
Let’s describe PgBouncer object pgbouncer-server
$ kubectl dba describe pb -n demo pgbouncer-server
Name:         pgbouncer-server
Namespace:    demo
Labels:       <none>
Annotations:  <none>
API Version:  kubedb.com/v1alpha2
Kind:         PgBouncer
Metadata:
  Creation Timestamp:  2022-06-01T11:18:39Z
  Finalizers:
    kubedb.com
  Generation:  2
  Managed Fields:
    API Version:  kubedb.com/v1alpha2
    Fields Type:  FieldsV1
    fieldsV1:
      f:metadata:
        f:annotations:
          .:
          f:kubectl.kubernetes.io/last-applied-configuration:
      f:spec:
        .:
        f:connectionPool:
          .:
          f:adminUsers:
          f:maxClientConnections:
          f:reservePoolSize:
        f:databases:
        f:replicas:
        f:userListSecretRef:
          .:
          f:name:
        f:version:
    Manager:      kubectl-client-side-apply
    Operation:    Update
    Time:         2022-06-01T11:18:39Z
    API Version:  kubedb.com/v1alpha2
    Fields Type:  FieldsV1
    fieldsV1:
      f:metadata:
        f:finalizers:
          .:
          v:"kubedb.com":
      f:status:
        .:
        f:conditions:
        f:observedGeneration:
        f:phase:
    Manager:         kubedb-provisioner
    Operation:       Update
    Time:            2022-06-01T11:18:39Z
  Resource Version:  69045
  UID:               eba4cf43-a489-40fc-bf7c-04b27097dcd1
Spec:
  Connection Pool:
    Admin Users:
      admin
      admin1
    Auth Type:               md5
    Max Client Connections:  20
    Pool Mode:               session
    Port:                    5432
    Reserve Pool Size:       5
  Databases:
    Alias:          postgres
    Database Name:  postgres
    Database Ref:
      Name:         quick-postgres
      Namespace:    demo
    Alias:          tmpdb
    Database Name:  mydb
    Database Ref:
      Name:       quick-postgres
      Namespace:  demo
  Pod Template:
    Controller:
    Metadata:
    Spec:
      Resources:
        Limits:
          Memory:  1Gi
        Requests:
          Cpu:         500m
          Memory:      1Gi
  Replicas:            1
  Ssl Mode:            disable
  Termination Policy:  Delete
  User List Secret Ref:
    Name:   db-user-pass
  Version:  1.17.0
Status:
  Conditions:
    Last Transition Time:  2022-06-01T11:18:39Z
    Message:               The KubeDB operator has started the provisioning of PgBouncer: demo/pgbouncer-server
    Reason:                DatabaseProvisioningStartedSuccessfully
    Status:                True
    Type:                  ProvisioningStarted
    Last Transition Time:  2022-06-01T11:22:08Z
    Message:               All replicas are ready and in Running state
    Observed Generation:   2
    Reason:                AllReplicasReady
    Status:                True
    Type:                  ReplicaReady
    Last Transition Time:  2022-06-01T11:22:08Z
    Message:               The PgBouncer: demo/pgbouncer-server is accepting client requests.
    Observed Generation:   2
    Reason:                DatabaseAcceptingConnectionRequest
    Status:                True
    Type:                  AcceptingConnection
    Last Transition Time:  2022-06-01T11:22:08Z
    Message:               DB is ready because of server getting Online and Running state
    Observed Generation:   2
    Reason:                ReadinessCheckSucceeded
    Status:                True
    Type:                  Ready
    Last Transition Time:  2022-06-01T11:18:48Z
    Message:               The PgBouncer: demo/pgbouncer-server is successfully provisioned.
    Observed Generation:   1
    Reason:                DatabaseSuccessfullyProvisioned
    Status:                True
    Type:                  Provisioned
  Observed Generation:     1
  Phase:                   Ready
Events:
  Type    Reason      Age    From             Message
  ----    ------      ----   ----             -------
  Normal  Successful  6m26s  KubeDB Operator  Successfully created governing service
  Normal  Successful  6m26s  KubeDB Operator  Successfully created Service
  Normal  Successful  6m26s  KubeDB Operator  Successfully created PgBouncer
  Normal  Successful  6m26s  KubeDB Operator  Successfully created appbinding
  Normal  Successful  3m6s   KubeDB Operator  Successfully patched appbinding
KubeDB has created a service for the PgBouncer object.
$ kubectl get service -n demo --selector=app.kubernetes.io/name=pgbouncers.kubedb.com,app.kubernetes.io/instance=pgbouncer-server
NAME                    TYPE        CLUSTER-IP      EXTERNAL-IP   PORT(S)    AGE
pgbouncer-server        ClusterIP   10.96.136.130   <none>        5432/TCP   7m48s
pgbouncer-server-pods   ClusterIP   None            <none>        5432/TCP   7m48s
Here, Service pgbouncer-server targets random pods to carry out connection-pooling.
Cleaning up
To cleanup the Kubernetes resources created by this tutorial, run:
$ kubectl delete -n demo pg/quick-postgres
postgres.kubedb.com "quick-postgres" deleted

$ kubectl delete -n demo pb/pgbouncer-server
pgbouncer.kubedb.com "pgbouncer-server" deleted

$ kubectl delete secret -n demo db-user-pass
secret "db-user-pass" deleted

$ kubectl delete ns demo
namespace "demo" deleted
Next Steps
- Learn about custom PgBouncerVersions.
- Monitor your PgBouncer with KubeDB using built-in Prometheus.
- Monitor your PgBouncer with KubeDB using Prometheus operator.
- Detail concepts of PgBouncer object.
- Use private Docker registry to deploy PgBouncer with KubeDB.
- Want to hack on KubeDB? Check our contribution guidelines.