


You are looking at the documentation of a prior release. To read the documentation of the latest release, please
visit here.
New to KubeDB? Please start here.
Kafka Migration Guide
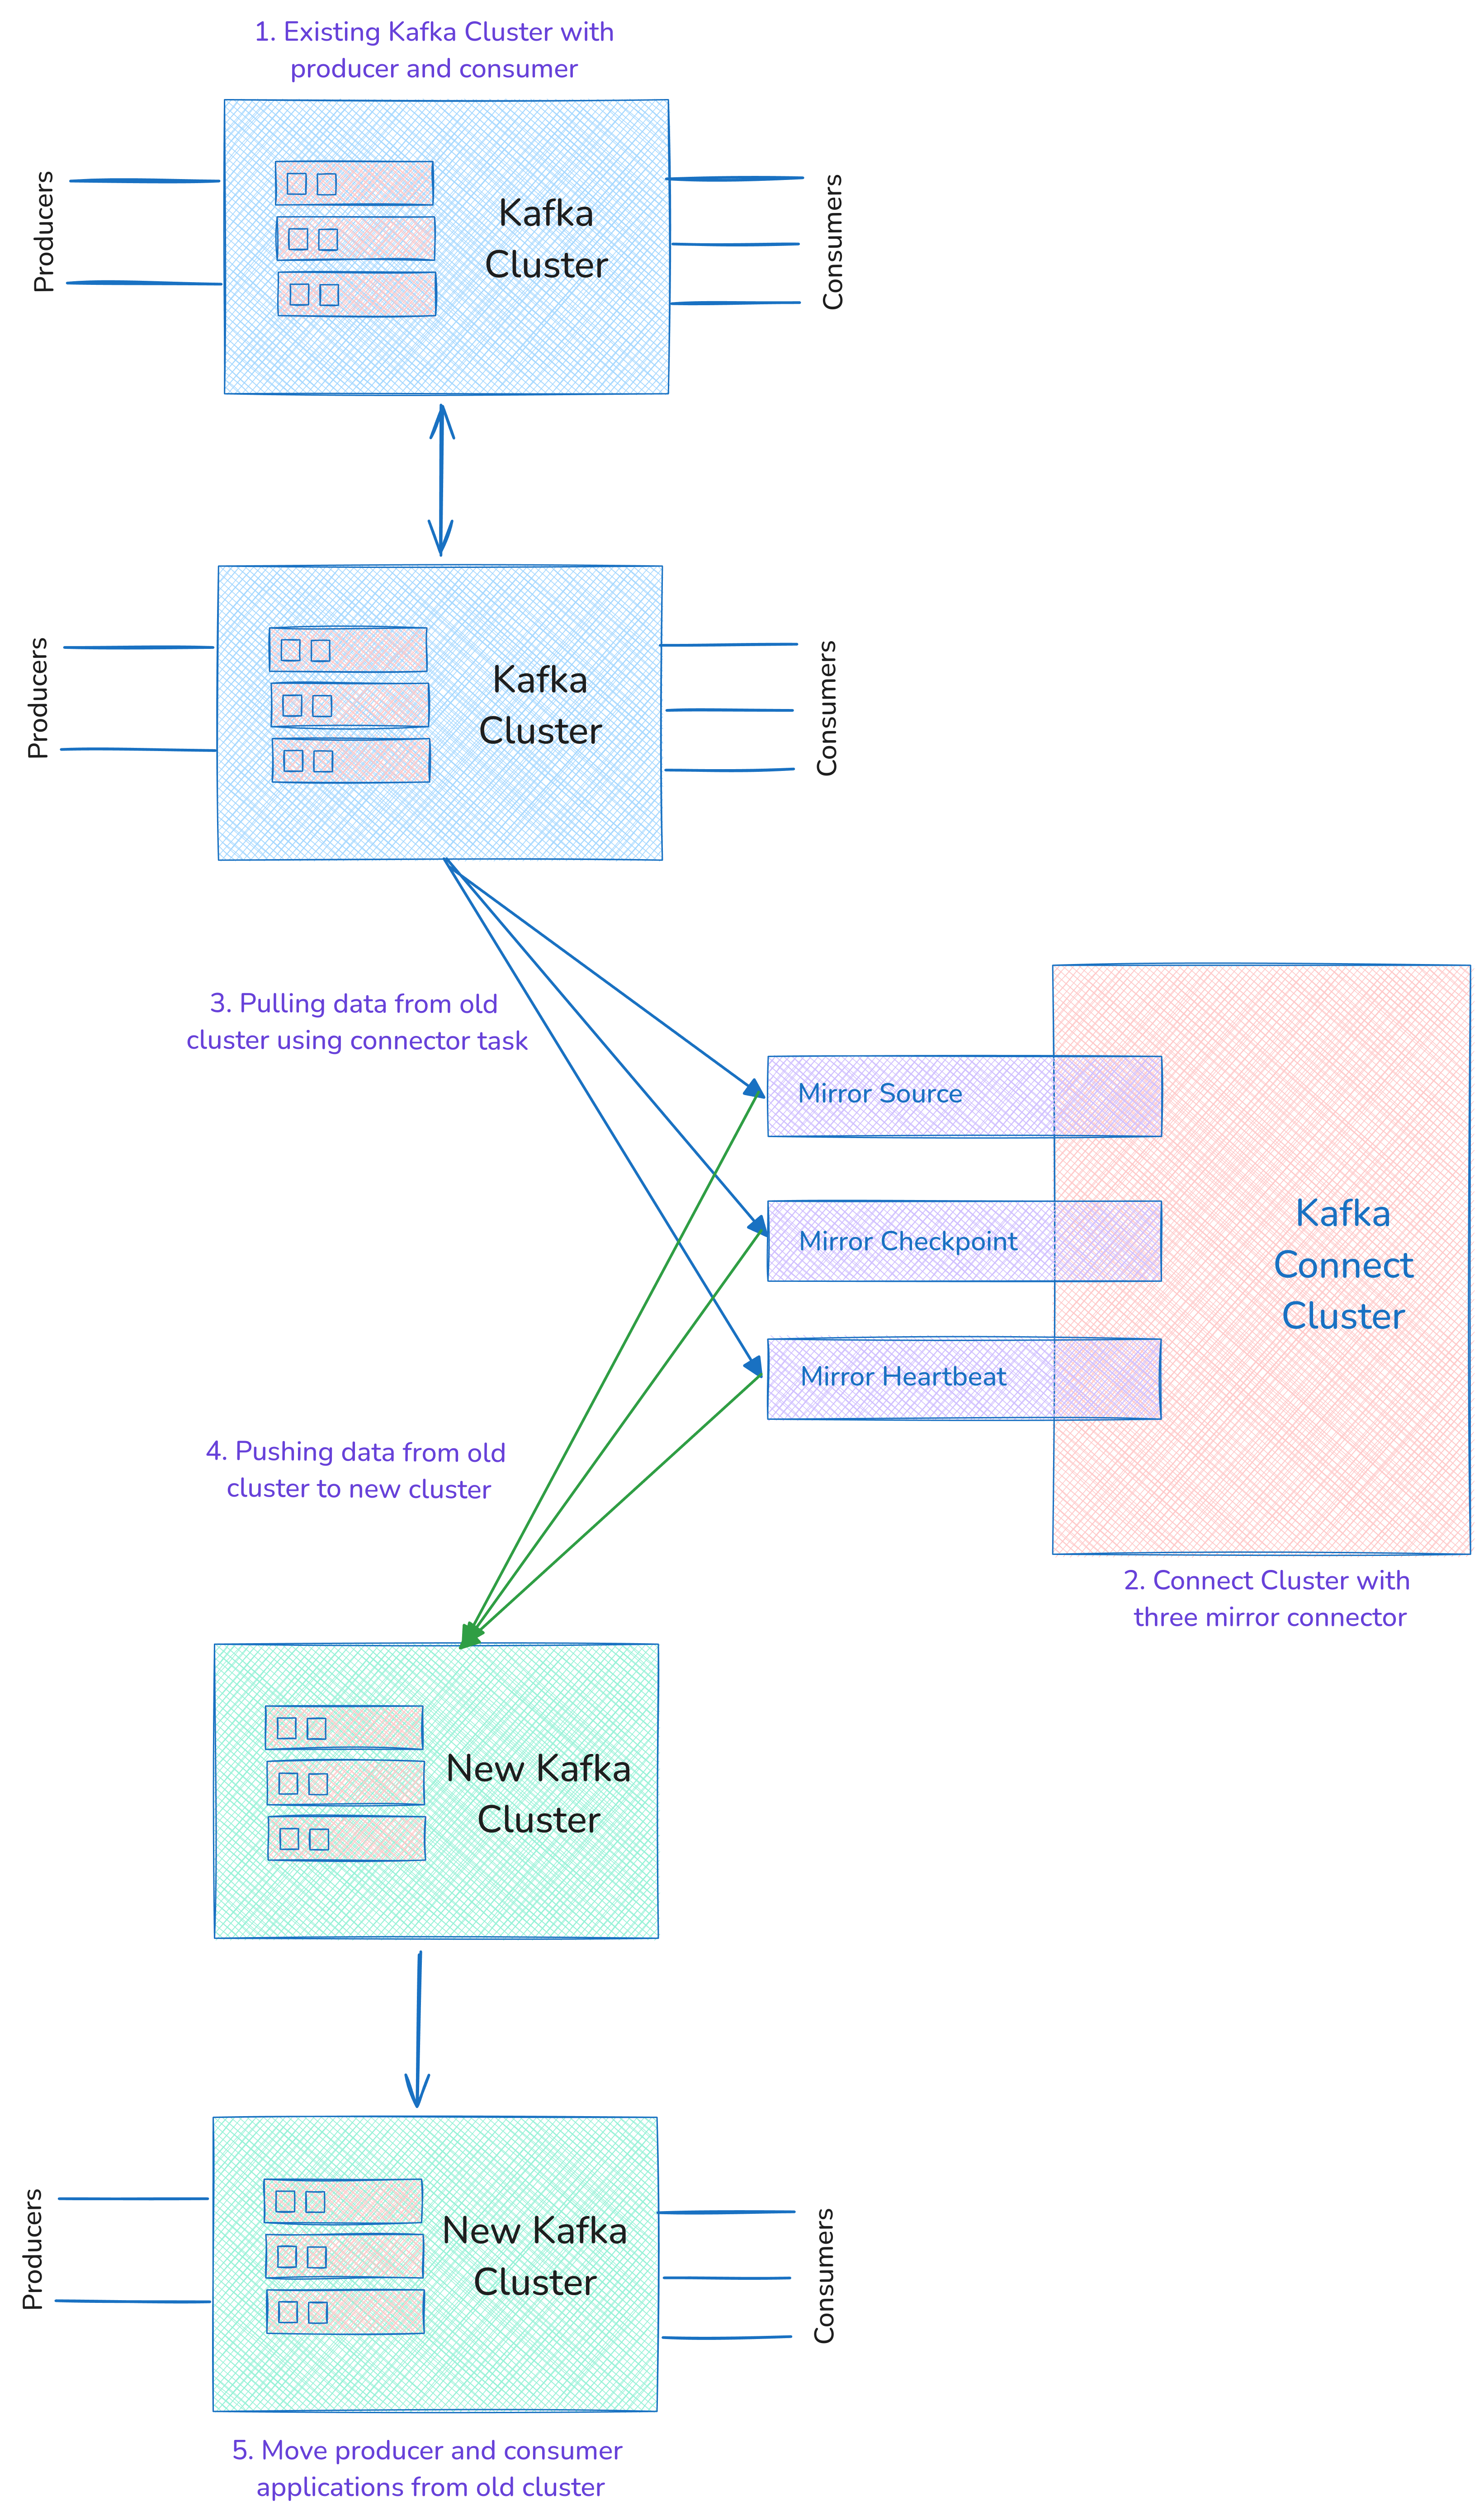
Suppose you are running kafka cluster on-prem or on any other cloud provider and want to migrate to KubeDB. This guide will help you to migrate your existing Kafka cluster to KubeDB Kafka. Also, you can migrate your KubeDB Kafka cluster to another KubeDB Kafka cluster.
Before You Begin
At first, you need to have a Kubernetes cluster, and the
kubectlcommand-line tool must be configured to communicate with your cluster.Install
KubeDBProvisioner and Ops-manager operator in your cluster following the steps here.Install Prometheus from here
You should be familiar with the following
KubeDBconcepts:
To keep everything isolated, we are going to use a separate namespace called demo throughout this tutorial.
$ kubectl create ns demo
namespace/demo created
Note: YAML files used in this tutorial are stored in docs/examples/kafka directory of kubedb/docs repository.
Prepare Pre-migration Plan
Migration of Kafka cluster is always a challenging task. Kafka is a distributed messaging system, and it is essential to plan the migration properly to avoid any data loss or downtime. Here are some steps you should consider before starting the migration:
Evaluate Existing Kafka Cluster: Evaluate the existing Kafka cluster and its dependencies like number of brokers, topics, partitions, and consumer groups.
Data Volume: Evaluate the existing Kafka cluster’s data volume and its growth rate.
Network Connectivity: Validate network connectivity between the existing Kafka cluster and the new Kafka cluster.
Evaluate Application Workload: Understand producer and consumer throughput, latency requirements, and compatibility with the existing Kafka cluster.
Evaluate what to Migrate: List down the following things that need to be migrated,
- Kafka topics
- Consumer groups
- ACLs
Migration Steps
We are using KubeDB Kafka for both source and target Kafka clusters. We are going to migrate the data from the source Kafka cluster to the target Kafka cluster. You can follow the following steps to migrate your kafka cluster to KubeDB.
Step 1: Create Source Kafka Cluster
Note: If you already have a source Kafka cluster, you can skip this step.
At first, we need to create a source Kafka cluster. We are going to use the following YAML file to create a Kafka cluster in the demo namespace.
Before creating the Kafka cluster, we need to create a secret with the source Kafka cluster’s authentication information.
apiVersion: v1
kind: Secret
metadata:
  name: source-kafka-auth
  namespace: demo
stringData:
    password: source-pass
    username: admin
Create the secret using the following command:
$ kubectl create -f https://github.com/kubedb/docs/raw/v2025.1.9/docs/examples/kafka/migration/source-kafka-auth.yaml
secret/source-kafka-auth created
apiVersion: kubedb.com/v1
kind: Kafka
metadata:
  name: source-kafka
  namespace: demo
spec:
  authSecret:
    name: source-kafka-auth
  replicas: 2
  version: 3.9.0
  storage:
    accessModes:
      - ReadWriteOnce
    resources:
      requests:
        storage: 1Gi
    storageClassName: standard
  storageType: Durable
  deletionPolicy: WipeOut
Create the Kafka cluster using the following command:
$ kubectl create -f https://github.com/kubedb/docs/raw/v2025.1.9/docs/examples/kafka/migration/source-kafka.yaml
kafka.kubedb.com/source-kafka created
Now, wait until source-kafka has status Ready. i.e,
$ kubectl get kafka -n demo -w
NAME           VERSION   STATUS         AGE
source-kafka   3.9.0     Provisioning   1s
source-kafka   3.9.0     Provisioning   111s
.
.
source-kafka   3.9.0     Ready          2m
Step 2: Create Producer and Consumer
Note: If you already have a producer and consumer application, you can skip this step.
Now, create a producer and consumer for testing purposes.
Exec into one of the broker pods:
Terminal 1:
$ kubectl exec -it source-kafka-0 -n demo -- /bin/bash
kafka@source-kafka-0:~$ kafka-topics.sh --create --topic foo --partitions 3 --replication-factor 2 --bootstrap-server localhost:9092 --command-config config/clientauth.properties
Created topic foo.
kafka@source-kafka-0:~$ kafka-console-producer.sh --topic foo --bootstrap-server localhost:9092 --producer.config config/clientauth.properties
> Hello, World!
> Welcome to KubeDB Kafka!
> Starting Migration
Now, create another terminal and exec into one of the broker pods to consume the messages:
Terminal 2:
$ kubectl exec -it source-kafka-0 -n demo -- /bin/bash
kafka@source-kafka-0:~$ kafka-console-consumer.sh --topic foo --group foo-consumer --from-beginning --bootstrap-server localhost:9092 --consumer.config config/clientauth.properties
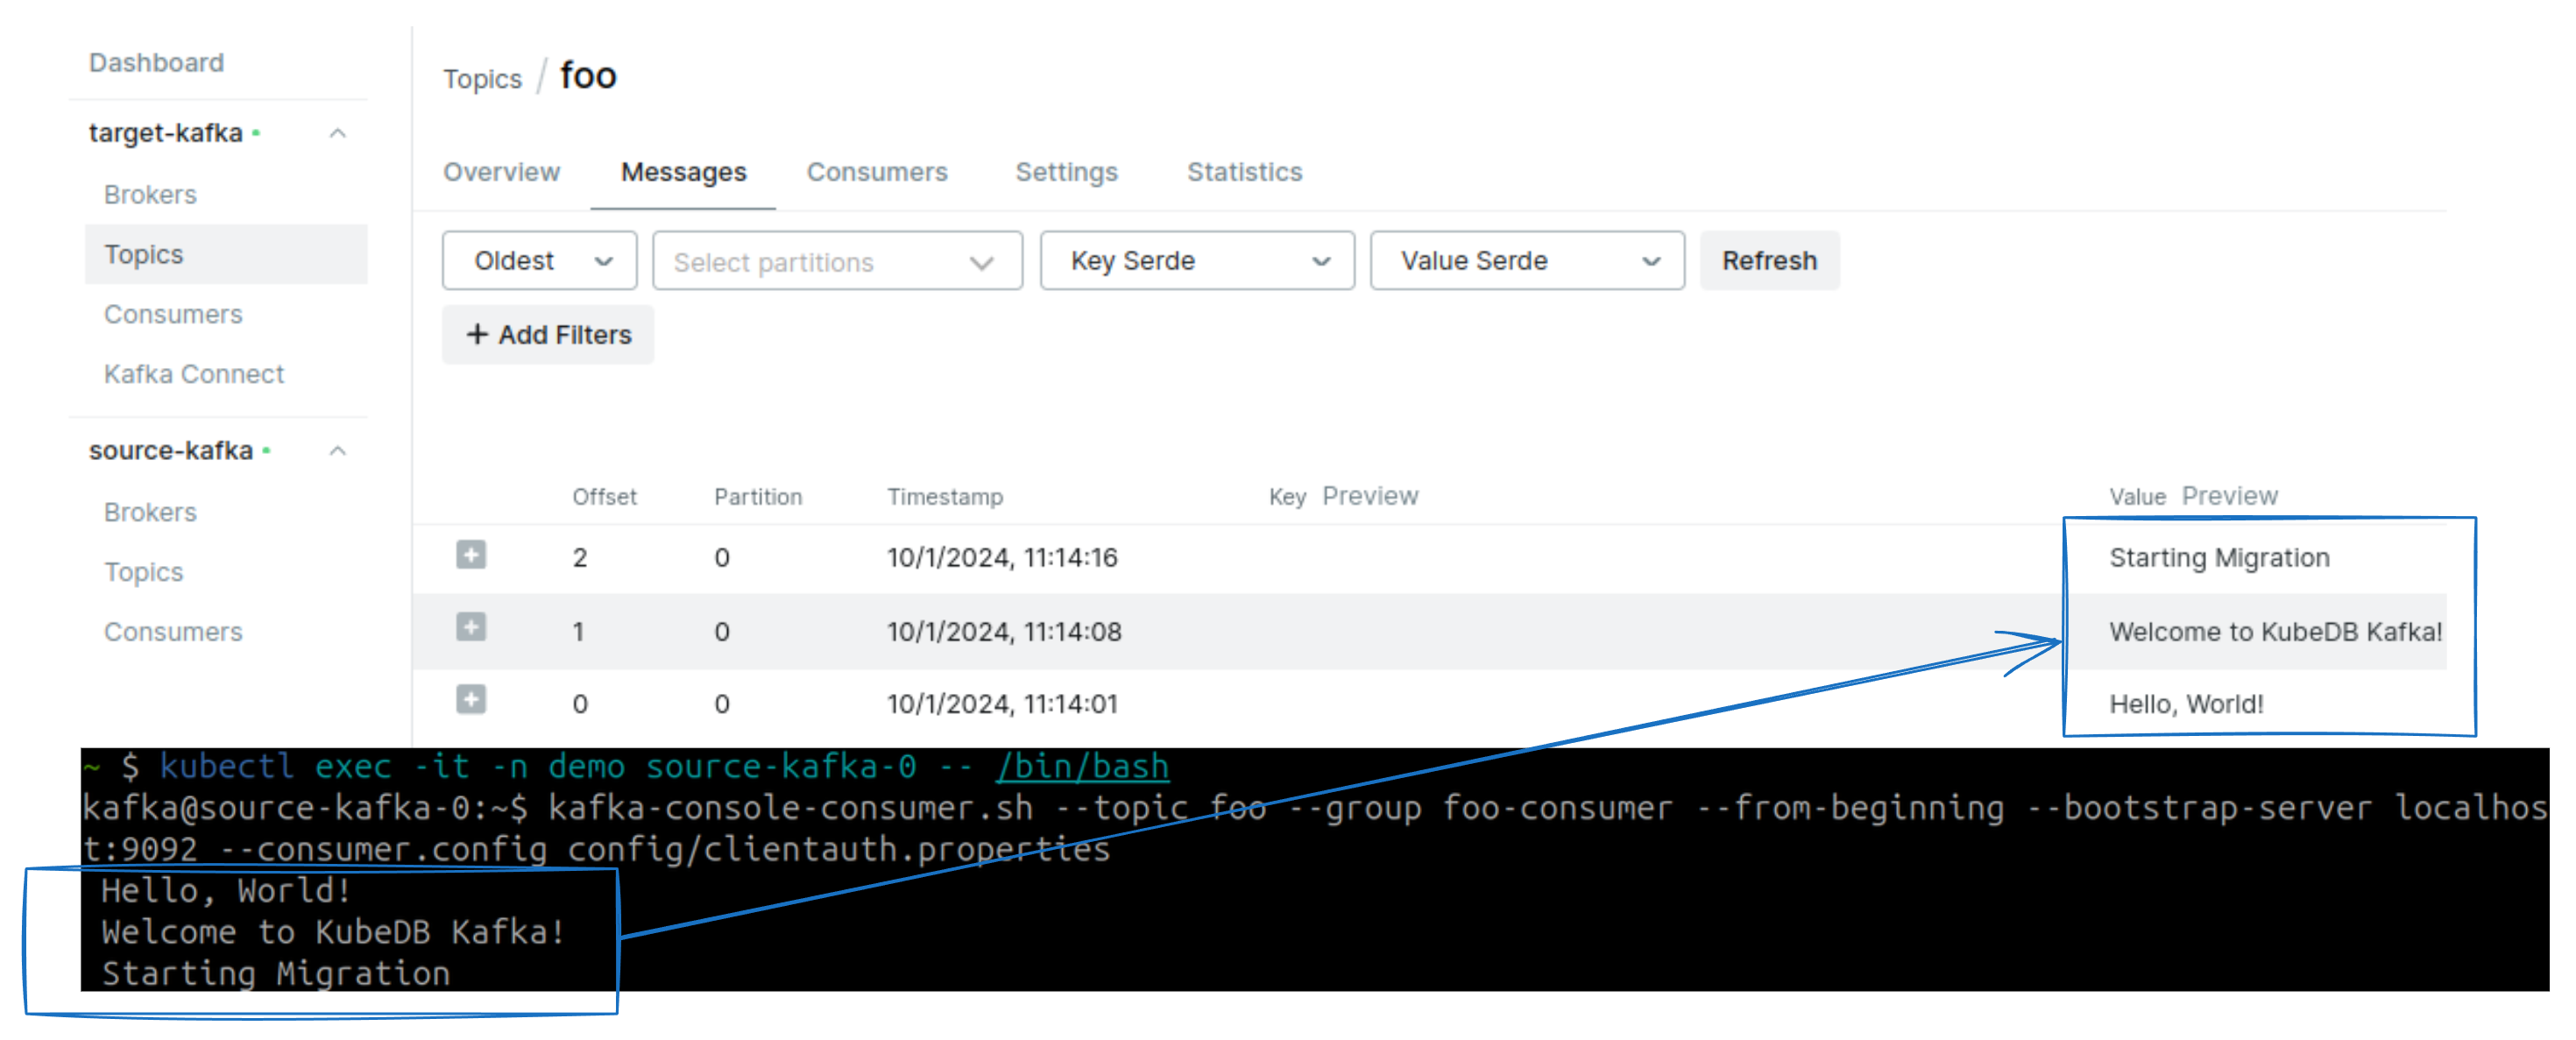
Hello, World!
Welcome to KubeDB Kafka!
Starting Migration
Don’t close the Terminal 2. This terminal acts like a consumer application for the source Kafka cluster.
Terminal 1:
Cancel the producer by pressing Ctrl+C. Now, create another topic bar.
kafka@source-kafka-0:~$ kafka-topics.sh --create --topic bar --partitions 3 --replication-factor 2 --bootstrap-server localhost:9092 --command-config config/clientauth.properties
Created topic bar.
Now, produce messages to the bar topic. To produce messages, run the following script:
while true; do
  TIMESTAMP=$(date +%s)
  RANDOM_VALUE=$(shuf -i 1-100 -n 1)
  JSON_MESSAGE="{\"timestamp\": $TIMESTAMP, \"value\": $RANDOM_VALUE}"

  echo "$JSON_MESSAGE" | kafka-console-producer.sh --bootstrap-server localhost:9092 --topic bar --producer.config config/clientauth.properties
  echo "Produced: $JSON_MESSAGE"
done
This script will produce messages to the bar topic with some interval.
kafka@kafka-prod-broker-0:~$ while true; do
  TIMESTAMP=$(date +%s)
  RANDOM_VALUE=$(shuf -i 1-100 -n 1)
  JSON_MESSAGE="{\"timestamp\": $TIMESTAMP, \"value\": $RANDOM_VALUE}"

  echo "$JSON_MESSAGE" | kafka-console-producer.sh --bootstrap-server localhost:9092 --topic bar --producer.config config/clientauth.properties
  echo "Produced: $JSON_MESSAGE"
done
Produced: {"timestamp": 1727759813, "value": 84}
Produced: {"timestamp": 1727759815, "value": 42}
Produced: {"timestamp": 1727759816, "value": 52}
Produced: {"timestamp": 1727759818, "value": 43}
Produced: {"timestamp": 1727759819, "value": 35}
Produced: {"timestamp": 1727759821, "value": 31}
Produced: {"timestamp": 1727759822, "value": 15}
Produced: {"timestamp": 1727759824, "value": 43}
Produced: {"timestamp": 1727759825, "value": 41}
Produced: {"timestamp": 1727759827, "value": 22}
Produced: {"timestamp": 1727759828, "value": 9}
.
.
Create another terminal and exec into one of the broker pods to consume the messages:
Terminal 3:
$ kubectl exec -it source-kafka-0 -n demo -- /bin/bash
kafka@source-kafka-0:~$ kafka-console-consumer.sh --topic bar --group bar-consumer --from-beginning --bootstrap-server localhost:9092 --consumer.config config/clientauth.properties
{"timestamp": 1727759815, "value": 42}
{"timestamp": 1727759818, "value": 43}
{"timestamp": 1727759819, "value": 35}
{"timestamp": 1727759824, "value": 43}
{"timestamp": 1727759827, "value": 22}
{"timestamp": 1727759830, "value": 66}
{"timestamp": 1727759842, "value": 76}
{"timestamp": 1727759852, "value": 77}
{"timestamp": 1727759853, "value": 78}
{"timestamp": 1727759821, "value": 31}
{"timestamp": 1727759825, "value": 41}
{"timestamp": 1727759835, "value": 72}
{"timestamp": 1727759841, "value": 43}
{"timestamp": 1727759844, "value": 48}
{"timestamp": 1727759845, "value": 44}
{"timestamp": 1727759858, "value": 14}
.
.
So, we have one producer and two consumers running in the source Kafka cluster.
Note: You can use SDKs to create producer and consumer applications for better scenarios.
Step 3: Create Target Kafka Cluster and ConnectCluster
Now, we are going to create a target Kafka cluster with monitoring enabled. We are going to use the following YAML file to create a Kafka cluster in the demo namespace.
Before creating the target Kafka cluster, we need to create a secret with the target Kafka cluster’s authentication information.
apiVersion: v1
kind: Secret
metadata:
  name: target-kafka-auth
  namespace: demo
stringData:
    password: target-pass
    username: admin
Create the secret using the following command:
$ kubectl create -f https://github.com/kubedb/docs/raw/v2025.1.9/docs/examples/kafka/migration/target-kafka-auth.yaml
secret/target-kafka-auth created
apiVersion: kubedb.com/v1
kind: Kafka
metadata:
  name: target-kafka
  namespace: demo
spec:
  authSecret:
    name: target-kafka-auth
  version: 3.9.0
  topology:
    broker:
      replicas: 2
      storage:
        accessModes:
          - ReadWriteOnce
        resources:
          requests:
            storage: 1Gi
        storageClassName: standard
    controller:
      replicas: 2
      storage:
        accessModes:
          - ReadWriteOnce
        resources:
          requests:
            storage: 1Gi
        storageClassName: standard
  monitor:
   agent: prometheus.io/operator
   prometheus:
     exporter:
       port: 56790
     serviceMonitor:
       labels:
         release: prometheus
       interval: 10s
  storageType: Durable
  deletionPolicy: WipeOut
Create the Kafka cluster using the following command:
$ kubectl create -f https://github.com/kubedb/docs/raw/v2025.1.9/docs/examples/kafka/migration/target-kafka.yaml
kafka.kubedb.com/target-kafka created
Now, wait until source-kafka has status Ready. i.e,
$ kubectl get kafka -n demo target-kafka -w
NAME           VERSION   STATUS         AGE
target-kafka   3.9.0     Provisioning   1s
target-kafka   3.9.0     Provisioning   111s
.
.
target-kafka   3.9.0     Ready          2m
Now, create a ConnectCluster with monitoring enabled to migrate from the source Kafka cluster to the target Kafka cluster using mirror-maker-2.
Before creating the Connect cluster, we need to create a secret with the connect cluster’s authentication information.
apiVersion: v1
kind: Secret
metadata:
  name: mirror-connect-auth
  namespace: demo
stringData:
    password: mirror-pass
    username: connect
Create the secret using the following command:
$ kubectl create -f https://github.com/kubedb/docs/raw/v2025.1.9/docs/examples/kafka/migration/mirror-connect-auth.yaml
secret/mirror-connect-auth created
apiVersion: kafka.kubedb.com/v1alpha1
kind: ConnectCluster
metadata:
  name: mirror-connect
  namespace: demo
spec:
  authSecret:
    name: mirror-connect-auth
  version: 3.9.0
  replicas: 3
  kafkaRef:
    name: target-kafka
    namespace: demo
  monitor:
   agent: prometheus.io/operator
   prometheus:
     exporter:
       port: 56790
     serviceMonitor:
       labels:
         release: prometheus
       interval: 10s
  deletionPolicy: WipeOut
Create the ConnectCluster using the following command:
$ kubectl create -f https://github.com/kubedb/docs/raw/v2025.1.9/docs/examples/kafka/migration/mirror-connect.yaml
connectcluster.kafka.kubedb.com/mirror-connect created
Now, wait until mirror-connect has status Ready. i.e,
$ kubectl get connectcluster -n demo -w
NAME                VERSION   STATUS         AGE
mirror-connect      3.9.0     Provisioning   1s
mirror-connect      3.9.0     Provisioning   111s
.
.
mirror-connect      3.9.0     Ready          90s
Step 4: Create MirrorSource Connector
Now, we are going to create a MirrorSource connector to replicate data from the source Kafka cluster to the target Kafka cluster.
apiVersion: v1
kind: Secret
metadata:
  name: mirror-source-config
  namespace: demo
stringData:
  config.properties: |
    tasks.max=2
    connector.class=org.apache.kafka.connect.mirror.MirrorSourceConnector
    source.cluster.alias=source
    source.cluster.bootstrap.servers=source-kafka-pods.demo.svc:9092
    source.cluster.security.protocol=SASL_PLAINTEXT
    source.cluster.sasl.mechanism=PLAIN
    source.cluster.sasl.jaas.config=org.apache.kafka.common.security.plain.PlainLoginModule required username="admin" password="source-pass";
    target.cluster.alias=target
    target.cluster.bootstrap.servers=target-kafka-pods.demo.svc:9092
    target.cluster.security.protocol=SASL_PLAINTEXT
    target.cluster.sasl.mechanism=PLAIN
    target.cluster.sasl.jaas.config=org.apache.kafka.common.security.plain.PlainLoginModule required username="admin" password="target-pass";
    offset.lag.max=100
    replication.factor=-1
    sync.topic.acls.enabled=false
    sync.topic.configs.enabled=true
    offset-syncs.topic.replication.factor=-1
    key.converter=org.apache.kafka.connect.converters.ByteArrayConverter
    value.converter=org.apache.kafka.connect.converters.ByteArrayConverter
    replication.policy.class=org.apache.kafka.connect.mirror.IdentityReplicationPolicy
    topics.exclude=.*[\-\.]internal,.*\.replica,__consumer_offsets,_internal_connectors.*,_schemas,kafka-health
---
apiVersion: kafka.kubedb.com/v1alpha1
kind: Connector
metadata:
  name: mirror-source-connector
  namespace: demo
spec:
  connectClusterRef:
    name: mirror-connect
    namespace: demo
  configSecret:
    name: mirror-source-config
  deletionPolicy: WipeOut
here,
- Properties with prefix
source.clusterare the source Kafka cluster’s authentication information. - Properties with prefix
target.clusterare the target Kafka cluster’s authentication information. replication.policy.class=org.apache.kafka.connect.mirror.IdentityReplicationPolicyis used to replicate topics exactly the same name as the source cluster.topics.excludeis used to exclude internal topics from replication.offset.lag.max=100is used to set the maximum allowable (out-of-sync) offset lag before a remote partition is synchronized.replication.factor=-1is used to set default replication factor for new topics in the target cluster.sync.topic.acls.enabled=falseis used to disable synchronization of ACLs from the source cluster.sync.topic.configs.enabled=trueis used to enable synchronization of topic configuration from the source cluster.
Create the MirrorSource connector using the following command:
$ kubectl create -f https://github.com/kubedb/docs/raw/v2025.1.9/docs/examples/kafka/migration/mirror-source.yaml
secret/mirror-source-config created
connector.kafka.kubedb.com/mirror-source-connector created
Step 5: Create MirrorCheckpoint
Create a MirrorCheckpoint connector to replicate the checkpoint data(consumer group offset) from the source Kafka cluster to the target Kafka cluster.
apiVersion: v1
kind: Secret
metadata:
  name: mirror-checkpoint-config
  namespace: demo
stringData:
  config.properties: |
    connector.class=org.apache.kafka.connect.mirror.MirrorCheckpointConnector
    source.cluster.alias=source
    source.cluster.bootstrap.servers=source-kafka-pods.demo.svc:9092
    source.cluster.security.protocol=SASL_PLAINTEXT
    source.cluster.sasl.mechanism=PLAIN
    source.cluster.sasl.jaas.config=org.apache.kafka.common.security.plain.PlainLoginModule required username="admin" password="source-pass";
    target.cluster.alias=target
    target.cluster.bootstrap.servers=target-kafka-pods.demo.svc:9092
    target.cluster.security.protocol=SASL_PLAINTEXT
    target.cluster.sasl.mechanism=PLAIN
    target.cluster.sasl.jaas.config=org.apache.kafka.common.security.plain.PlainLoginModule required username="admin" password="target-pass";
    sync.group.offsets.enabled=true
    refresh.groups.interval.seconds=10
    emit.checkpoints.interval.seconds=10
    sync.group.offsets.interval.seconds=10
    checkpoints.topic.replication.factor=-1
    key.converter=org.apache.kafka.connect.converters.ByteArrayConverter
    value.converter=org.apache.kafka.connect.converters.ByteArrayConverter
    replication.policy.class=org.apache.kafka.connect.mirror.IdentityReplicationPolicy
---
apiVersion: kafka.kubedb.com/v1alpha1
kind: Connector
metadata:
  name: mirror-checkpoint-connector
  namespace: demo
spec:
  connectClusterRef:
    name: mirror-connect
    namespace: demo
  configSecret:
    name: mirror-checkpoint-config
  deletionPolicy: WipeOut
here,
- Properties with prefix
source.clusterare the source Kafka cluster’s authentication information. - Properties with prefix
target.clusterare the target Kafka cluster’s authentication information. sync.group.offsets.enabled=trueis used to enable synchronization of consumer group offsets to the target cluster__consumer_offsetstopic.refresh.groups.interval.seconds=10is used to set the frequency of consumer group refresh.emit.checkpoints.interval.seconds=10is used to set the frequency of consumer offset translation.sync.group.offsets.interval.seconds=10is used to set the frequency of consumer group offset synchronization.
Create the MirrorCheckpoint connector using the following command:
$ kubectl create -f https://github.com/kubedb/docs/raw/v2025.1.9/docs/examples/kafka/migration/mirror-checkpoint.yaml
secret/mirror-checkpoint-config created
connector.kafka.kubedb.com/mirror-checkpoint-connector created
Step 6: Create MirrorHeartbeat
Create a MirrorHeartbeat connector. Heartbeat Connector enables the monitoring of the health of a MirrorMaker 2 instance.
apiVersion: v1
kind: Secret
metadata:
  name: mirror-heartbeat-config
  namespace: demo
stringData:
  config.properties: |
    connector.class=org.apache.kafka.connect.mirror.MirrorHeartbeatConnector
    source.cluster.alias=source
    source.cluster.bootstrap.servers=source-kafka-pods.demo.svc:9092
    source.cluster.security.protocol=SASL_PLAINTEXT
    source.cluster.sasl.mechanism=PLAIN
    source.cluster.sasl.jaas.config=org.apache.kafka.common.security.plain.PlainLoginModule required username="admin" password="source-pass";
    target.cluster.alias=target
    target.cluster.bootstrap.servers=target-kafka-pods.demo.svc:9092
    target.cluster.security.protocol=SASL_PLAINTEXT
    target.cluster.sasl.mechanism=PLAIN
    target.cluster.sasl.jaas.config=org.apache.kafka.common.security.plain.PlainLoginModule required username="admin" password="target-pass";
    heartbeats.topic.replication.factor=-1
    key.converter=org.apache.kafka.connect.converters.ByteArrayConverter
    value.converter=org.apache.kafka.connect.converters.ByteArrayConverter
---
apiVersion: kafka.kubedb.com/v1alpha1
kind: Connector
metadata:
  name: mirror-heartbeat-connector
  namespace: demo
spec:
  connectClusterRef:
    name: mirror-connect
    namespace: demo
  configSecret:
    name: mirror-heartbeat-config
  deletionPolicy: WipeOut
here,
- Properties with prefix
source.clusterare the source Kafka cluster’s authentication information. - Properties with prefix
target.clusterare the target Kafka cluster’s authentication information.
$ kubectl create -f https://github.com/kubedb/docs/raw/v2025.1.9/docs/examples/kafka/migration/mirror-heartbeat.yaml
secret/mirror-hearbeat-config created
connector.kafka.kubedb.com/mirror-hearbeat-connector created
Check the status of the connectors:
kubectl get connector -n demo
NAME                                TYPE                        CONNECTCLUSTER    STATUS    AGE
mirror-checkpoint-heartbeat         kafka.kubedb.com/v1alpha1   mirror-connect    Running   20s
mirror-heartbeat-connector          kafka.kubedb.com/v1alpha1   mirror-connect    Running   20s
mirror-source-connector             kafka.kubedb.com/v1alpha1   mirror-connect    Running   20s
Configuration tables for MirrorSource, MirrorCheckpoint, and MirrorHeartbeat
| Property | Description | Default | sourceConnector | checkpointConnector | heartbeatConnector |
|---|---|---|---|---|---|
| admin.timeout.ms | Timeout for admin tasks, such as detecting new topics. | 60000 (1 minute) | ✓ | ✓ | ✓ |
| replication.policy.class | Policy to define the remote topic naming convention. | org.apache.kafka.connect.mirror.DefaultReplicationPolicy | ✓ | ✓ | ✓ |
| consumer.poll.timeout.ms | Timeout when polling the source cluster. | 1000 (1 second). | ✓ | ✓ | ✓ |
| offset-syncs.topic.location | The location of the offset-syncs topic, which can be the source or target cluster. | source | ✓ | ✓ | |
| topic.filter.class | Topic filter to select the topics to replicate. | org.apache.kafka.connect.mirror.DefaultTopicFilter | ✓ | ✓ | |
| config.property.filter.class | Topic filter to select the topic configuration properties to replicate. | ✓ | ✓ | ||
| config.properties.exclude | Topic configuration properties that should not be replicated.(comma separated and regular exp) | ✓ | |||
| offset.lag.max | Maximum allowable (out-of-sync) offset lag before a remote partition is synchronized. | 100 | ✓ | ||
| offset-syncs.topic.replication.factor | Replication factor for the internal offset-syncs topic. | 3 | ✓ | ||
| refresh.topics.enabled | Enables check for new topics and partitions. | true | ✓ | ||
| refresh.topics.interval.seconds | Frequency of topic refresh. | 600 (10 minute) | ✓ | ||
| replication.factor | The replication factor for new topics. | 2 | ✓ | ||
| sync.topic.acls.enabled | Enables synchronization of ACLs from the source cluster. | true | ✓ | ||
| sync.topic.acls.interval.seconds | Frequency of ACL synchronization. | 600 (10 minute) | ✓ | ||
| sync.topic.configs.enabled | Enables synchronization of topic configuration from the source cluster. | true | ✓ | ||
| sync.topic.configs.interval.seconds | Frequency of topic configuration synchronization. | 600 (10 minute) | ✓ | ||
| checkpoints.topic.replication.factor | Replication factor for the internal checkpoints topic. | 3 | ✓ | ||
| emit.checkpoints.enabled | Enables synchronization of consumer offsets to the target cluster. | true | ✓ | ||
| emit.checkpoints.interval.seconds | Frequency of consumer offset synchronization. | 600 (10 minute) | ✓ | ||
| group.filter.class | Group filter to select the consumer groups to replicate. | org.apache.kafka.connect.mirror.DefaultGroupFilter | ✓ | ||
| refresh.groups.enabled | Enables check for new consumer groups. | true | ✓ | ||
| refresh.groups.interval.seconds | Frequency of consumer group refresh. | 600 (10 minute) | ✓ | ||
| sync.group.offsets.enabled | Enables synchronization of consumer group offsets to the target cluster __consumer_offsets topic. | false | ✓ | ||
| sync.group.offsets.interval.seconds | Frequency of consumer group offset synchronization. | 60 (1 minute) | ✓ | ||
| emit.heartbeats.enabled | Enables connectivity checks on the target cluster. | true | ✓ | ||
| emit.heartbeats.interval.seconds | Frequency of connectivity checks. | 1 | ✓ | ||
| heartbeats.topic.replication.factor | Replication factor for the internal heartbeats topic. | 3 | ✓ |
Additional Steps: Install Kafbat(Kafka-UI) to view the status of the migration
To install kafka-ui create a values.yaml file with the following content:
yamlApplicationConfig:
  kafka:
    clusters:
      - name: target-kafka
        bootstrapServers: "target-kafka-pods.demo.svc.cluster.local:9092"
        properties:
          sasl.mechanism: PLAIN
          security.protocol: SASL_PLAINTEXT
          sasl.jaas.config: org.apache.kafka.common.security.plain.PlainLoginModule required username="admin" password="target-pass";
        kafkaConnect:
          - name: mirror-connect
            address: http://mirror-connect.demo.svc.cluster.local:8083
            username: connect
            password: mirror-pass
      - name: source-kafka
        bootstrapServers: "source-kafka-pods.demo.svc.cluster.local:9092"
        properties:
          sasl.mechanism: PLAIN
          security.protocol: SASL_PLAINTEXT
          sasl.jaas.config: org.apache.kafka.common.security.plain.PlainLoginModule required username="admin" password="source-pass";
Now, install Kafbat using the following command:
$ helm repo add kafbat-ui https://kafbat.github.io/helm-charts
$ helm install kafbat-ui kafbat-ui/kafka-ui -n demo -f values.yaml
Now, port-forward the Kafbat service to access the UI:
$ kubectl port-forward svc/kafbat-ui-kafka-ui 8080:80 -n demo
Forwarding from 127.0.0.1:8080 -> 8080
Forwarding from [::1]:8080 -> 8080
Now, open your browser and navigate to http://localhost:8080 to view the Kafbat UI.
Step 7: Monitor Migration
List connector from the UI. You will see the following connectors are running:
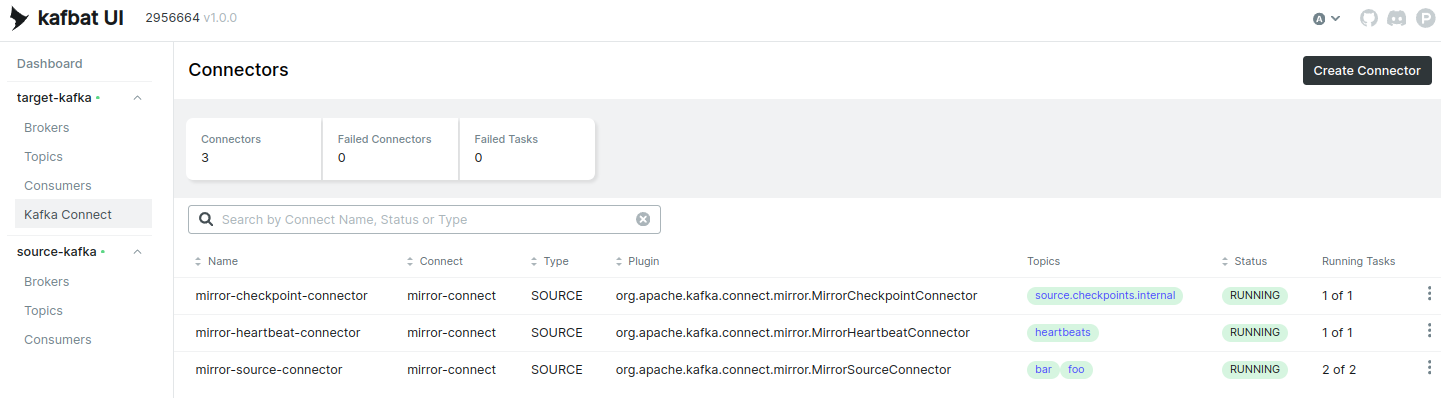
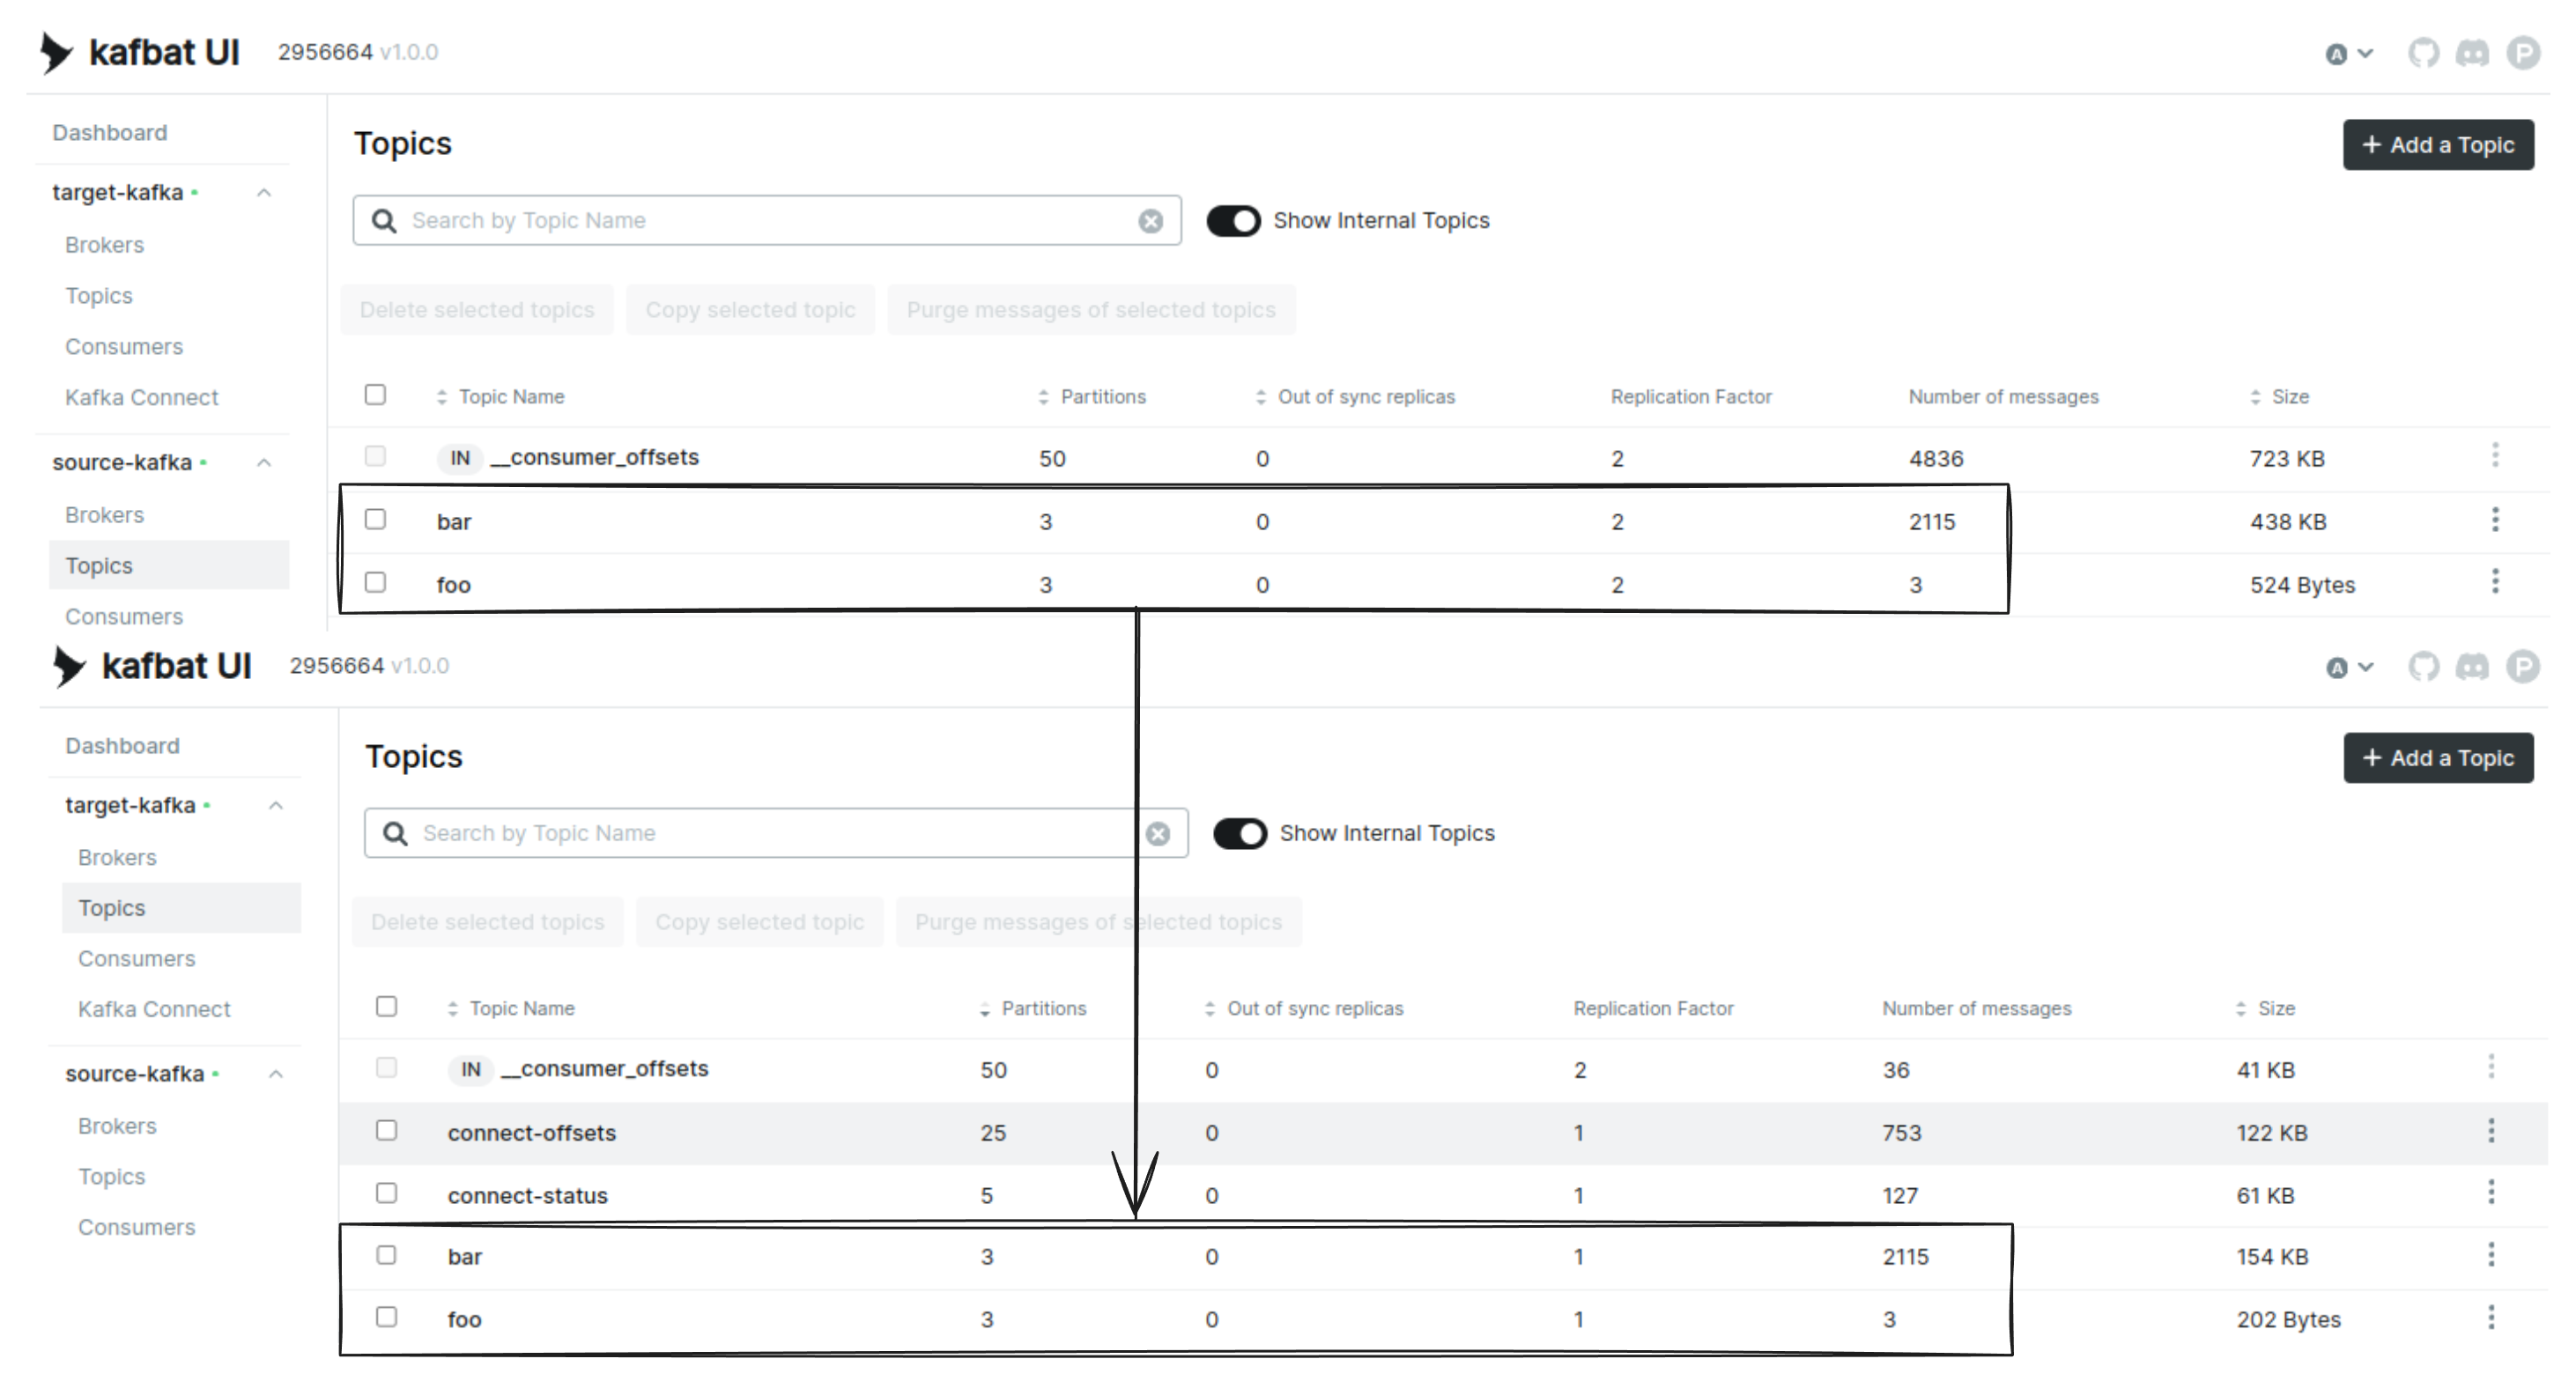
Here, you can see mirror-source-connector replicating topics foo and bar from the source Kafka cluster to the target Kafka cluster.
Topic foo and bar has created and replicated to the target cluster.
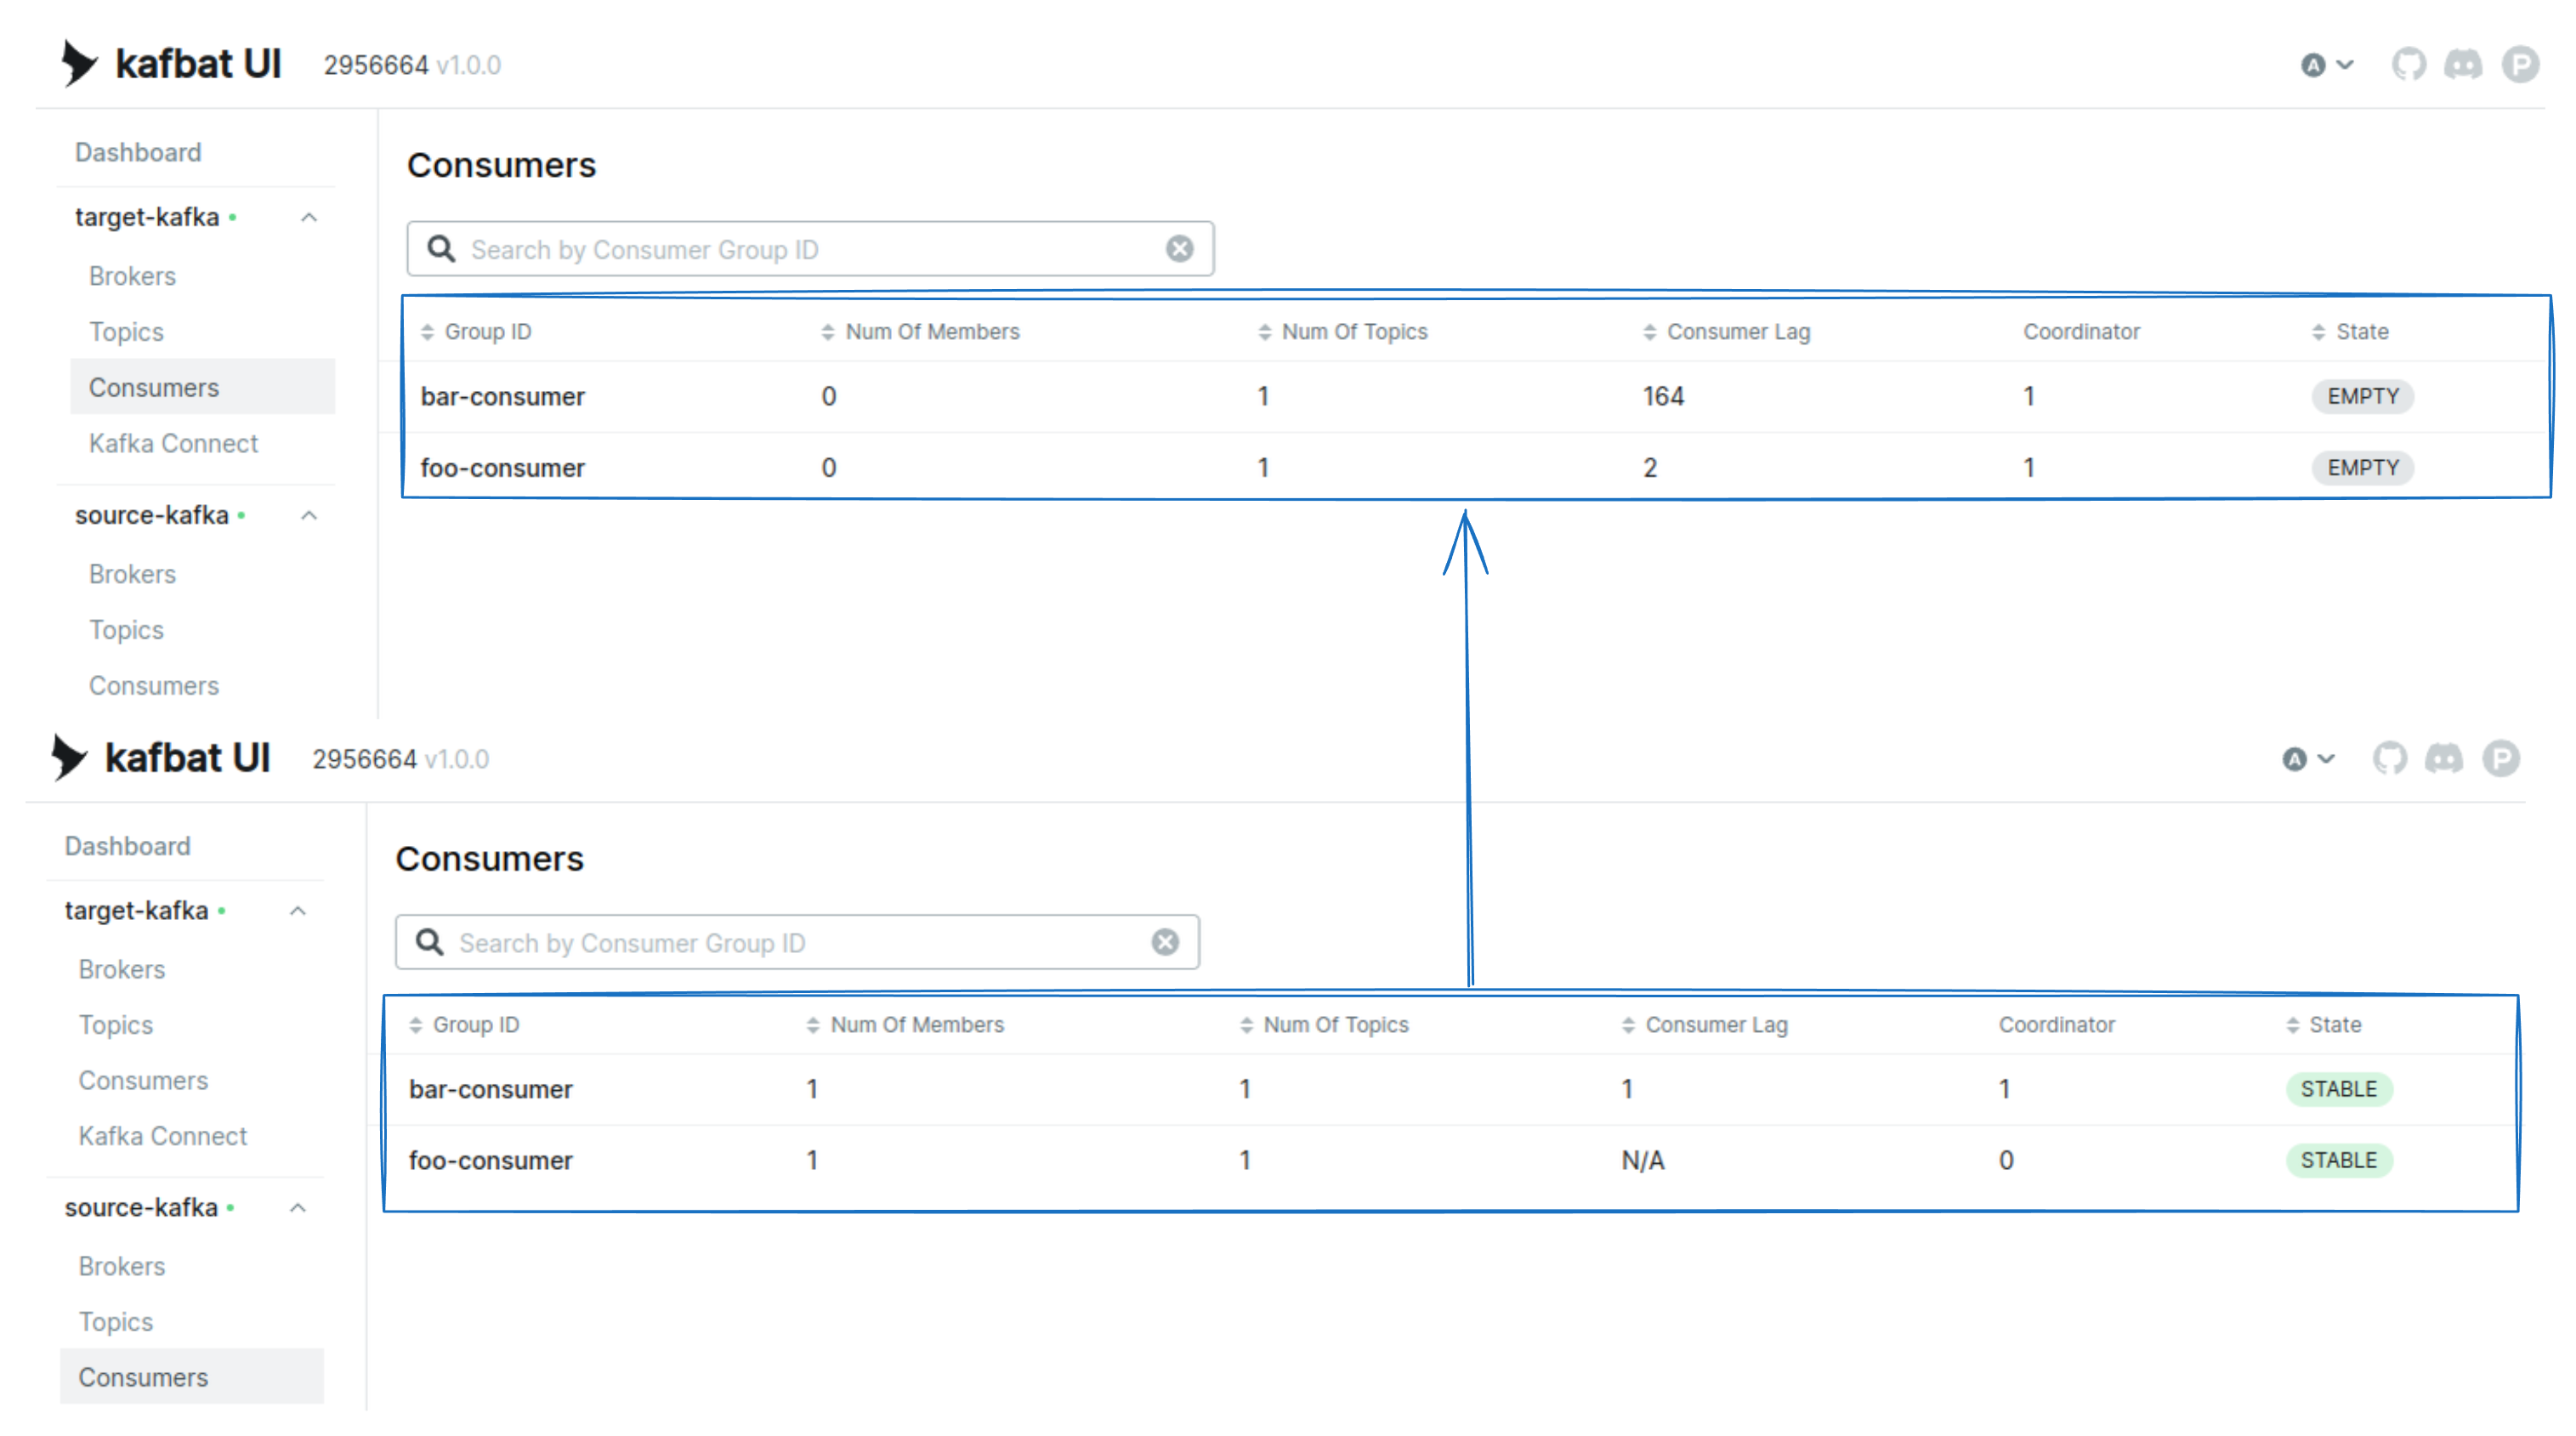
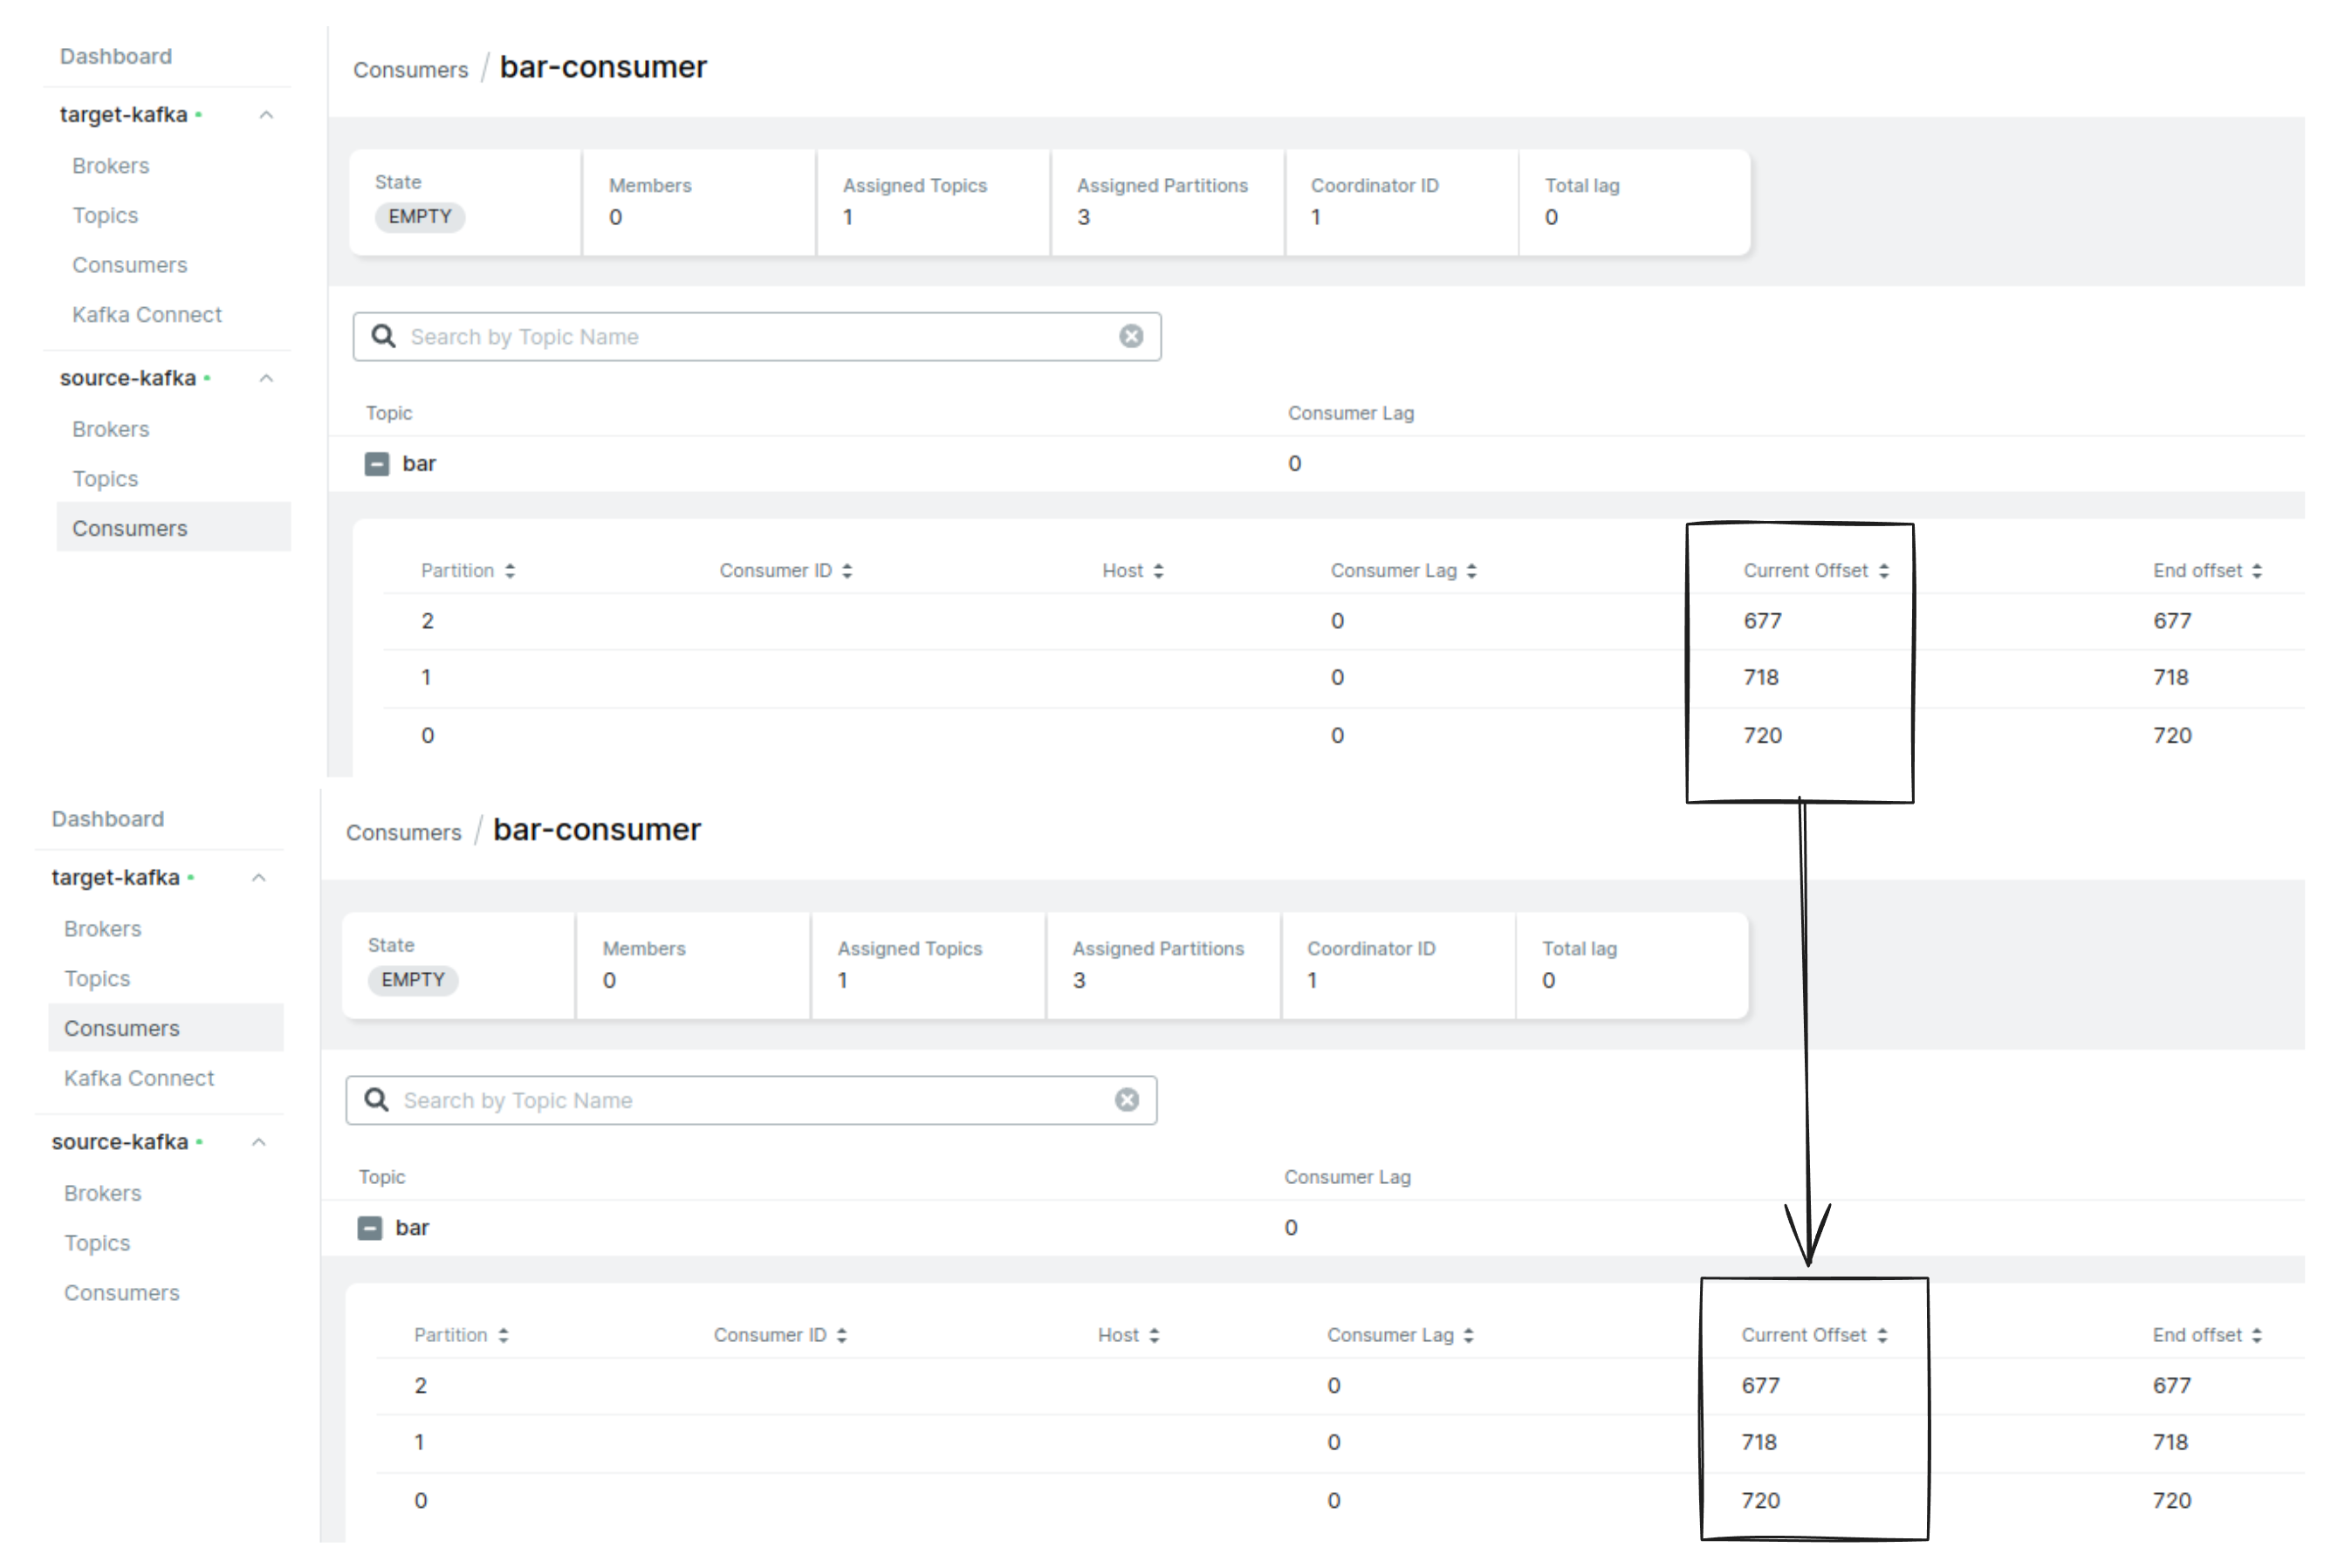
Consumer group foo-consumer and bar-consumer are also translated using the MirrorCheckpoint connector.
Also, monitor the migration process using prometheus and grafana.
To check the metrics port-forward the prometheus service:
$ kubectl port-forward -n monitoring svc/prometheus-operated 9090:9090 -n demo
Forwarding from 127.0.0.1:9090 -> 9090
Forwarding from [::1]:9090 -> 9090
Handling connection for 9090
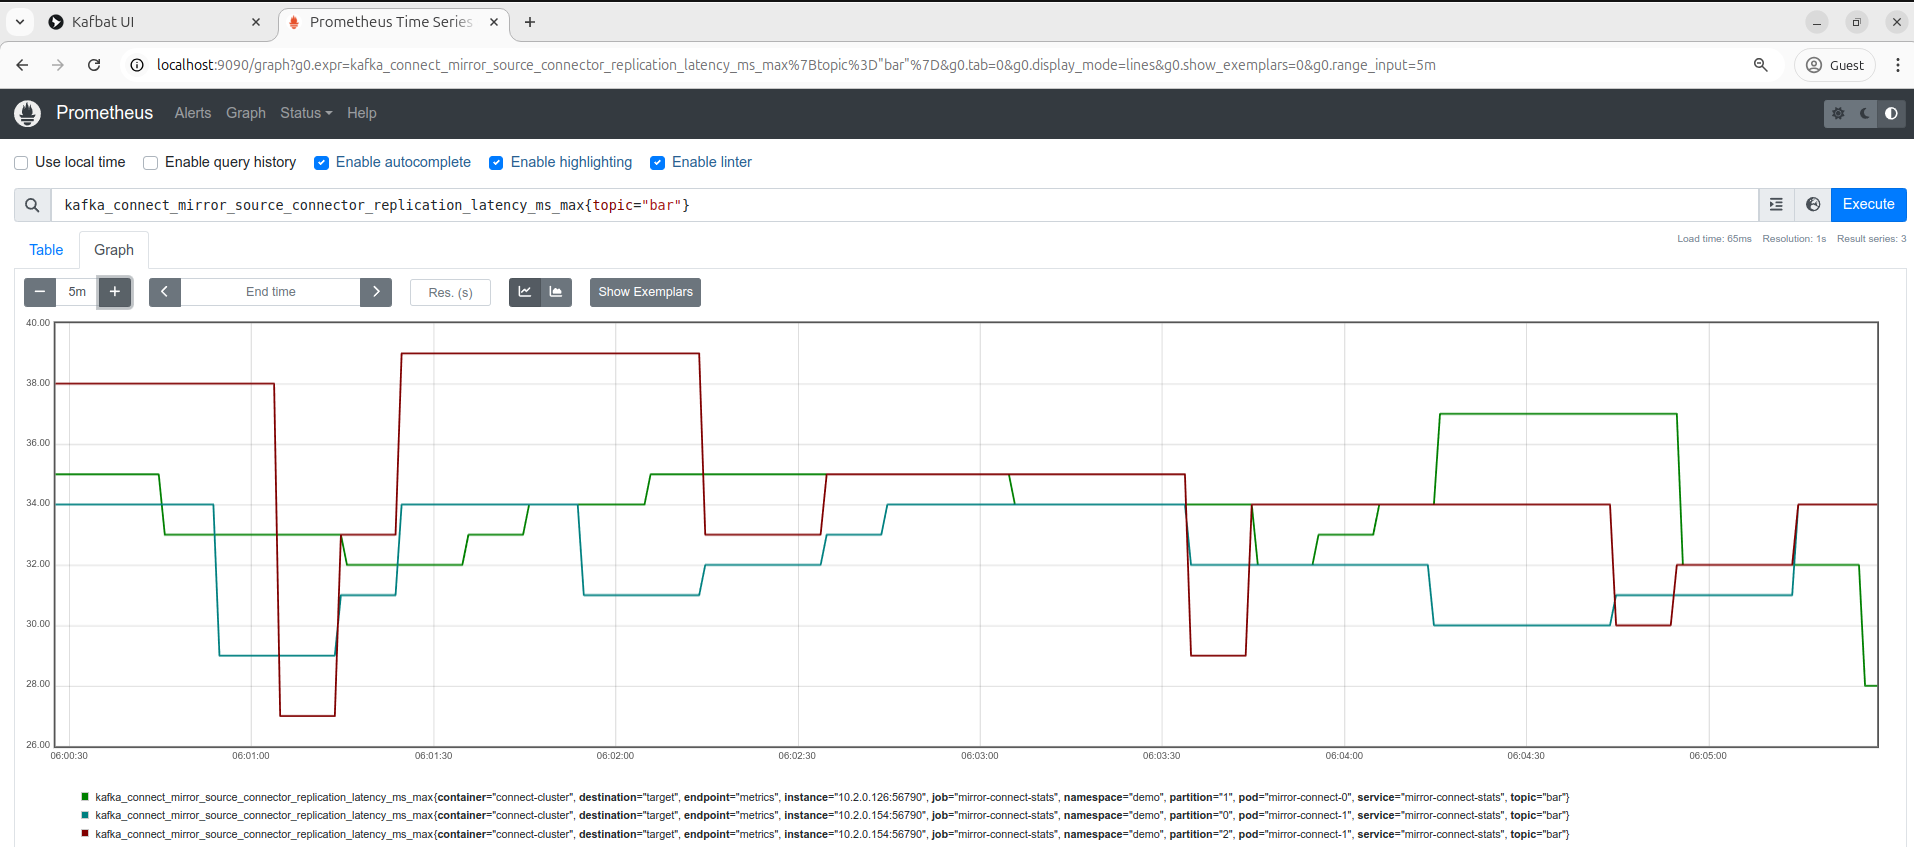
Now, open your browser and navigate to http://localhost:9090/graph to view the Prometheus UI. You can add queries to the query box like the following:
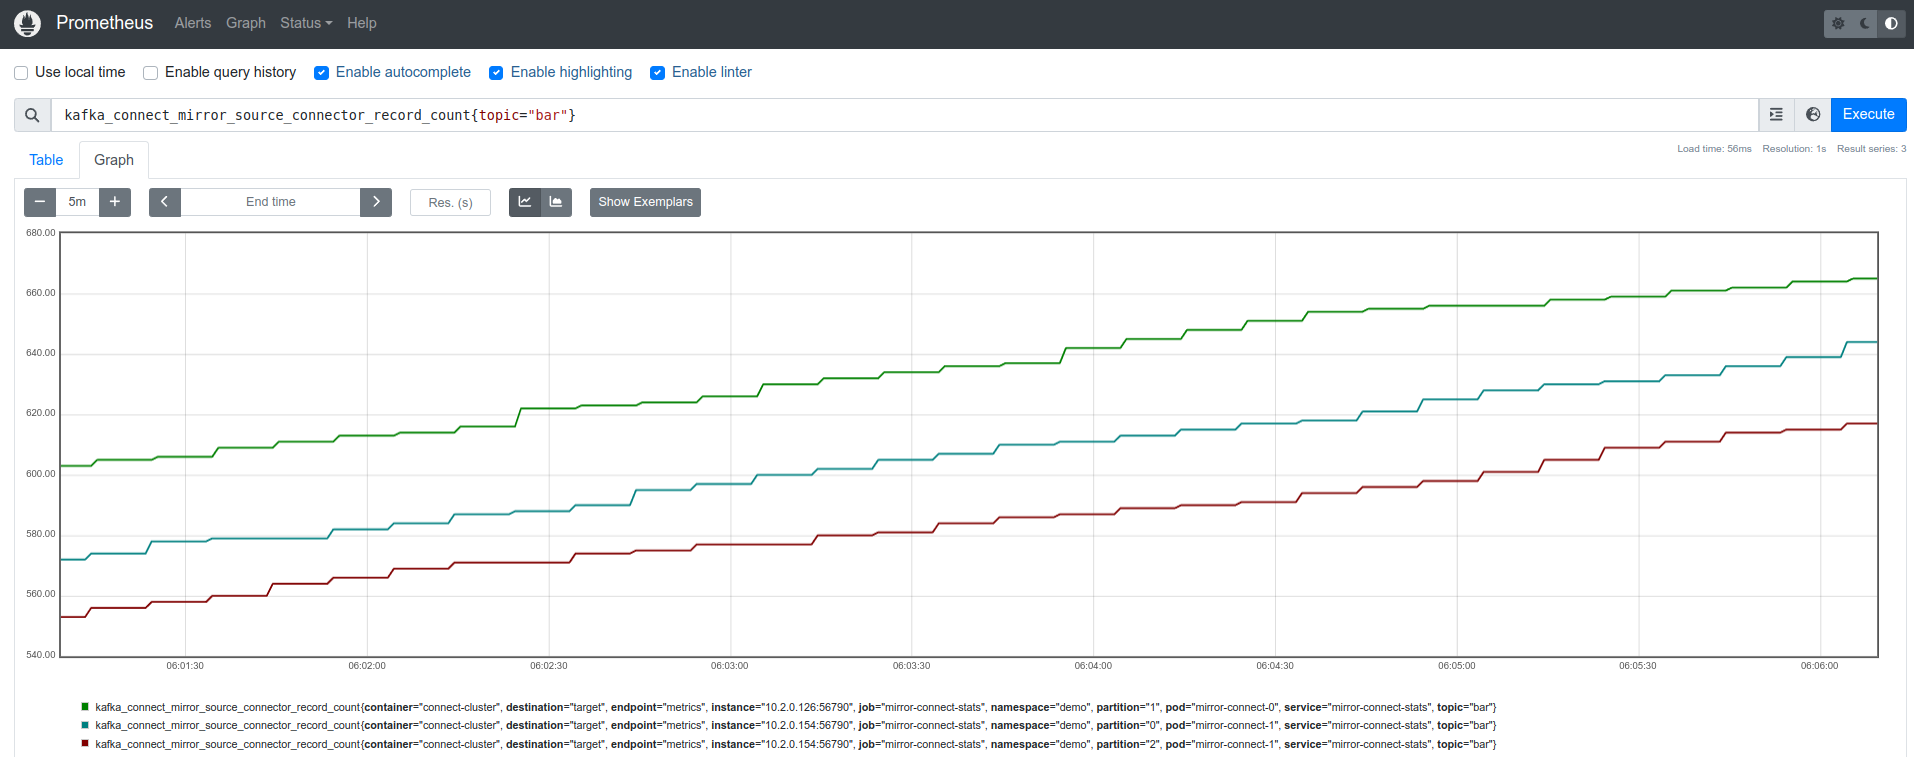
There are two main metrics to notice:
- kafka_connect_mirror_source_connector_replication_latency_ms_max: At the beginning, there’s an increase in the number of messages as the system transfers the existing data between clusters. But as replication progresses, the target cluster catches up, and the message count gradually decreases until it reaches zero and stabilizes.
- kafka_connect_mirror_source_connector_record_count: There will be an increase in activity as new data is added to the source topic. But during migration, any changes will stop once all producers have switched to the new cluster.
Note: You can also add more tasks to the
MirrorSourceconnector to replicate faster using thetasks.maxproperty.
There are several metrics that track errors or retries. These metrics help identify issues like failed data transfers or connection problems, allowing you to spot potential errors in the migration. These Prometheus metrics include:
kafka_connector_producer_record_retry_total
kafka_connect_task_error_total_record_errors
kafka_connect_task_error_total_record_failures
kafka_connect_task_error_total_records_skipped
Also, you can monitor the whole cluster using prometheus and grafana.
Step 8: Move Producer and Consumer to Target Kafka Cluster
We are monitoring the migration process using the Kafbat UI and prometheus. When we find the replication lag is minimum, we can move the producer and consumer to the target Kafka cluster.
There are two ways you can move producer and consumer applications.
Move producer before consumer: This method works well for migrating data with MirrorMaker 2, but it does have some limitations. Since the producer is moved first, consumers are still reading from the old cluster. Once they finish processing all the data from the old cluster, they may experience a delay in receiving new data. However, by setting a lower value for the offset.lag.max property in the MirrorSource connector, you can reduce the chances of reading duplicate messages.
To manage this effectively, you first stop the producer applications, ensuring all data are migrated to the target cluster. Once done, you redirect the producers to the new cluster. Monitor the performance of the new cluster with the producer application, and if everything works as expected, you can then stop the consumers in the old cluster and start them in the new one.
Move consumer before producer: This approach is beneficial in case any issues arise with the new Kafka cluster. Since the producer applications continue writing to the old cluster, you can revert back with minimal effort and without worrying about data loss. However, special care must be taken when translating consumer group offsets to avoid reprocessing duplicate messages.
To manage this effectively, you first stop the consumer applications, ensuring the offsets are correctly aligned and translated to the target cluster. Once done, you redirect the consumers to the new cluster. Monitor the performance of the new cluster with the consumer application, and if everything works as expected, you can then stop the producers in the old cluster and start them in the new one.
Note: During migration, If consumer-groups are not fully synced before the start of consumers to new cluster, you have to manually reset the target cluster consumer group offset to the current offset of the source cluster using the
kafka-consumer-groups.shscript or any other tools. Otherwise, you may face reading duplicate messages.
In this tutorial, we are going to move the producer before the consumer.
Move Producer
Stop the producer (Terminal 1) in the source Kafka cluster and check all messages are migrated to the target Kafka cluster.
Now, exec into one of the broker pods in the target Kafka cluster and run the same script here.
katka@target-kafka-0:~$ while true; do
  TIMESTAMP=$(date +%s)
  RANDOM_VALUE=$(shuf -i 1-100 -n 1)
  JSON_MESSAGE="{\"timestamp\": $TIMESTAMP, \"value\": $RANDOM_VALUE}"

  echo "$JSON_MESSAGE" | kafka-console-producer.sh --bootstrap-server localhost:9092 --topic bar --producer.config config/clientauth.properties
  echo "Produced: $JSON_MESSAGE"
done
Produced: {"timestamp": 1727759813, "value": 84}
Produced: {"timestamp": 1727759815, "value": 42}
Produced: {"timestamp": 1727759816, "value": 52}
Produced: {"timestamp": 1727759818, "value": 43}
Note: If you have multiple producers, you will move all producers to the target Kafka cluster.
Move Consumer
Now, stop the consumer (Terminal 2 and Terminal 3) in the source Kafka cluster. Check all messages are consumed and replicated consumer group current offset is similar to the source cluster.
Now, exec into one of the broker pods (Terminal 2 and 3) in the target Kafka cluster and run the consumer script to consume messages from the target Kafka cluster.
Terminal 2:
katka@target-kafka-0:~$ kafka-console-consumer.sh --topic foo --group foo-consumer --bootstrap-server localhost:9092 --consumer.config config/clientauth.properties
Terminal 3:
katka@target-kafka-0:~$ kafka-console-consumer.sh --topic bar --group bar-consumer --bootstrap-server localhost:9092 --consumer.config config/clientauth.properties
{"timestamp": 1727759815, "value": 42}
{"timestamp": 1727759818, "value": 43}
{"timestamp": 1727759819, "value": 35}
{"timestamp": 1727759824, "value": 43}
Step 9: Validate Migration
Now, validate the migration process by checking the following things:
Check the producer and consumer applications are running as expected in the target Kafka cluster.
Consumers are consuming messages from the exact offset where the source Kafka cluster left.
Check the load on the target Kafka cluster.
Strategies and validations can be different based on your setup and applications.
Migration between source and target Kafka clusters is successfully completed.
Tips and Tricks
Below are some tips and tricks to make the migration process smoother:
- Make a declarative script to make the migration process easier.
- Keep ready the rollback plan in case of any failure.
- Monitor the migration process using Prometheus and Grafana.
- Use the recent version of Kafka before migration.
- Use the same version of Kafka in both source and target clusters.
- Try to automate the migration process as much as possible.
Cleanup
To clean up the Kubernetes resources created by this tutorial, you can run:
$ kubectl delete connector mirror-source-connector, mirror-checkpoint-connector, mirror-heartbeat-connector -n demo
$ kubectl delete secret mirror-source-config mirror-checkpoint-config mirror-heartbeat-config -n demo
$ kubectl delete connectcluster mirror-connect -n demo
$ kubectl delete kafka source-kafka target-kafka -n demo
$ kubectl delete ns demo
Next Steps
- Learn how to configure Kafka Topology.
- Learn ConnectCluster
- Monitor your Kafka database with KubeDB using
out-of-the-boxPrometheus operator. - Want to hack on KubeDB? Check our contribution guidelines.