


You are looking at the documentation of a prior release. To read the documentation of the latest release, please
visit here.
New to KubeDB? Please start here.
RabbitMQ QuickStart
This tutorial will show you how to use KubeDB to run a RabbitMQ database.
Note: The yaml files used in this tutorial are stored in docs/examples/rabbitmq/quickstart folder in GitHub repository kubedb/docs.
Before You Begin
At first, you need to have a Kubernetes cluster, and the kubectl command-line tool must be configured to communicate with your cluster. If you do not already have a cluster, you can create one by using kind.
Now, install KubeDB in your cluster following the steps here and make sure install with helm command including
--set global.featureGates.RabbitMQ=trueto ensure RabbitMQ CRDs.StorageClass is required to run KubeDB. Check the available StorageClass in cluster.
$ kubectl get storageclasses
NAME                 PROVISIONER             RECLAIMPOLICY     VOLUMEBINDINGMODE      ALLOWVOLUMEEXPANSION   AGE
standard (default)   rancher.io/local-path   Delete            WaitForFirstConsumer   false                  6h22m
To keep things isolated, this tutorial uses a separate namespace called
demothroughout this tutorial.$ kubectl create ns demo namespace/demo created
Find Available RabbitMQVersion
When you have installed KubeDB, it has created RabbitMQVersion CR for all supported RabbitMQ versions. Check it by using the kubectl get rabbitmqversions command. You can also use rmv shorthand instead of rabbitmqversions.
$ kubectl get rabbitmqversion
NAME      VERSION   DB_IMAGE                                                     DEPRECATED   AGE
3.12.12   3.12.12   ghcr.io/appscode-images/rabbitmq:3.12.12-management-alpine                7d1h
Create a RabbitMQ database
KubeDB implements a RabbitMQ CRD to define the specification of a RabbitMQ database. Below is the RabbitMQ object created in this tutorial.
apiVersion: kubedb.com/v1alpha2
kind: RabbitMQ
metadata:
  name: rm-quickstart
  namespace: demo
spec:
  version: "3.13.2"
  replicas: 3
  storage:
    accessModes:
      - ReadWriteOnce
    resources:
      requests:
        storage: 1Gi
    storageClassName: standard
  storageType: Durable
  deletionPolicy: WipeOut  # DoNotTerminate(blocks deletion), Halt( retains pvc,secret), Delete (retains secret)
  podTemplate:
    spec:
      containers:
        - name: rabbitmq
          resources:
            requests:
              cpu: "0.5"
              memory: "1Gi"
            limits:
              cpu: "2"
              memory: "2Gi"
  serviceTemplates:
    - alias: primary
      spec:
        type: LoadBalancer
$ kubectl create -f https://github.com/kubedb/docs/raw/v2025.3.24/docs/examples/rabbitmq/quickstart/quickstart.yaml
rabbitmq.kubedb.com/rm-quickstart created
Here,
.spec.replicais used to provide the number of required replicas or, peers for intended rabbitmq cluster.spec.versionis the name of the RabbitMQVersion CRD where the docker images are specified. In this tutorial, a RabbitMQ3.13.2database is going to be created.spec.storageTypespecifies the type of storage that will be used for RabbitMQ database. It can beDurableorEphemeral. Default value of this field isDurable. IfEphemeralis used then KubeDB will create RabbitMQ database usingEmptyDirvolume. In this case, you don’t have to specifyspec.storagefield. This is useful for testing purposes.spec.deletionPolicygives flexibility whether tonullify(reject) the delete operation ofRabbitMQCRD or which resources KubeDB should keep or delete when you deleteRabbitMQCRD. If admission webhook is enabled, It prevents users from deleting the database as long as thespec.deletionPolicyis set toDoNotTerminate. Learn details of allDeletionPolicyhere
.spec.podTemplateis used to provide specific pod specifications or container specification. You can override default resources, securityContext etc. set for rabbitmq container. Find details herespec.serviceTemplatesis used to provide template for the services created by KubeDB operator for RabbitMQ database. This will allow you to set the type and other properties of the services.
Note:
spec.storagesection is used to create PVC for database pod. It will create PVC with storage size specified instorage.resources.requestsfield. Don’t specify limits here. PVC does not get resized automatically.
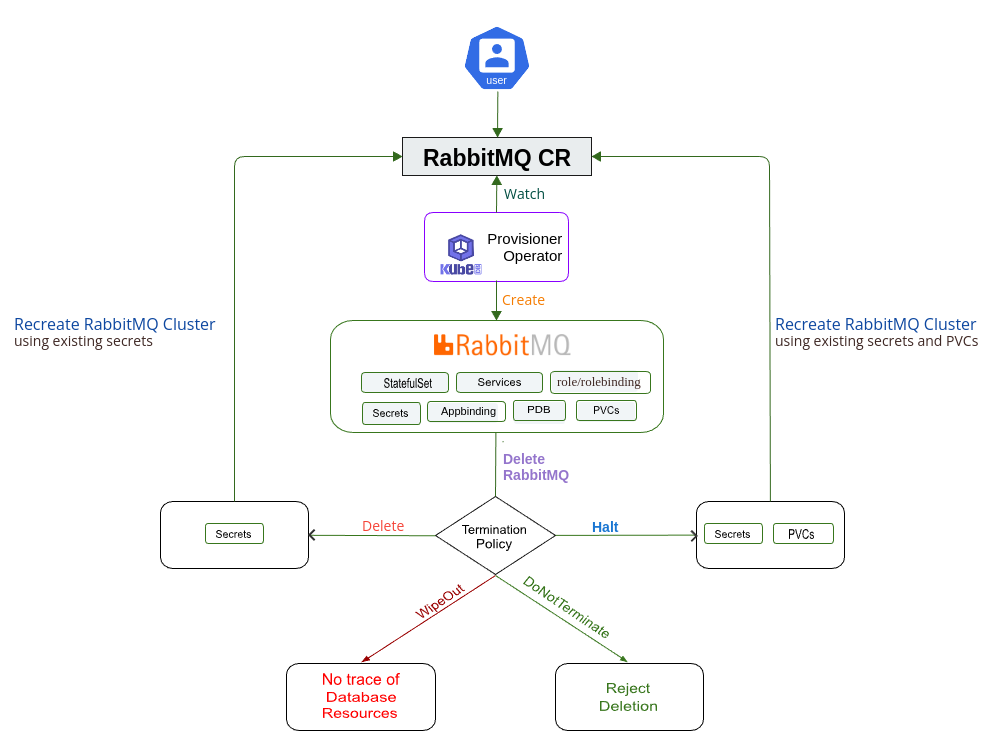
KubeDB operator watches for RabbitMQ objects using Kubernetes API. When a RabbitMQ object is created, KubeDB provisioner operator will create new PetSet (aka StatefulSet 2.0), Services with the matching RabbitMQ object name and Required secrets for cluster communication and authentication if not present. The services will include a primary service for Client communication with AMQP,MQTT,STOMP or WebSocket, a governing service for inter-node cluster governance, a dashboard service for connecting to management UI and interact with http endpointsm and a stats service to provide metrics endpoint if enabled. KubeDB operator will also create an AppBinding resource. AppBinding is a Kubernetes CustomResourceDefinition(CRD) which points to an application using either its URL (usually for a non-Kubernetes resident service instance) or a Kubernetes service object (if self-hosted in a Kubernetes cluster), some optional parameters and a credential secret.
$ kubectl get petset -n demo
NAME            AGE
rm-quickstart   6m14s

$ kubectl get pvc -n demo
NAME                                 STATUS   VOLUME                                     CAPACITY   ACCESS MODES   STORAGECLASS   VOLUMEATTRIBUTESCLASS   AGE
rm-quickstart-data-rm-quickstart-0   Bound    pvc-596bd8de-4123-40fd-a8d1-a864b9acddc2   1Gi        RWO            standard       <unset>                 6m38s
rm-quickstart-data-rm-quickstart-1   Bound    pvc-c94bd3d0-8fa7-4794-9221-8295bc3e7b38   1Gi        RWO            standard       <unset>                 6m32s
rm-quickstart-data-rm-quickstart-2   Bound    pvc-ddfd1987-c8b2-4c72-90ad-a8361ed4de56   1Gi        RWO            standard       <unset>                 6m26s

$ kubectl get pv -n demo
NAME                                       CAPACITY   ACCESS MODES   RECLAIM POLICY   STATUS   CLAIM                                         STORAGECLASS   VOLUMEATTRIBUTESCLASS   REASON   AGE
pvc-596bd8de-4123-40fd-a8d1-a864b9acddc2   1Gi        RWO            Delete           Bound    demo/rm-quickstart-data-rm-quickstart-0       standard       <unset>                          7m4s
pvc-c94bd3d0-8fa7-4794-9221-8295bc3e7b38   1Gi        RWO            Delete           Bound    demo/rm-quickstart-data-rm-quickstart-1       standard       <unset>                          6m58s
pvc-ddfd1987-c8b2-4c72-90ad-a8361ed4de56   1Gi        RWO            Delete           Bound    demo/rm-quickstart-data-rm-quickstart-2       standard       <unset>                          6m52s

$ kubectl get service -n demo
NAME                      TYPE           CLUSTER-IP      EXTERNAL-IP      PORT(S)                                                                         AGE
rm-quickstart             LoadBalancer   10.128.221.60   172.232.241.73   5672:31803/TCP,1883:31938/TCP,61613:31884/TCP,15675:32567/TCP,15674:32599/TCP   8m59s
rm-quickstart-dashboard   ClusterIP      10.128.240.53   <none>           15672/TCP                                                                       8m58s
rm-quickstart-pods        ClusterIP      None            <none>           4369/TCP,25672/TCP                                                              8m59s

$ kubectl get appbinding -n demo
NAME            TYPE                  VERSION   AGE
rm-quickstart   kubedb.com/rabbitmq   3.13.2    23h
KubeDB operator sets the status.phase to Running once the database is successfully created. Run the following command to see the modified RabbitMQ object:
$ kubectl get rm -n demo rm-quickstart -oyaml
apiVersion: kubedb.com/v1alpha2
kind: RabbitMQ
metadata:
  annotations:
    kubectl.kubernetes.io/last-applied-configuration: |
      {"apiVersion":"kubedb.com/v1alpha2","kind":"RabbitMQ","metadata":{"annotations":{},"name":"rm-quickstart","namespace":"demo"},"spec":{"deletionPolicy":"WipeOut","podTemplate":{"spec":{"containers":[{"name":"rabbitmq","resources":{"limits":{"cpu":2,"memory":"2Gi"},"requests":{"cpu":0.5,"memory":"1Gi"}}}]}},"replicas":3,"serviceTemplates":[{"alias":"primary","spec":{"type":"LoadBalancer"}}],"storage":{"accessModes":["ReadWriteOnce"],"resources":{"requests":{"storage":"1Gi"}},"storageClassName":"linode-block-storage"},"storageType":"Durable","version":"3.13.2"}}
  creationTimestamp: "2024-09-10T09:23:57Z"
  finalizers:
  - kubedb.com/rabbitmq
  generation: 3
  name: rm-quickstart
  namespace: demo
  resourceVersion: "58864"
  uid: f3a948e4-b5c3-4327-b65e-b170fd744e89
spec:
  authSecret:
    name: rm-quickstart-admin-cred
  deletionPolicy: WipeOut
  healthChecker:
    failureThreshold: 3
    periodSeconds: 10
    timeoutSeconds: 10
  podTemplate:
    controller: {}
    metadata: {}
    spec:
      containers:
      - name: rabbitmq
        resources:
          limits:
            cpu: "2"
            memory: 2Gi
          requests:
            cpu: 500m
            memory: 1Gi
        securityContext:
          allowPrivilegeEscalation: false
          capabilities:
            drop:
            - ALL
          runAsNonRoot: true
          runAsUser: 999
          seccompProfile:
            type: RuntimeDefault
      initContainers:
      - name: rabbitmq-init
        resources: {}
        securityContext:
          allowPrivilegeEscalation: false
          capabilities:
            drop:
            - ALL
          runAsNonRoot: true
          runAsUser: 999
          seccompProfile:
            type: RuntimeDefault
      podPlacementPolicy:
        name: default
      securityContext:
        fsGroup: 999
  replicas: 3
  serviceTemplates:
  - alias: primary
    metadata: {}
    spec:
      type: LoadBalancer
  storage:
    accessModes:
    - ReadWriteOnce
    resources:
      requests:
        storage: 1Gi
    storageClassName: standard
  storageType: Durable
  version: 3.13.2
status:
  conditions:
  - lastTransitionTime: "2024-09-10T09:23:57Z"
    message: 'The KubeDB operator has started the provisioning of Rabbitmq: demo/rm-quickstart'
    observedGeneration: 2
    reason: DatabaseProvisioningStartedSuccessfully
    status: "True"
    type: ProvisioningStarted
  - lastTransitionTime: "2024-09-10T09:32:52Z"
    message: All replicas are ready
    observedGeneration: 3
    reason: AllReplicasReady
    status: "True"
    type: ReplicaReady
  - lastTransitionTime: "2024-09-10T09:25:46Z"
    message: 'The Rabbitmq: demo/rm-quickstart is accepting client requests'
    observedGeneration: 3
    reason: DatabaseAcceptingConnectionRequest
    status: "True"
    type: AcceptingConnection
  - lastTransitionTime: "2024-09-10T09:25:46Z"
    message: Ready for publishing messages
    observedGeneration: 3
    reason: Successfully publishing messages
    status: "True"
    type: DatabaseWriteAccess
  - lastTransitionTime: "2024-09-10T09:25:46Z"
    message: 'The Rabbitmq: demo/rm-quickstart is ready.'
    observedGeneration: 3
    reason: ReadinessCheckSucceeded
    status: "True"
    type: Ready
  - lastTransitionTime: "2024-09-10T09:25:47Z"
    message: 'The Rabbitmq: demo/rm-quickstart is successfully provisioned.'
    observedGeneration: 3
    reason: DatabaseSuccessfullyProvisioned
    status: "True"
    type: Provisioned
  - lastTransitionTime: "2024-09-10T09:25:56Z"
    message: Ready for Consuming messages
    observedGeneration: 3
    reason: Successfully Consuming messages
    status: "True"
    type: DatabaseReadAccess
  phase: Ready
Connect with RabbitMQ database
Unless provided by the user in .spec.authSecret.name field, KubeDB operator creates a new Secret called rm-quickstart-admin-cred (format: {rabbitmq-object-name}-admin-cred) for storing the password for admin user who has administrative authorizations over / vhost of RabbitMQ cluster. This secret contains a username key which contains the username for RabbitMQ admin user and a password key which contains the password for this user.
If you want to use an existing secret please specify that when creating the RabbitMQ object using spec.authSecret.name. While creating this secret manually, make sure the secret contains these two keys containing data username and password and also make sure of using admin as value of username.
Now, we need username and password to connect to this database.
$ kubectl get secrets -n demo rm-quickstart-admin-cred -o jsonpath='{.data.username}' | base64 -d
admin
$ kubectl get secrets -n demo rm-quickstart-admin-cred -o jsonpath='{.data.password}' | base64 -d
password
We can check client connectivity using an opensource load-testing tool called perf-test. It runs producers and consumers to continuously publish and consume messages in RabbitMQ cluster. Here’s how to run it on kubernetes using the credentials and the address for operator generated primary service.
kubectl run perf-test --image=pivotalrabbitmq/perf-test -- --uri "amqp://admin:[email protected]:5672/"
You can check the log for this pod which shows publish and consume rates of messages in RabbitMQ.
$ kubectl logs pod/perf-test -f
id: test-104606-706, starting consumer #0
id: test-104606-706, starting consumer #0, channel #0
id: test-104606-706, starting producer #0
id: test-104606-706, starting producer #0, channel #0
id: test-104606-706, time 1.000 s, sent: 81286 msg/s, received: 23516 msg/s, min/median/75th/95th/99th consumer latency: 6930/174056/361178/503928/519681 µs
id: test-104606-706, time 2.000 s, sent: 30997 msg/s, received: 30686 msg/s, min/median/75th/95th/99th consumer latency: 529789/902251/1057447/1247103/1258790 µs
id: test-104606-706, time 3.000 s, sent: 29032 msg/s, received: 30418 msg/s, min/median/75th/95th/99th consumer latency: 1262421/1661565/1805425/1953992/1989182 µs
id: test-104606-706, time 4.000 s, sent: 30997 msg/s, received: 31228 msg/s, min/median/75th/95th/99th consumer latency: 1572496/1822873/1938918/2035918/2065812 µs
id: test-104606-706, time 5.000 s, sent: 29032 msg/s, received: 33588 msg/s, min/median/75th/95th/99th consumer latency: 1503867/1729779/1831281/1930593/1968284 µs
id: test-104606-706, time 6.000 s, sent: 32704 msg/s, received: 32493 msg/s, min/median/75th/95th/99th consumer latency: 1503915/1749654/1865878/1953439/1971834 µs
id: test-104606-706, time 7.000 s, sent: 38117 msg/s, received: 30759 msg/s, min/median/75th/95th/99th consumer latency: 1511466/1772387/1854642/1918369/1940327 µs
id: test-104606-706, time 8.000 s, sent: 35088 msg/s, received: 31676 msg/s, min/median/75th/95th/99th consumer latency: 1578860/1799719/1915632/1985467/2024141 µs
id: test-104606-706, time 9.000 s, sent: 29706 msg/s, received: 31375 msg/s, min/median/75th/95th/99th consumer latency: 1516415/1743385/1877037/1972570/1988962 µs
id: test-104606-706, time 10.000 s, sent: 15903 msg/s, received: 26711 msg/s, min/median/75th/95th/99th consumer latency: 1569546/1884700/1992762/2096417/2136613 µs
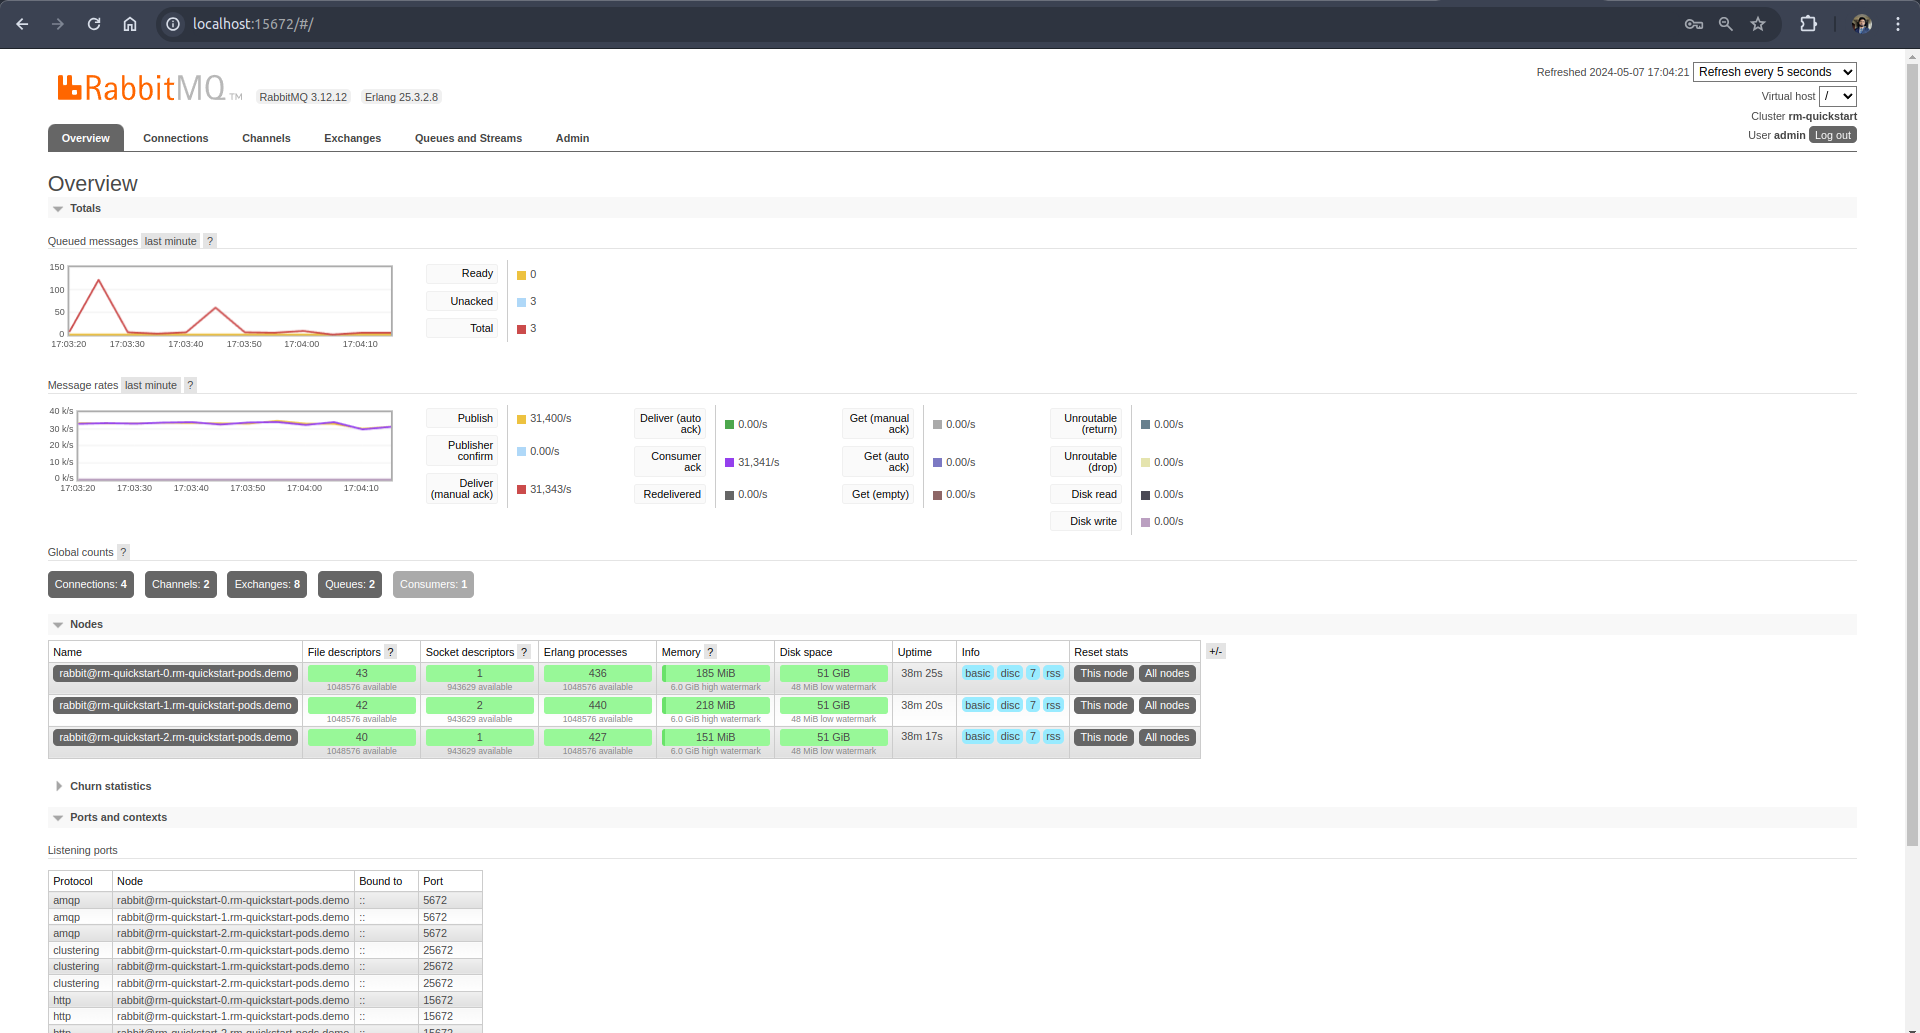
You can also connect with the RabbitMQ Management UI. It can be accessed through Dashboard service’s 15672 Port or from a localhost port if the port is forwarded.
$ kubectl port-forward -n demo svc/rm-quickstart-dashboard 15672
Forwarding from 127.0.0.1:15672 -> 15672
Forwarding from [::1]:15672 -> 15672
Lets, open your browser and go to the http://localhost:15672 then access using the credentials.
Database DeletionPolicy
This field is used to regulate the deletion process of the related resources when RabbitMQ object is deleted. User can set the value of this field according to their needs. The available options and their use case scenario is described below:
DoNotTerminate:
When deletionPolicy is set to DoNotTerminate, KubeDB takes advantage of ValidationWebhook feature in Kubernetes 1.9.0 or later clusters to implement DoNotTerminate feature. If admission webhook is enabled, It prevents users from deleting the database as long as the spec.deletionPolicy is set to DoNotTerminate. You can see this below:
$ kubectl delete rm rm-quickstart -n demo
The RabbitMQ "rm-quickstart" is invalid: spec.deletionPolicy: Invalid value: "rm-quickstart": Can not delete as deletionPolicy is set to "DoNotTerminate"
Now, run kubectl patch -n demo rm rm-quickstart -p '{"spec":{"deletionPolicy":"Halt"}}' --type="merge" to set spec.deletionPolicy to Halt (which deletes the RabbitMQ object and keeps PVC, snapshots, Secrets intact) or remove this field (which default to Delete). Then you will be able to delete/halt the database.
Learn details of all DeletionPolicy here.
Halt:
Suppose you want to reuse your database volume and credential to deploy your database in future using the same configurations. But, right now you just want to delete the database except the database volumes and credentials. In this scenario, you must set the RabbitMQ object deletionPolicy to Halt.
When the DeletionPolicy is set to halt and the RabbitMQ object is deleted, the KubeDB operator will delete the PetSet and its pods but leaves the PVCs, secrets and database backup data(snapshots) intact. You can set the deletionPolicy to halt in existing database using patch command for testing.
At first, run kubectl patch -n demo rm rm-quickstart -p '{"spec":{"deletionPolicy":"Halt"}}' --type="merge". Then delete the RabbitMQ object,
$ kubectl delete rm rm-quickstart -n demo
rabbitmq.kubedb.com "rm-quickstart" deleted
Now, run the following command to get all rabbitmq resources in demo namespaces,
$ kubectl get petset,svc,secret,pvc -n demo
NAME                              TYPE                       DATA   AGE
secret/rm-quickstart-admin-cred   kubernetes.io/basic-auth   2      3m35s

NAME                                 STATUS   VOLUME                                     CAPACITY   ACCESS MODES   STORAGECLASS   VOLUMEATTRIBUTESCLASS   AGE
rm-quickstart-data-rm-quickstart-0   Bound    pvc-596bd8de-4123-40fd-a8d1-a864b9acddc2   1Gi        RWO            standard       <unset>                 6m38s
rm-quickstart-data-rm-quickstart-1   Bound    pvc-c94bd3d0-8fa7-4794-9221-8295bc3e7b38   1Gi        RWO            standard       <unset>                 6m32s
rm-quickstart-data-rm-quickstart-2   Bound    pvc-ddfd1987-c8b2-4c72-90ad-a8361ed4de56   1Gi        RWO            standard       <unset>                 6m26s
From the above output, you can see that all RabbitMQ resources(PetSet, Service, etc.) are deleted except PVC and Secret. You can recreate your RabbitMQ again using these resources.
You can also set the
deletionPolicytoHalt(deprecated). It’s behavior same ashaltand right nowHaltis replaced byHalt.
Delete:
If you want to delete the existing database along with the volumes used, but want to restore the database from previously taken snapshots and secrets then you might want to set the RabbitMQ object deletionPolicy to Delete. In this setting, PetSet and the volumes will be deleted. If you decide to restore the database, you can do so using the snapshots and the credentials.
When the DeletionPolicy is set to Delete and the RabbitMQ object is deleted, the KubeDB operator will delete the PetSet and its pods along with PVCs but leaves the secret and database backup data(snapshots) intact.
Suppose, we have a database with deletionPolicy set to Delete. Now, are going to delete the database using the following command:
$ kubectl delete rm rm-quickstart -n demo
rabbitmq.kubedb.com "rm-quickstart" deleted
Now, run the following command to get all RabbitMQ resources in demo namespaces,
$ kubectl get petset,svc,secret,pvc -n demo
NAME                              TYPE                       DATA   AGE
secret/rm-quickstart-admin-cred   kubernetes.io/basic-auth   2      17m
From the above output, you can see that all RabbitMQ resources(PetSet, Service, PVCs etc.) are deleted except Secret.
If you don’t set the deletionPolicy then the kubeDB set the DeletionPolicy to Delete by-default.
WipeOut:
You can totally delete the RabbitMQ database and relevant resources without any tracking by setting deletionPolicy to WipeOut. KubeDB operator will delete all relevant resources of this RabbitMQ database (i.e, PVCs, Secrets, Snapshots) when the deletionPolicy is set to WipeOut.
Suppose, we have a database with deletionPolicy set to WipeOut. Now, are going to delete the database using the following command:
$ kubectl delete rm rm-quickstart -n demo
rabbitmq.kubedb.com "rm-quickstart" deleted
Now, run the following command to get all RabbitMQ resources in demo namespaces,
$ kubectl get petset,svc,secret,pvc -n demo
No resources found in demo namespace.
From the above output, you can see that all RabbitMQ resources are deleted. There is no option to recreate/reinitialize your database if deletionPolicy is set to Delete.
Be careful when you set the
deletionPolicytoDelete. Because there is no option to trace the database resources if once deleted the database.
Cleaning up
To cleanup the Kubernetes resources created by this tutorial, run:
kubectl patch -n demo rabbitmq/rm-quickstart -p '{"spec":{"deletionPolicy":"WipeOut"}}' --type="merge"
kubectl delete -n demo rabbitmq/rm-quickstart
kubectl delete ns demo
Tips for Testing
If you are just testing some basic functionalities, you might want to avoid additional hassles due to some safety features that are great for production environment. You can follow these tips to avoid them.
- Use
storageType: Ephemeral. Databases are precious. You might not want to lose your data in your production environment if database pod fail. So, we recommend to usespec.storageType: Durableand provide storage spec inspec.storagesection. For testing purpose, you can just usespec.storageType: Ephemeral. KubeDB will use emptyDir for storage. You will not require to providespec.storagesection. - Use
deletionPolicy: WipeOut. It is nice to be able to delete everything created by KubeDB for a particular RabbitMQ crd when you delete the crd. For more details about deletion policy, please visit here.