


You are looking at the documentation of a prior release. To read the documentation of the latest release, please
visit here.
New to KubeDB? Please start here.
Valkey QuickStart
This tutorial will show you how to use KubeDB to run a Valkey server.
Before You Begin
At first, you need to have a Kubernetes cluster, and the
kubectlcommand-line tool must be configured to communicate with your cluster. If you do not already have a cluster, you can create one by using kind.Now, install KubeDB cli on your workstation and KubeDB operator in your cluster following the steps here.
StorageClass is required to run KubeDB. Check the available StorageClass in cluster.
$ kubectl get storageclasses
NAME                 PROVISIONER             RECLAIMPOLICY       VOLUMEBINDINGMODE      ALLOWVOLUMEEXPANSION              AGE
standard (default)   rancher.io/local-path      Delete          WaitForFirstConsumer           false                      4h
To keep things isolated, this tutorial uses a separate namespace called
demothroughout this tutorial. Run the following command to prepare your cluster for this tutorial:$ kubectl create namespace demo namespace/demo created $ kubectl get namespaces NAME STATUS AGE demo Active 10s
Note: The yaml files used in this tutorial are stored in docs/examples folder in GitHub repository kubedb/docs.
Find Available RedisVersion
When you have installed KubeDB, it has created RedisVersion crd for all supported Redis and Valkey versions. Check:
$ kubectl get redisversions
NAME           VERSION   DB_IMAGE                                        DEPRECATED   AGE
4.0.11         4.0.11    ghcr.io/kubedb/redis:4.0.11                                  14d
5.0.14         5.0.14    ghcr.io/appscode-images/redis:5.0.14-bullseye                14d
6.0.20         6.0.20    ghcr.io/appscode-images/redis:6.0.20-bookworm                14d
6.2.14         6.2.14    ghcr.io/appscode-images/redis:6.2.14-bookworm                14d
6.2.16         6.2.16    ghcr.io/appscode-images/redis:6.2.16-bookworm                14d
7.0.14         7.0.14    ghcr.io/appscode-images/redis:7.0.14-bookworm                14d
7.0.15         7.0.15    ghcr.io/appscode-images/redis:7.0.15-bookworm                14d
7.2.3          7.2.3     ghcr.io/appscode-images/redis:7.2.3-bookworm                 14d
7.2.4          7.2.4     ghcr.io/appscode-images/redis:7.2.4-bookworm                 14d
7.2.6          7.2.6     ghcr.io/appscode-images/redis:7.2.6-bookworm                 14d
7.4.0          7.4.0     ghcr.io/appscode-images/redis:7.4.0-bookworm                 14d
7.4.1          7.4.1     ghcr.io/appscode-images/redis:7.4.1-bookworm                 14d
valkey-7.2.5   7.2.5     ghcr.io/appscode-images/valkey:7.2.5                         14d
valkey-7.2.9   7.2.9     ghcr.io/appscode-images/valkey:7.2.9                         14d
valkey-8.0.3   8.0.3     ghcr.io/appscode-images/valkey:8.0.3                         14d
valkey-8.1.1   8.1.1     ghcr.io/appscode-images/valkey:8.1.1                         14d
Note: RedisVersion which contains valkey database image, will have spec.distribution as valkey
Create a Valkey server
KubeDB implements a Redis CRD to define the specification of a Valkey server. Below is the Redis object created in this tutorial.
Note: If your KubeDB version is less or equal to v2024.6.4, You have to use v1alpha2 apiVersion.
apiVersion: kubedb.com/v1
kind: Redis
metadata:
  name: valkey-quickstart
  namespace: demo
spec:
  version: valkey-8.1.1
  storageType: Durable
  storage:
    storageClassName: "standard"
    accessModes:
      - ReadWriteOnce
    resources:
      requests:
        storage: 1Gi
  deletionPolicy: WipeOut
$ kubectl create -f https://github.com/kubedb/docs/raw/v2025.7.31/docs/examples/redis/quickstart/demo-valkey-v1.yaml
redis.kubedb.com/valkey-quickstart created
apiVersion: kubedb.com/v1alpha2
kind: Redis
metadata:
  name: valkey-quickstart
  namespace: demo
spec:
  version: valkey-8.1.1
  storageType: Durable
  storage:
    storageClassName: "standard"
    accessModes:
    - ReadWriteOnce
    resources:
      requests:
        storage: 1Gi
  terminationPolicy: WipeOut
$ kubectl create -f https://github.com/kubedb/docs/raw/v2025.7.31/docs/examples/redis/quickstart/demo-valkey-v1alpha2.yaml
redis.kubedb.com/valkey-quickstart created
Here,
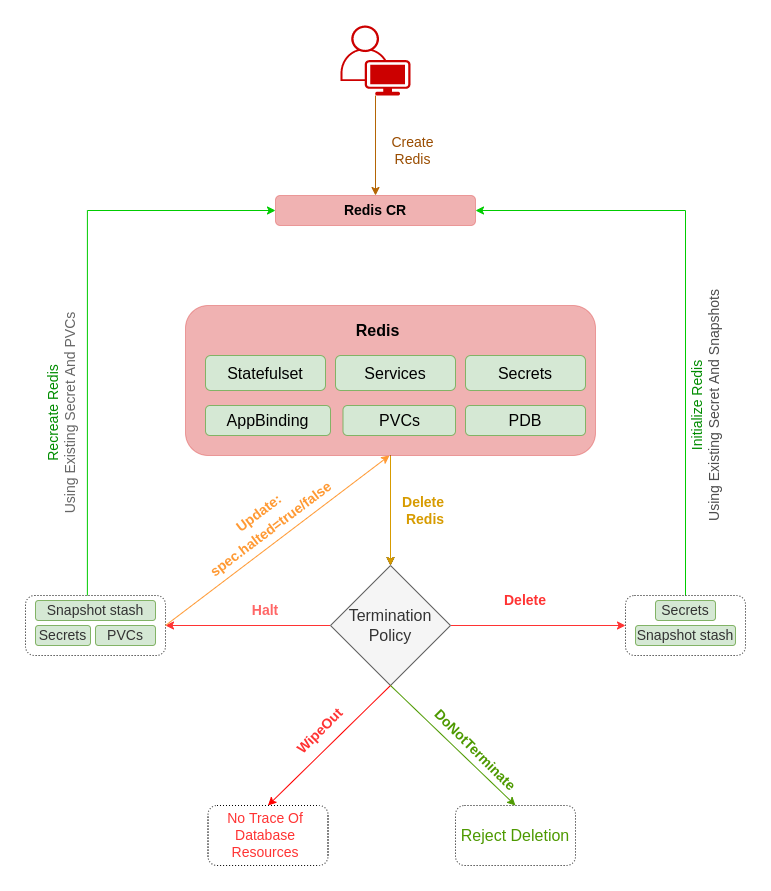
spec.versionis name of the RedisVersion crd where the docker images are specified. In this tutorial, a valkey 8.1.1 database is created.spec.storageTypespecifies the type of storage that will be used for Valkey server. It can beDurableorEphemeral. Default value of this field isDurable. IfEphemeralis used then KubeDB will create Valkey server usingEmptyDirvolume. In this case, you don’t have to specifyspec.storagefield. This is useful for testing purposes.spec.storagespecifies PVC spec that will be dynamically allocated to store data for this database. This storage spec will be passed to the StatefulSet created by KubeDB operator to run database pods. You can specify any StorageClass available in your cluster with appropriate resource requests.spec.terminationPolicyorspec.deletionPolicygives flexibility whether tonullify(reject) the delete operation ofRediscrd or which resources KubeDB should keep or delete when you deleteRediscrd. If admission webhook is enabled, It prevents users from deleting the database as long as thespec.terminationPolicyis set toDoNotTerminate. Learn details of allTerminationPolicyhere
Note:
spec.storagesection is used to create PVC for database pod. It will create PVC with storage size specified in storage.resources.requests field. Don’t specify limits here. PVC does not get resized automatically.
KubeDB operator watches for Redis objects using Kubernetes api. When a Redis object is created, KubeDB operator will create a new PetSet and a Service with the matching Redis object name. KubeDB operator will also create a governing service for PetSets with the name kubedb, if one is not already present.
$ kubectl get rd -n demo
NAME               VERSION        STATUS   AGE
valkey-quickstart  valkey-8.1.1   Ready    6m16s

$ kubectl describe rd -n demo valkey-quickstart
Name:         valkey-quickstart
Namespace:    demo
Labels:       <none>
Annotations:  <none>
API Version:  kubedb.com/v1
Kind:         Redis
Metadata:
  Creation Timestamp:  2025-07-31T10:51:06Z
  Finalizers:
    kubedb.com
  Generation:        2
  Resource Version:  1029811
  UID:               536a75e8-4d57-4475-9bf1-94bf61d967d2
Spec:
  Allowed Schemas:
    Namespaces:
      From:  Same
  Auth Secret:
    Name:  valkey-quickstart-auth
  Auto Ops:
  Deletion Policy:  WipeOut
  Health Checker:
    Failure Threshold:  1
    Period Seconds:     10
    Timeout Seconds:    10
  Mode:                 Standalone
  Pod Template:
    Controller:
    Metadata:
    Spec:
      Containers:
        Name:  redis
        Resources:
          Limits:
            Memory:  1Gi
          Requests:
            Cpu:     500m
            Memory:  1Gi
        Security Context:
          Allow Privilege Escalation:  false
          Capabilities:
            Drop:
              ALL
          Run As Group:     1000
          Run As Non Root:  true
          Run As User:      1000
          Seccomp Profile:
            Type:  RuntimeDefault
      Init Containers:
        Name:  redis-init
        Resources:
          Limits:
            Memory:  512Mi
          Requests:
            Cpu:     200m
            Memory:  256Mi
        Security Context:
          Allow Privilege Escalation:  false
          Capabilities:
            Drop:
              ALL
          Run As Group:     1000
          Run As Non Root:  true
          Run As User:      1000
          Seccomp Profile:
            Type:  RuntimeDefault
      Pod Placement Policy:
        Name:  default
      Security Context:
        Fs Group:            1000
      Service Account Name:  valkey-quickstart
  Replicas:                  1
  Storage:
    Access Modes:
      ReadWriteOnce
    Resources:
      Requests:
        Storage:         1Gi
    Storage Class Name:  standard
  Storage Type:          Durable
  Version:               valkey-8.1.1
Status:
  Conditions:
    Last Transition Time:  2025-07-31T10:51:06Z
    Message:               The KubeDB operator has started the provisioning of Redis: demo/valkey-quickstart
    Reason:                DatabaseProvisioningStartedSuccessfully
    Status:                True
    Type:                  ProvisioningStarted
    Last Transition Time:  2025-07-31T10:51:16Z
    Message:               All desired replicas are ready.
    Reason:                AllReplicasReady
    Status:                True
    Type:                  ReplicaReady
    Last Transition Time:  2025-07-31T10:51:26Z
    Message:               The Redis: demo/valkey-quickstart is ready.
    Observed Generation:   2
    Reason:                ReadinessCheckSucceeded
    Status:                True
    Type:                  Ready
    Last Transition Time:  2025-07-31T10:51:36Z
    Message:               The Redis: demo/valkey-quickstart is accepting rdClient requests.
    Observed Generation:   2
    Reason:                DatabaseAcceptingConnectionRequest
    Status:                True
    Type:                  AcceptingConnection
    Last Transition Time:  2025-07-31T10:51:38Z
    Message:               The Redis: demo/valkey-quickstart is successfully provisioned.
    Observed Generation:   2
    Reason:                DatabaseSuccessfullyProvisioned
    Status:                True
    Type:                  Provisioned
  Observed Generation:     2
  Phase:                   Ready
Events:
  Type    Reason      Age    From             Message
  ----    ------      ----   ----             -------
  Normal  Successful  6m29s  KubeDB Operator  Successfully created governing service
  Normal  Successful  6m29s  KubeDB Operator  Successfully created Service
  Normal  Successful  6m27s  KubeDB Operator  Successfully created appbinding
KubeDB operator sets the status.phase to Ready once the database is successfully created. Run the following command to see the modified Redis object:
$ kubectl get rd -n demo valkey-quickstart -o yaml
apiVersion: kubedb.com/v1
kind: Redis
metadata:
  annotations:
    kubectl.kubernetes.io/last-applied-configuration: |
      {"apiVersion":"kubedb.com/v1","kind":"Redis","metadata":{"annotations":{},"name":"valkey-quickstart","namespace":"demo"},"spec":{"deletionPolicy":"WipeOut","storage":{"accessModes":["ReadWriteOnce"],"resources":{"requests":{"storage":"1Gi"}},"storageClassName":"standard"},"storageType":"Durable","version":"valkey-8.1.1"}}
  creationTimestamp: "2025-07-31T10:51:06Z"
  finalizers:
  - kubedb.com
  generation: 2
  name: valkey-quickstart
  namespace: demo
  resourceVersion: "1029811"
  uid: 536a75e8-4d57-4475-9bf1-94bf61d967d2
spec:
  allowedSchemas:
    namespaces:
      from: Same
  authSecret:
    name: valkey-quickstart-auth
  autoOps: {}
  deletionPolicy: WipeOut
  healthChecker:
    failureThreshold: 1
    periodSeconds: 10
    timeoutSeconds: 10
  mode: Standalone
  podTemplate:
    controller: {}
    metadata: {}
    spec:
      containers:
      - name: redis
        resources:
          limits:
            memory: 1Gi
          requests:
            cpu: 500m
            memory: 1Gi
        securityContext:
          allowPrivilegeEscalation: false
          capabilities:
            drop:
            - ALL
          runAsGroup: 1000
          runAsNonRoot: true
          runAsUser: 1000
          seccompProfile:
            type: RuntimeDefault
      initContainers:
      - name: redis-init
        resources:
          limits:
            memory: 512Mi
          requests:
            cpu: 200m
            memory: 256Mi
        securityContext:
          allowPrivilegeEscalation: false
          capabilities:
            drop:
            - ALL
          runAsGroup: 1000
          runAsNonRoot: true
          runAsUser: 1000
          seccompProfile:
            type: RuntimeDefault
      podPlacementPolicy:
        name: default
      securityContext:
        fsGroup: 1000
      serviceAccountName: valkey-quickstart
  replicas: 1
  storage:
    accessModes:
    - ReadWriteOnce
    resources:
      requests:
        storage: 1Gi
    storageClassName: standard
  storageType: Durable
  version: valkey-8.1.1
status:
  conditions:
  - lastTransitionTime: "2025-07-31T10:51:06Z"
    message: 'The KubeDB operator has started the provisioning of Redis: demo/valkey-quickstart'
    reason: DatabaseProvisioningStartedSuccessfully
    status: "True"
    type: ProvisioningStarted
  - lastTransitionTime: "2025-07-31T10:51:16Z"
    message: All desired replicas are ready.
    reason: AllReplicasReady
    status: "True"
    type: ReplicaReady
  - lastTransitionTime: "2025-07-31T10:51:26Z"
    message: 'The Redis: demo/valkey-quickstart is ready.'
    observedGeneration: 2
    reason: ReadinessCheckSucceeded
    status: "True"
    type: Ready
  - lastTransitionTime: "2025-07-31T10:51:36Z"
    message: 'The Redis: demo/valkey-quickstart is accepting rdClient requests.'
    observedGeneration: 2
    reason: DatabaseAcceptingConnectionRequest
    status: "True"
    type: AcceptingConnection
  - lastTransitionTime: "2025-07-31T10:51:38Z"
    message: 'The Redis: demo/valkey-quickstart is successfully provisioned.'
    observedGeneration: 2
    reason: DatabaseSuccessfullyProvisioned
    status: "True"
    type: Provisioned
  observedGeneration: 2
  phase: Ready
Now, you can connect to this database through redis-cli. In this tutorial, we are connecting to the Redis server from inside of pod.
$ kubectl exec -it -n demo valkey-quickstart-0 -- sh
/data $ valkey-cli
127.0.0.1:6379> ping
PONG
127.0.0.1:6379> set mykey "hello"
OK
127.0.0.1:6379> get mykey
"hello"
127.0.0.1:6379> exit
/data $ exit
DoNotTerminate Property
Learn details of all DeletionPolicy here
Now, run kubectl edit rd valkey-quickstart -n demo to set spec.deletionPolicy to Halt . Then you will be able to delete/halt the database.
Halt Database
When DeletionPolicy is set to halt, and you delete the redis object, the KubeDB operator will delete the PetSet and its pods but leaves the PVCs, secrets and database backup (snapshots) intact. Learn details of all DeletionPolicy here.
You can also keep the redis object and halt the database to resume it again later. If you halt the database, the KubeDB operator will delete the petsets and services but will keep the redis object, pvcs, secrets and backup (snapshots).
To halt the database, first you have to set the deletionPolicy to Halt in existing database. You can use the below command to set the deletionPolicy to Halt, if it is not already set.
$ kubectl patch -n demo rd/valkey-quickstart -p '{"spec":{"deletionPolicy":"Halt"}}' --type="merge"
redis.kubedb.com/valkey-quickstart patched
Then, you have to set the spec.halted as true to set the database in a Halted state. You can use the below command.
$ kubectl patch -n demo rd/valkey-quickstart -p '{"spec":{"halted":true}}' --type="merge"
redis.kubedb.com/valkey-quickstart patched
After that, kubedb will delete the petsets and services, and you can see the database Phase as Halted.
Now, you can run the following command to get all redis resources in demo namespaces,
$ kubectl get redis,secret,pvc -n demo
NAME                                VERSION        STATUS   AGE
redis.kubedb.com/valkey-quickstart  valkey-8.1.1   Halted   19m

NAME                              TYPE                       DATA   AGE
secret/valkey-quickstart-auth     kubernetes.io/basic-auth   2      19m
secret/valkey-quickstart-config   Opaque                     1      19m

NAME                                            STATUS   VOLUME                                     CAPACITY   ACCESS MODES   STORAGECLASS   VOLUMEATTRIBUTESCLASS   AGE
persistentvolumeclaim/data-valkey-quickstart-0   Bound    pvc-c7d0fc32-c863-42eb-a7db-23a7852fbfac   1Gi        RWO            standard       <unset>                 19m
Resume Halted Redis
Now, to resume the database, i.e. to get the same database setup back again, you have to set the spec.halted as false. You can use the below command.
$ kubectl patch -n demo rd/valkey-quickstart -p '{"spec":{"halted":false}}' --type="merge"
redis.kubedb.com/valkey-quickstart patched
When the database is resumed successfully, you can see the database Status is set to Ready.
$ kubectl get rd -n demo
NAME                VERSION        STATUS   AGE
valkey-quickstart   valkey-8.1.1   Ready    20m
Now, If you again exec into the pod and look for previous data, you will see that, all the data persists.
$ kubectl exec -it -n demo valkey-quickstart-0 -- sh

/data > valkey-cli

127.0.0.1:6379> ping
PONG

# view data
127.0.0.1:6379> GET mykey
"Hello"

127.0.0.1:6379> exit

/data > exit
Cleaning up
To clean up the Kubernetes resources created by this tutorial, run:
$ kubectl patch -n demo rd/valkey-quickstart -p '{"spec":{"deletionPolicy":"WipeOut"}}' --type="merge"
redis.kubedb.com/valkey-quickstart patched

$ kubectl delete -n demo rd/valkey-quickstart
redis.kubedb.com "valkey-quickstart" deleted

$ kubectl delete ns demo
namespace "demo" deleted
Tips for Testing
If you are just testing some basic functionalities, you might want to avoid additional hassles due to some safety features that are great for production environment. You can follow these tips to avoid them.
- Use
storageType: Ephemeral. Databases are precious. You might not want to lose your data in your production environment if database pod fail. So, we recommend to usespec.storageType: Durableand provide storage spec inspec.storagesection. For testing purpose, you can just usespec.storageType: Ephemeral. KubeDB will use emptyDir for storage. You will not require to providespec.storagesection. - Use
deletionPolicy: WipeOut. It is nice to be able to resume database from previous one.So, we preserve all yourPVCs, authSecrets. If you don’t want to resume database, you can just usespec.deletionPolicy: WipeOut. It will delete everything created by KubeDB for a particular Redis crd when you delete the crd. For more details about termination policy, please visit here.
Next Steps
- Monitor your Valkey server with KubeDB using out-of-the-box Prometheus operator.
- Monitor your Valkey server with KubeDB using out-of-the-box builtin-Prometheus.
- Use private Docker registry to deploy Redis with KubeDB.
- Detail concepts of Redis object.
- Detail concepts of RedisVersion object.
- Want to hack on KubeDB? Check our contribution guidelines.